Learn the Best Way to Focus for Everything from Sports to Buildings: Discover Focusing Modes

Quick and precise focusing even in difficult light. That’s one of the main advantages of DSLRs. They also offer photographers several focusing modes that make it easier to photograph every kind of scene, from static to action-packed. But it can be hard at first to understand them all. So join us for a look at which mode means what and when to use them.
Besides manual focusing, DSLRs also let you choose from among several modes for automatic focusing. These can be described generally as:
- single-shot,
- continuous,
- and intelligent.
Single-shot Focusing: One Shot or AF-S
The basic autofocus mode is one-shot focusing. On Canon cameras you’ll find it under the name One Shot; on Nikon cameras, it’s under AF-S.
The way it works is that you press your camera’s trigger halfway down, and the camera focuses on the area that’s under the active focus point (or group of points). This also locks the focus into place. It also measures the exposure. Pressing the button all the way in then exposes the shot.
You’ll find this mode especially useful when you’re photographing static subjects without a tripod. It also lets you use the “recomposing” technique, where you set the center focusing point as active—because that one is the most precise. You then press the trigger halfway to focus on the region you want, recompose the scene, and finally press the trigger all the way in to expose the shot.
However, recomposing tends not to be the right choice for scenes with difficult light. In these situations, your camera’s exposure meter is reading a slightly different scene than the one you’ll be photographing.
This technique can also be problematic when shooting with a fast lens and a wide-open aperture. With these lenses the depth of field is so small that the plane of focus moves as you recompose the picture. This makes the object you’re focusing on land outside the field of focus. You can especially run into this when photographing objects from close up.
In this situation try focusing using a point other than the center point. The total number of points will depend on your camera model. The more advanced your DSLR, the more focusing points it offers. And you then have an easier time adapting the final composition and avoiding the above-described problems.
Continuous Focusing: AI Servo and AF-C
When you’re photographing moving objects, working with a single-shot mode becomes difficult. Especially in situations where the photographed object is moving towards or away from you. It will usually leave the field of focus before you’ve managed to focus and recompose, leaving you with an unfocused picture.
The classic technique here is to focus on a spot where you expect that the object will arrive. As soon as it actually gets there, you expose the shot.
But motion like this can’t always be predicted correctly. In this situation a continuous automatic focusing mode such as Canon’s AI Servo or Nikon’s AF-C will help.
When you press the trigger in halfway, the camera begins continuously focusing on the object under the active focus point (or group of points). It then keeps on focusing until you press the trigger all the way in, exposing the shot. That gives you a much better chance of capturing even moving objects sharply.
Intelligent Focusing: AI Focus and AF-A
Intelligent Focusing is the combination of the two focusing modes above. On Canons it’s called AI Focus; on Nikons it’s called AF-A. Here the camera evaluates motion in the scene (or more precisely under the active focus point or group or points) and automatically sets the most suitable focusing mode.
So if you’re focusing on a static object, the focus works similarly as it would in a single-shot mode (One Shot or AF-S). But as soon as the object starts moving, the camera starts working as it would in continuous focusing mode (AI Servo or AF-C).
So the intelligent mode is especially useful for photographing sports or children. For other genres it’s better to reach straight for the focusing mode that fits your static or moving subject.
Manual Focusing
You’ll mainly get use out of manual focusing when you’re photographing static scenes using a tripod. In that situation, turn off the autofocus. The switch for that is right on the lens. You’ll also find a control ring there that you can use for manual focusing.
Here you aren’t limited by the focusing points that your camera has available, nor do you have to work with recomposing the scene. You’ll especially appreciate manual focusing for landscapes, architecture, still lifes, and macro.
Manual focusing is also a good match for shooting in Live View mode, where you can always evaluate the photographed scene on your camera’s display. For example on Canon cameras you can use up to 10x zoom during Live View. That lets you focus the scene very precisely.
Focusing with the Rear Button
Some cameras let you move the job of focusing from the camera trigger to a button located on the rear side of the camera, by your right thumb. That way you can separate focusing away from setting exposure. At the same time this makes it possible to use manual focusing without having to turn off automatic focusing on the lens.
Just focus on the selected object and press the trigger directly without pressing it halfway down first. Then in continuous mode hold down the separate button with your thumb and expose with the trigger. If you master this technique, you’ll never want to go back to focusing via the trigger.
Zone Focusing
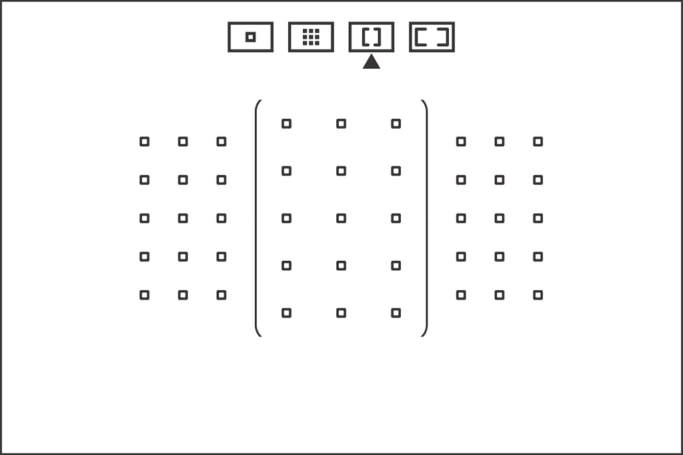
Generally when you’re taking pictures you’ll be working with a single active focus point. But when you want to photograph quickly moving objects, you’ll find that it’s hard to keep a single focus point on top of them.
In that case you can group points into a zone (a continuous group of focusing points). The most common technique here is to divide things into three zones: the left, middle, and right third of the picture. The camera then focuses using all the points in a configured zone. Keeping a moving object within a zone that occupies a third of the scene is much easier than keeping it on a point.
When you’re using multiple focusing points, the camera automatically focuses on the closest object that is under them. So zone focusing isn’t suitable for complicated static scenes. That’s because with this kind of scene, the camera can end up focusing on a foreground element instead of on the main subject.
Focusing using Live View
When you’re focusing through a live preview, the camera’s basic focusing system isn’t used for automatic focusing. The camera focuses based on the contrast of edges within the picture instead.
This type of measurement, which you’ll also encounter normally on non-DSLR cameras, is much slower than the phase focusing used by DSLRS. However, it enables much more precise focusing. That’s because you’re not limited by how many focus points the camera has and where they’re located.
Especially for newer cameras with a touch display, this kind of focusing is an attractive alternative to classical autofocus. Already due to the very fact that the display shows precisely where the camera will be focusing.
Try Out the Focusing Modes
Modern DSLRs offer you sophisticated systems for automatic focusing. So don’t be afraid to try out all the different modes. That’s the only way to find out which ones will serve you best in various situations.
And if you master continuous focusing for moving objects, you can significantly improve the percentage of pictures on your card that are focused correctly. And you’ll better capture “the decisive moment” during quick-moving events.


