Freelensing – Tilt-shift for Everyone

Tired of normal photography? Try some tricks! For example, try capturing the world around you with your lens in your left hand, a few millimeters in front of the camera and detached from it. Since you can turn it to the sides, you can easily change the focal plane and get some exceptional effects.
Pictures taken with a tilt-shift lens usually grab audiences’ attention, primarily because of their tilted focal plane. In tilt-shift, the areas away from the focus point do not have to grow blurrier classically towards the front and back; you can also make them e.g. blur upwards and downwards instead.
Because these specialized lenses are very expensive, people have found ways to achieve this effect more cheaply. One way is the cheaper Lensbaby lenses. Another is the software route in Zoner Studio (described in an earlier article). And yet another is using a normal lens, but taking it off the camera and holding it right in front of the camera. This technique is called freelensing. It lets you tilt and shift the lens, just like an actual tilt-shift lens would.

Below is a comparison of photos from an identically-positioned camera, but with a differently-tilted lens. I should note that in this article, all the photos will be unedited except for their brightness and contrast, to make it as clear as possible what kind of pictures you can create with this technique. It’s only fair, because this way in some pictures you’ll see the shifted colors and light defects that come with freelensing. These problems came during the shots, not during computer edits.

No Free Lunch
Of course this extremely primitive solution does have some downsides. The most fundamental is the loss of distance focusing. Even if you move out to infinity, you usually will only get sharpness for pictures taken about a meter away. With some lenses, it’s possible to unscrew just their rear section. That enables you to put the lens in roughly its original position, and thus preserve the original maximum focusing distance. But this approach bears several risks, so I only recommend it for fearless and highly technically skilled photographers.
Another alternative is to use lenses made for a larger sensor than your camera has—for example using a medium format lens instead of a 35mm lens. These lenses are designed for a different lens-to-sensor distance than what your camera normally has, so when you hold one of these lenses in front of the mount on a normal DSLR, you can still focus out to any distance. However, this does bring the minor difficulty of actually obtaining a medium format lens. They’re not expensive, but you probably don’t have one just sitting at home.
If you do go with a normal lens and without special mounting, then you can still get a little extra distance focusing by using a long lens. Wide lenses meanwhile will lose focus in easily a few centimeters. Therefore you want a lens that’s 50mm or longer.
The last major disadvantage, and one that you’ve probably already thought of, is dust. By freelensing, you’re suddenly giving dust easy access to the sensor and the back of the lens. But unless you’re walking straight through a sandstorm, this risk is not as large as it seems.
Why Do It
Despite all the disadvantages, freelensing is still an interesting way to try something new. With freelensing, you can recall the old days of analog imperfection and break free a bit from modern flawlessness. Your suddenly can put a lot of unsharpness in your photos, even in situations that would not normally allow you to work with a low depth of focus.
Here the sun is creating many more reflections and false light sources:

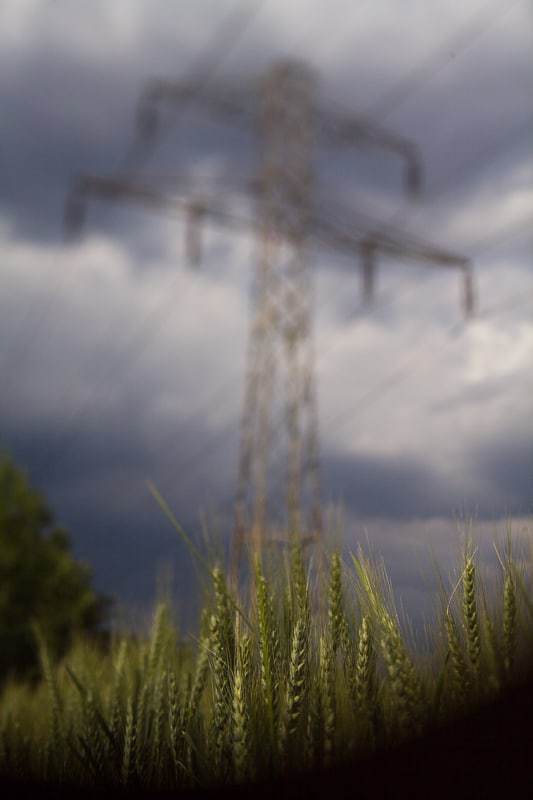
With a strong tilt or shift, you also get strong vignetting:

Similarly, you’ll frequently see overall softness and a loss of contrast:

What To Watch Out For
Holding the lens in your left hand is not so awkward, but when you try to also focus while you’re doing it, you’re begging to trip and fall. The best is to first focus to infinity (in any case in practice we’re only talking about at most one meter of distance) and then to take the lens off the camera. Not much more focusing is needed; it’s enough to just slightly move the lens and, if need be, the camera body.
You also need to keep in mind that the lens will not have any connection with the electronics in the body. This brings the minor inconvenience of your lens information not appearing in pictures’ EXIF data, and the larger one of being unable to control the aperture. To overcome this, set the desired aperture, press the button for focus depth previewing, and remove the lens while that button is pressed. The aperture will then remain set to that same value.
Use Sparingly
Naturally, freelensing is not something for every day. I don’t expect that you’ll start using it for every photo you take. If you did, you’d soon start to miss the ability to take pictures with distant subjects. But it’s a good exercise that can help you move outside your comfort zone.