How to Make Your Own Softbox
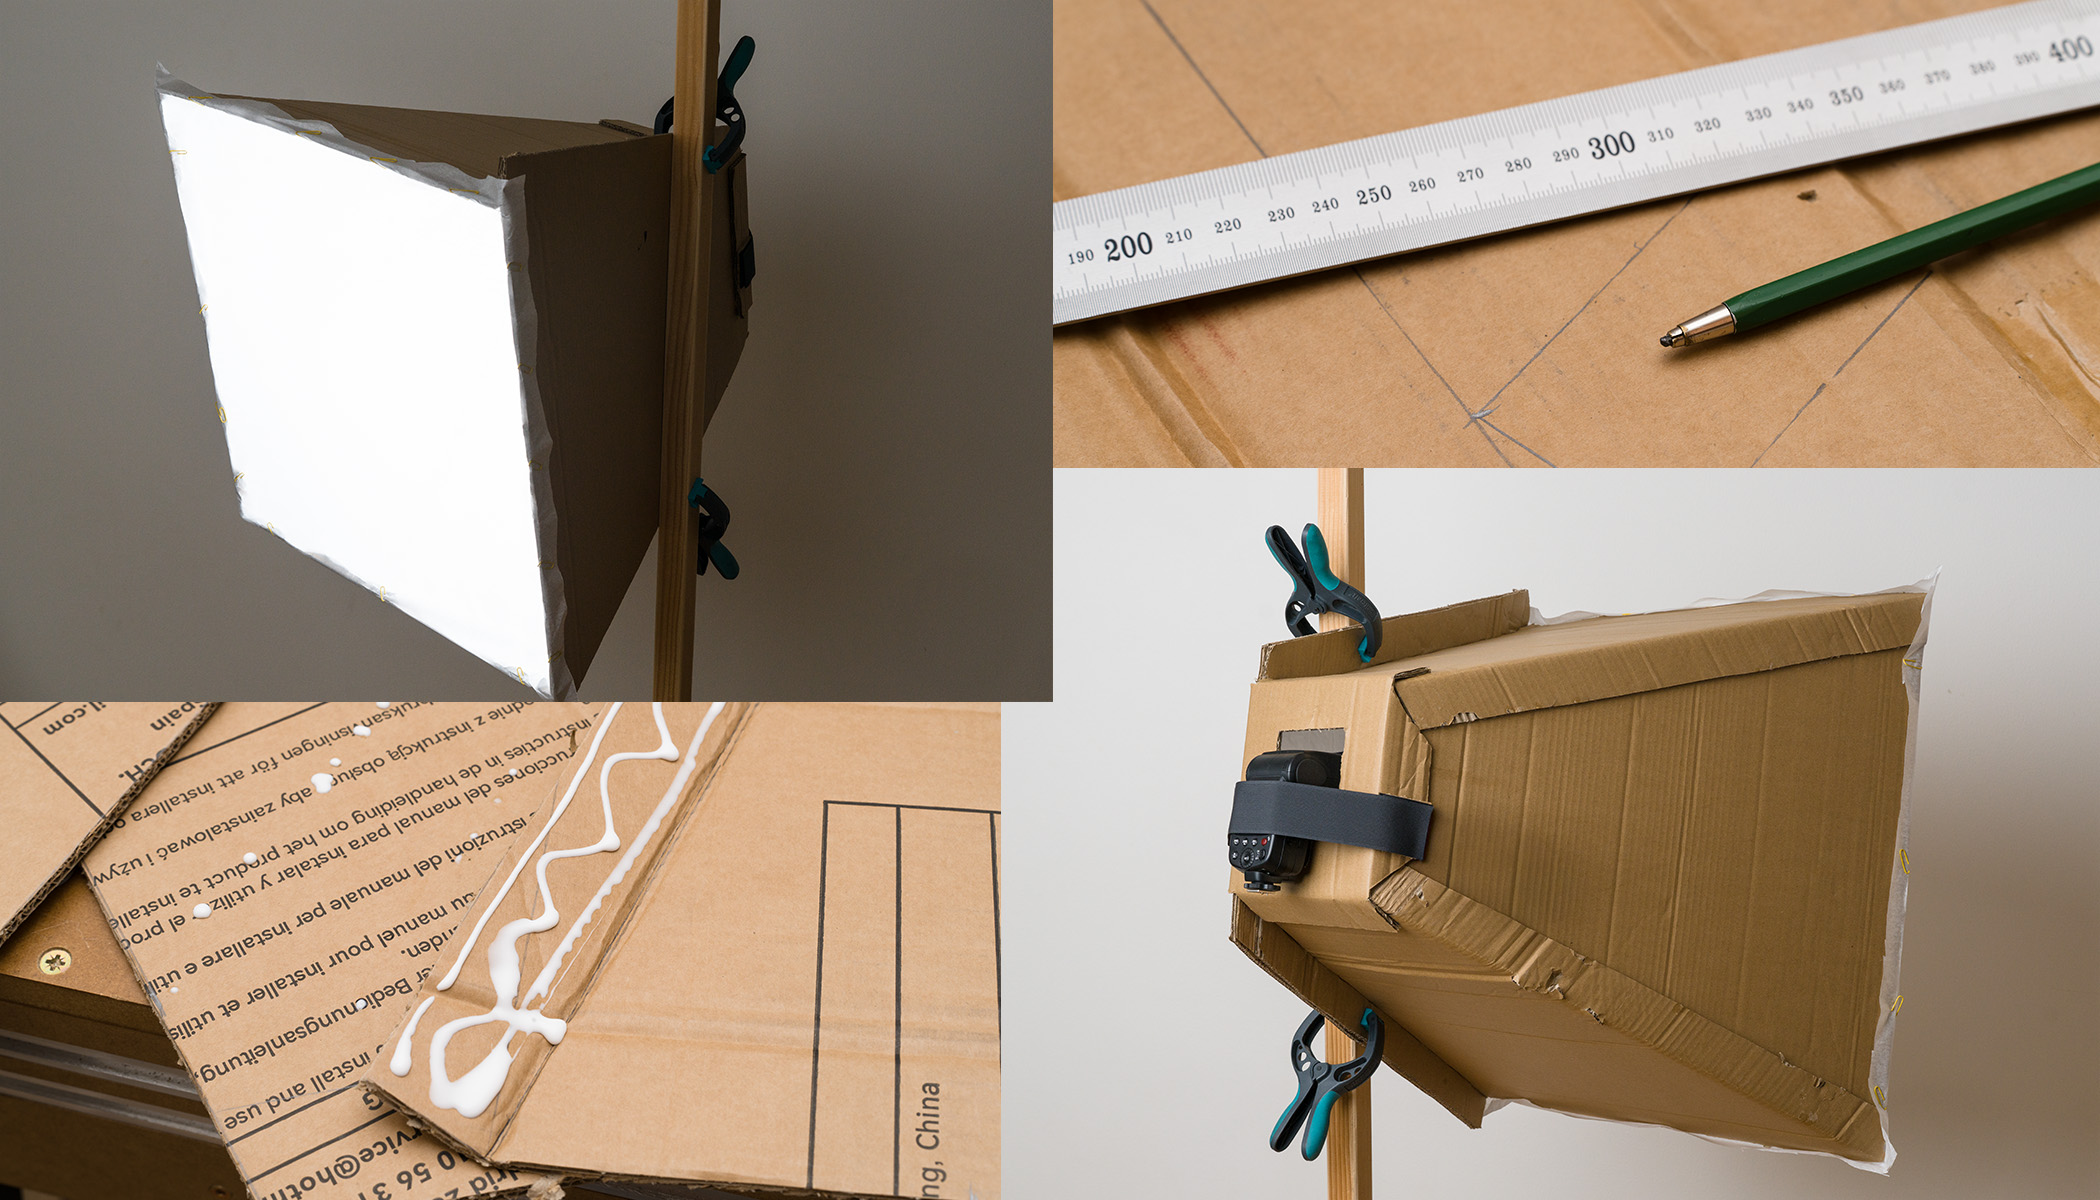
Modern softboxes and stands aren’t as expensive as they used to be. Still, it might not make sense for beginners to invest too much in them before they know whether they’ll use them or what size they’ll need. With this inexpensive DIY cardboard softbox, you can easily experiment and test different shapes and sizes.
In this article, you’ll learn:
- What tools and materials are needed to make your own softbox.
- How to design and cut the pieces from cardboard.
- How to glue the pieces together and fold them into the final shape.
- How to attach a flash or light bulb as a light source.
- How to attach the semi-transparent front material.
- How to mount the softbox on a stand or other object in the room.
Another advantage of a DIY softbox is that you can experiment with highly specialized prototypes tailored precisely to your needs. This was the case with my older tall but narrow softbox, which was perfect for a corner of the room. This time, I’ll focus on conventional shapes and a simple solution for mounting the softbox at a certain height.
I tried to come up with a design that would be as inexpensive and accessible as possible. More advanced photographers can use their own light stands or adapt the shape for a different light source, with minor adjustments.
Key ideas
The unconventional mounting method makes the design a bit unusual, so here’s what we’re aiming for:

The softbox ends up with a makeshift “flap” that’s easy to clip onto almost anything around you, whether it’s a lamp stand, a household stepladder, or a piece of furniture. You can rotate it on any of these surfaces to direct the light at the desired angle.
The main structure is made of cardboard, and the large opening on one side is covered with white, semi-transparent material. This can be polyester fabric, which is used as lining, or tissue paper. Fabric is more durable, while tissue paper is less expensive. The light source is mounted on the opposite side. It can either be a screw-in light bulb or a remotely triggered camera flash.
Aluminum foil is glued to the entire interior to make the most of the light and prevent the brown cardboard from affecting its color.

Materials needed to make your softbox
Gather the following materials for this project:
- An old box to cut up
- Aluminum foil
- Paper glue
- Semi-transparent materials—fabric or paper
- Paper clips to secure the white material
- Velcro to attach the flash if needed
- Clamps or clips to attach the softbox to a stand
You only need a few simple tools:
- Box cutter or knife
- Scissors for cutting fabric or paper
- Ruler or measuring tape (a retractable tape measure is fine), or any straight edge for drawing long lines
- Pencil
- Stapler
Cutting the cardboard
Cardboard boxes are almost always available, so they’re an easy, free DIY material. I’ve even managed to salvage five-ply cardboard from the trash. It’s sturdy, but on the other hand, it’s very thick, which can make it difficult to work with. It can also make the entire structure unnecessarily heavy.

Normal three-ply cardboard is more than enough, and gluing the pieces together at right angles can significantly strengthen the entire construction.
Plan your design based on the size of the material you have. My softbox will have a light-emitting area of 60 × 60 centimeters (23.6 x 23.6 inches). This is a decent size, suitable even for photographing people.
I used this sketch as a guide, tracing it onto the cardboard with a pencil and ruler.
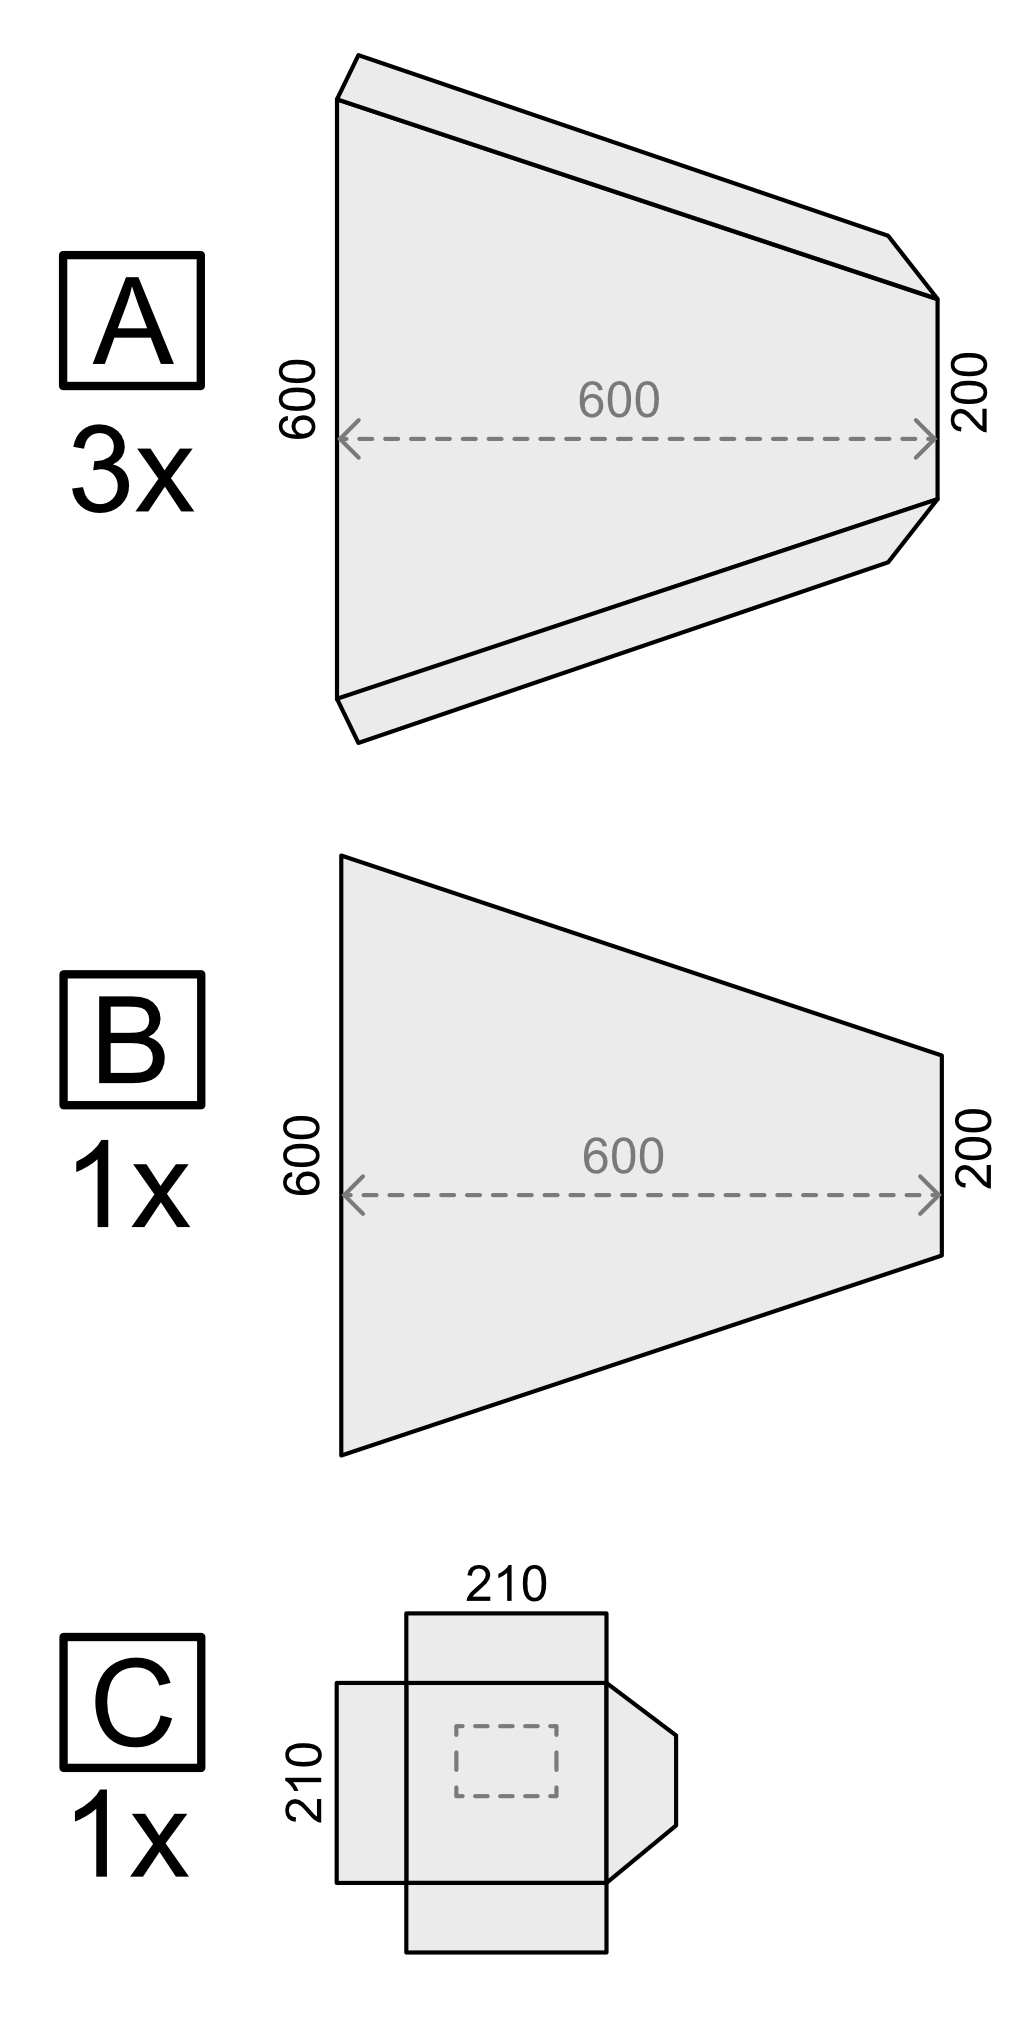
It’s best to cut out the smallest piece only after you’ve glued everything else together. This is because you can adjust it based on how well you managed to bend the sides and how thick the cardboard is.
Bending and gluing
Of the three identical pieces, one will not be folded at all. For the remaining two, the opposite folds will bend in opposite directions. The two pieces are also mirror images of each other. Here’s another photo showing what we want:

It’s easier to fold the cardboard if you first run a blunt object along the fold line from the side on which the cardboard will be folded. I recommend trying this on a scrap piece of cardboard first.
With a bit of planning, you can end up with the original fold on the inside, where it will be covered with aluminum foil. The outside will remain clean, brown cardboard.
Use liquid glue to glue the pieces tighter. To make the process as simple as possible, I recommend the following sequence:
First, glue the piece with the two folded sections to the other piece, A.

Next, attach aluminum foil to the finished section and to the remaining unfolded piece A. Be sure to leave the flaps that will be glued together uncovered.

Once the foil is dry, glue the pieces together to form the base of the softbox.
Back panel
Prepare the smallest piece (C) to fit the resulting opening, and cover it with aluminum foil. You also need to cut a hole in it for the light source. For this example, I chose a small flash, which makes the softbox very versatile. It’s even easier to mount a light bulb socket, but then you have to work with lower light intensity.
Be sure to cut the flash opening higher than the center of the piece so the flash can be easily attached. You’ll see what I mean in a moment.

Attaching the flash
There are many ways to attach the light source, and I chose a simple Velcro solution. A rubber strap or even another piece of cardboard shaped to fit the flash would work well, too.
My solution involves gluing two smaller pieces of Velcro to the sides. I then secure the flash using a longer piece of Velcro.

Since glue doesn’t stick very well to plastic Velcro, a better solution is to simply attach the Velcro strips to the flaps of part C in advance using a stapler. I only realized this afterward, so if you forget, you can still attach them to another piece of cardboard and then glue that piece into place.
Glue the finished back piece to the rest of the box.

Front panel
For the front, semi-transparent panel, you can choose between fabric and paper. With either option, you need to cut the panel slightly larger than the opening and then attach it to the front of the softbox.
It’s easiest to permanently attach it using glue. Alternatives include Velcro in the corners (and preferably in the middle of the sides too) or clothespins or paperclips around the edges.

All done!
The project is now complete. You should have a softbox that looks just like the one shown at the beginning of the article.

For testing, I chose a 40-centimeter toy horse, which demonstrates how soft the light from the DIY softbox can be. The shadows are beautifully blurred, and with a softbox like this, I wouldn’t hesitate to use it for portraits of real people.

I hope you found this guide useful, whether you want to make the same softbox or use this guide as an inspiration for a design that’s exactly what you need.
FAQs
What can you use to make an inexpensive DIY softbox?
All you need is an old cardboard box, aluminum foil, paper glue, and semi-transparent material for the front, such as polyester fabric or tissue paper. The total cost is minimal because most of the materials can be upcycled.
What material should be used for the semi-transparent front panel of the softbox?
Polyester fabric or tissue paper can be used to line the softbox. Fabric is more durable, while paper is significantly cheaper.
Why do you line the softbox with aluminum foil?
Aluminum foil helps maximize the light by reflecting it off the inner walls and, at the same time, prevents the brown cardboard from giving the light an undesirable tint.
How do you secure the flash inside the softbox?
The simplest method is to use Velcro. Attach smaller pieces to the flaps of the back panel using glue or a stapler, and secure the flash with a longer strip of Velcro. An alternative is a rubber strap or a piece of cardboard shaped specifically to fit the flash.
How do you attach the softbox to a stand or other object?
Thanks to the cardboard flap on the back, the softbox can be clipped onto practically anything—a lamp stand, a stepladder, or a piece of furniture. It can also be rotated to any angle as needed.