How to Photograph Motion and Make Blurring Work for You
Many photographers try to freeze the motion in their pictures perfectly, but sometimes it pays to make exceptions here. Motion photography can be more creative than that. You just have to put motion blurring to work in your favor. Take a look at how to photograph motion in three genres where blurring can be an advantage.
Motion is a core part of e.g. sports and reportage, and thanks to the long exposures needed, every night photograph is, in its way, a time-lapse video collapsed into one still frame. In each of these cases, you can creatively utilize motion blurring to significantly liven up the scene.
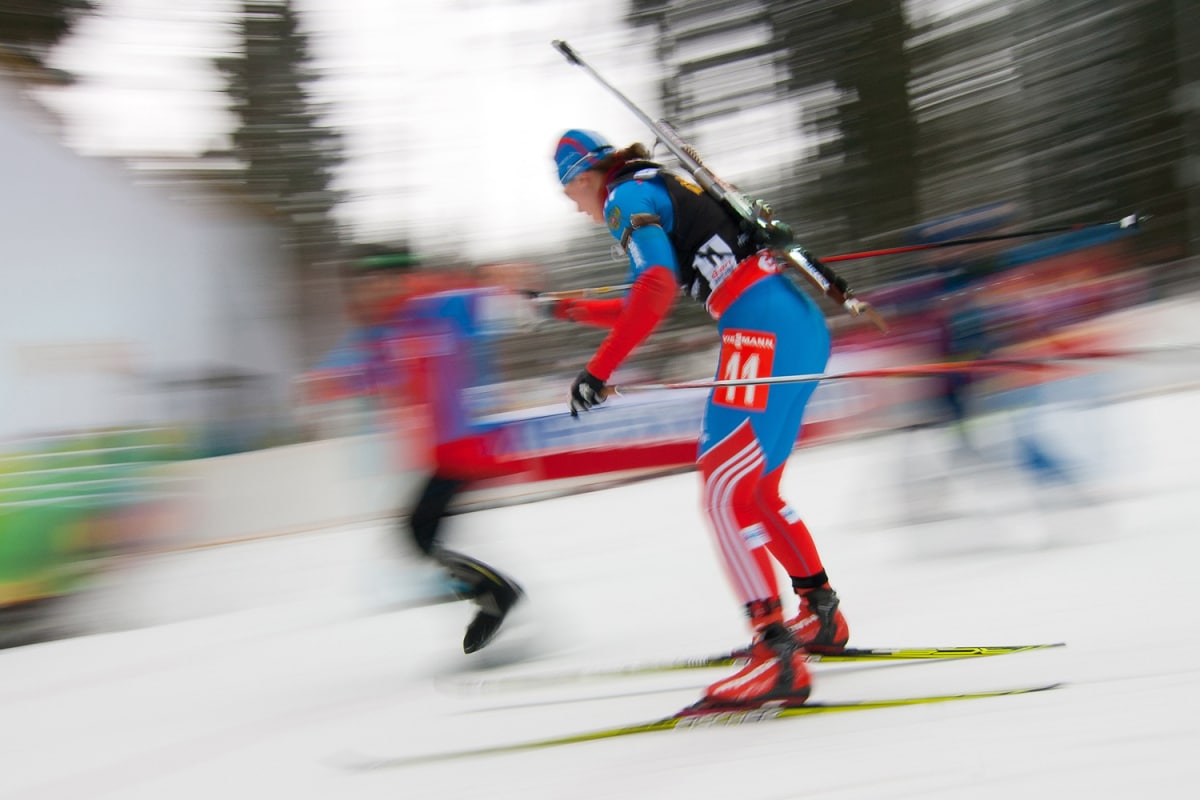
For Creative Sports Shots, Try Panning
Motion and sports inseparably belong together. At sports events you’ll find a number of ways to harness the technique called panning.
In panning, you focus on a moving object and, keeping it in focus, you follow it in the viewfinder all the way until you press the trigger. Not only does this keep the subject inside the frame, but meanwhile with a long enough exposure time you can also blur the surroundings.
Besides the above-mentioned factor—the time for which the shutter is open—the strength of this effect is also affected by other factors such as the subject’s speed relative to the background.
The focal length used also has a role to play in panning, as does the distance to the subject. While there’s no one firm set of rules for choosing exposure values here, after a few tries you’ll discover on your own the combinations that let you work with this experiment to your satisfaction. Still, there are a few tips here.
It’s clear that it’s easier to blur the hand of a volleyball player spiking the ball or a car approaching nearby than a yachting contest on calm waters. Especially on a sunny day, however, it can easily happen that you can’t extend your exposure times enough—especially in the automatic modes.
But don’t think that there’s a problem here, because that’s exactly how the camera is supposed to behave. In fact even in bad conditions it generally first adjusts the f-stop, and then raises the sensitivity (if Auto ISO is on). And only after that, when there are no other ways left to balance exposure, does it automatically adjust the exposure length. Personally I’d recommend avoiding the automated program modes if possible.
When you’re photographing motion, it’s better to use one of the other modes. One option is full control via manual mode (M); another is somewhat simpler work with shutter priority. For panning, it’s good to start with speeds that you can manage well by hand and then gradually try keeping the shutter open longer for as long as you can still get a technically and visually good picture.
If you’re using a compact, where you can’t influence the exposure length directly, then you can still reduce the amount of light falling on the chip by using ND filters.
How to Include Motion in Landscape Photography
Have you ever wondered why landscape photographers carry so much equipment? Locking a suitable composition enables the photographer to concentrate solely on taming the equipment itself, which is especially important when you have to wait a long time for the right light.
Another reason is that having the camera on a tripod lets you handle panoramic shots much more easily. And it also gives you more ways to work with exposure times.
Imagine a dramatic view out onto a landscape with a variety of structures in the clouds. This kind of picture can be interesting in itself, but in certain places it can be a little too concrete. By this I mean the infinite depth of field that’s frequently used here—it can distract the viewer from interesting things in the landscape. In exactly this situation it’s useful to naturally blur the sky by lengthening the exposure time.
The exposure time needed in order to blur clouds’ structures varies depending on their type. Sometimes you only need a few dozen seconds for this kind of photo, while at other times you need whole minutes. But keeping the shutter open for that long also means the presence of a lot of light, and here you don’t want that.
One option is to wait until dusk. But this way you lose both the intensity of the scene’s lighting and its natural magic. The better option is to tighten the aperture. Even this however will be a compromise, because high f-stops are not all-powerful. Also, if you raise the f-stop too much, you paradoxically begin to lose sharpness. When light passes through a very small aperture, it is bent away from its original direction and enters the geometric shadow of the lens’s shutter blades.
So when you’re capturing the motion of the clouds, it’s best to use a gray ND filter, which you mount in front of the lens. You can find lenses on the market with an extending factor that can raise maximum exposure length by up to a thousand times.
But keep in mind that with a filter that lets in so little light, focusing can be a problem. Therefore it’s best to focus automatically even before mounting it and then switch to manual focusing (if available).

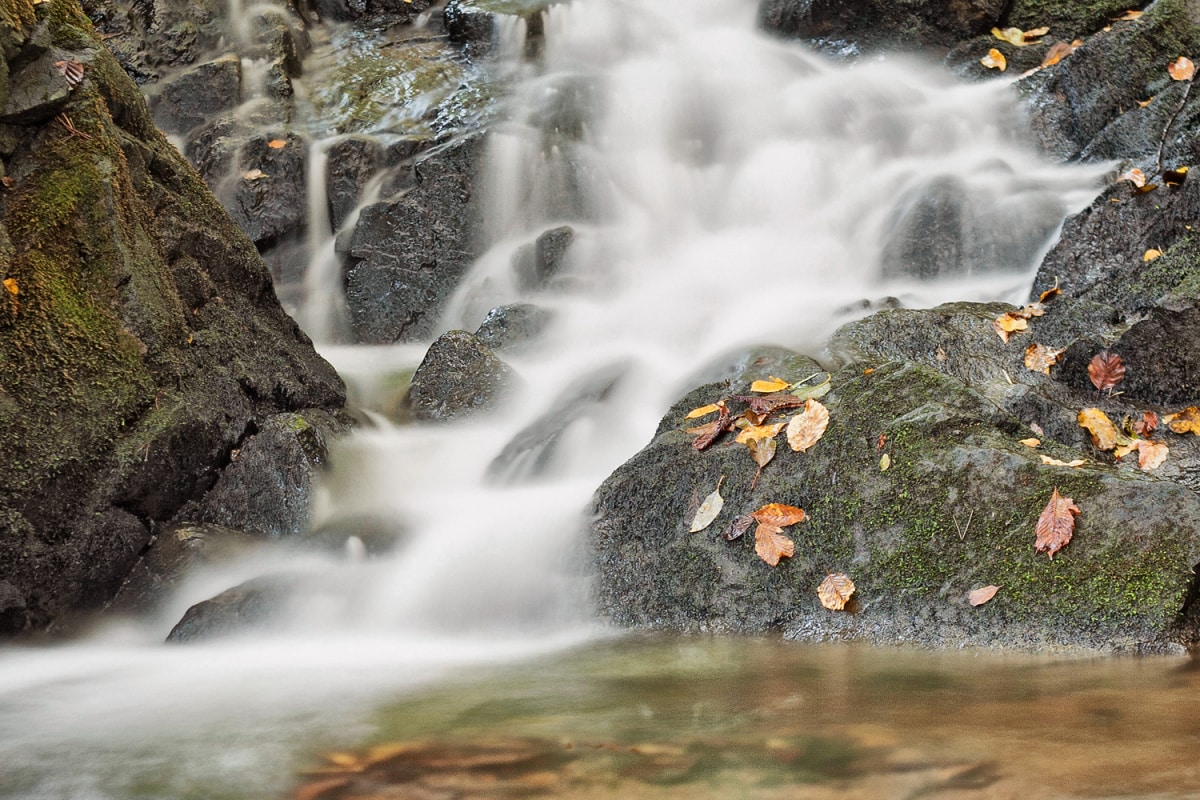
This technique also comes in handy when you’re photographing the motion of water. Depending how fast it’s flowing, raising the exposure time to even just the single-second range may already make the water pleasantly “milky.” It depends on your eyes and your taste how much water you want to let flow through the picture.
Photographing Motion at Night
Night photography definitely has one advantage here: there’s so little light that it forces you towards long exposures. Here the same thing that would be the biggest challenge and obstacle in a normal scene is suddenly a wish come true.
You’ll appreciate it for example when you’re taking pictures in the city, where you can unveil many rewarding topics as you’re walking down the darkened streets. Crossroads, highway junctions, tram tracks… it’s all a play of lights at every moment.
I’ve found that it’s best to shoot shortly before dawn or after dusk, instead of during the deep night. At those times the contrast between shadows and lights is not as striking. That will prevent trouble with dynamic range.
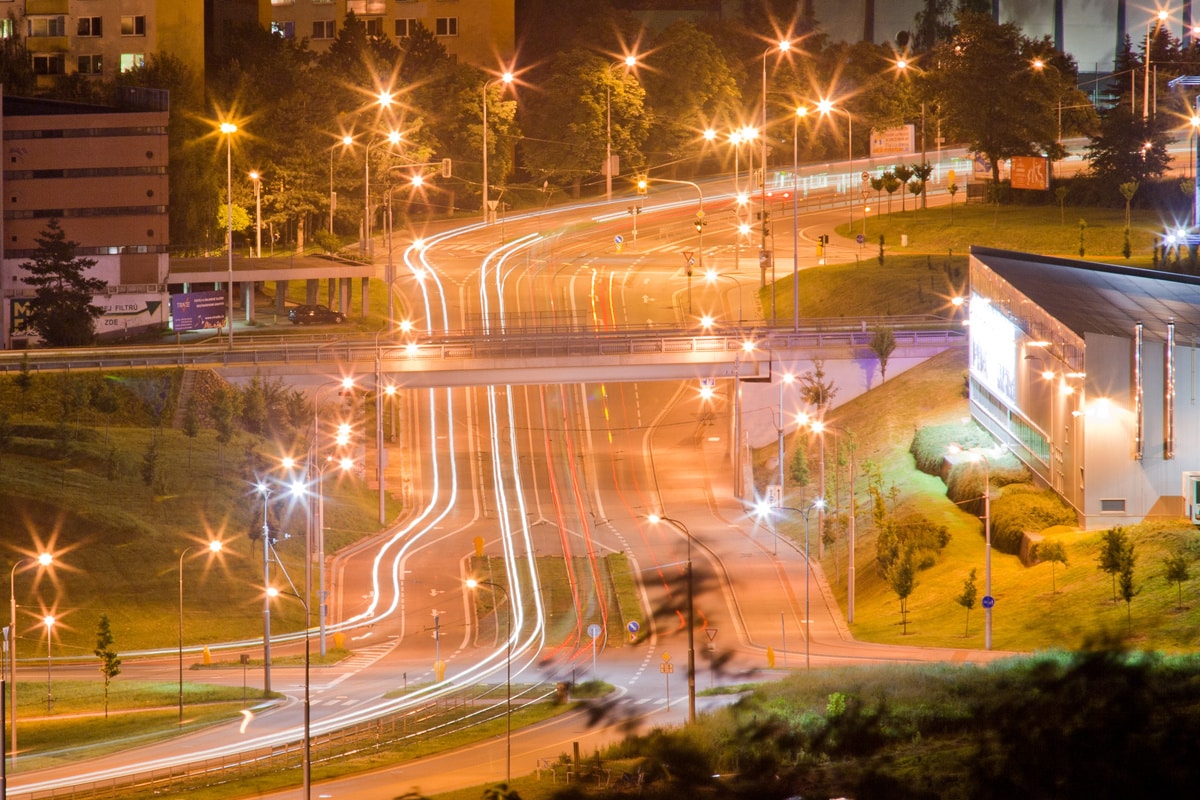
A tripod—ideally combined with a self-timer—is also important for photographing motion at night. You can also invest in a remote trigger; it can be either cable or wireless. That way you don’t have to worry about accidentally shaking the camera.
You’ll especially appreciate this when working with Bulb mode (B). You’ll find this mode on all mid- and high-range cameras. Its magic is that the shutter stays open for as long as you keep the trigger held down.
Don’t Fear Bad Pictures
If you still have the feeling that you haven’t achieved what you wanted even after long efforts, stay calm. Like everything, photography needs time, and e.g. for panning you need to think about it repeatedly. Even the masters make mistakes and may not get a photo right on the first try.
Also, every situation demands a slightly different approach and settings, so you should expect a high percentage of unusable pictures in advance. And after all, our digital era is made to easily handle exactly that.
There are no comments yet.