Macro Photography with Your Lens Turned Backwards
The high quality of today’s cameras lets us all capture the right moments at the highest quality, and also advance our ways of seeing the world. We zoom up on things hundreds of meters away, capture the wondrous scenery of the night sky, and likewise photograph the stunning details of our nearest surroundings. Let’s zoom in on that last bit. Professional macro photographers can’t get by without expensive equipment. But if you’re just starting out with macro, then you can take great pictures even without a macro lens—you just reverse your normal lens.
Would you like to be able to photograph all kinds of flies, beetles, spiders, and other tiny animals without having to have the “right” equipment? There’s no need to break the bank and spend hundreds of dollars on a macro lens—often you can take great pictures even with basic equipment.
Equipment
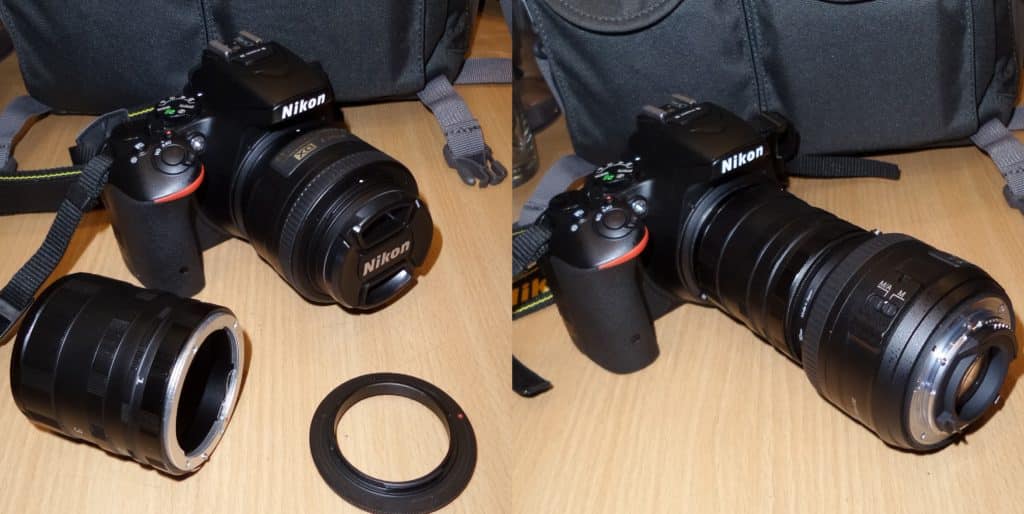
What will you need to be able to take superb macro photos? You’ll definitely need a camera with exchangeable lenses. Personally I work with a Nikon D5500 DSLR and a Nikkor 35 mm, f/1.8 lens.
You’ll also need some patience, as well as a set of extension tubes (costing a few dozen dollars). You use these to create a set distance between the camera body and the lens. These tubes will help you to get more magnification out of your lens.
You’ll also need a reverse macro ring (costing a little less than the extension tubes). Use it to turn your lens assembly so that its outer lens faces the camera body. That will magnify the subject of your photo.
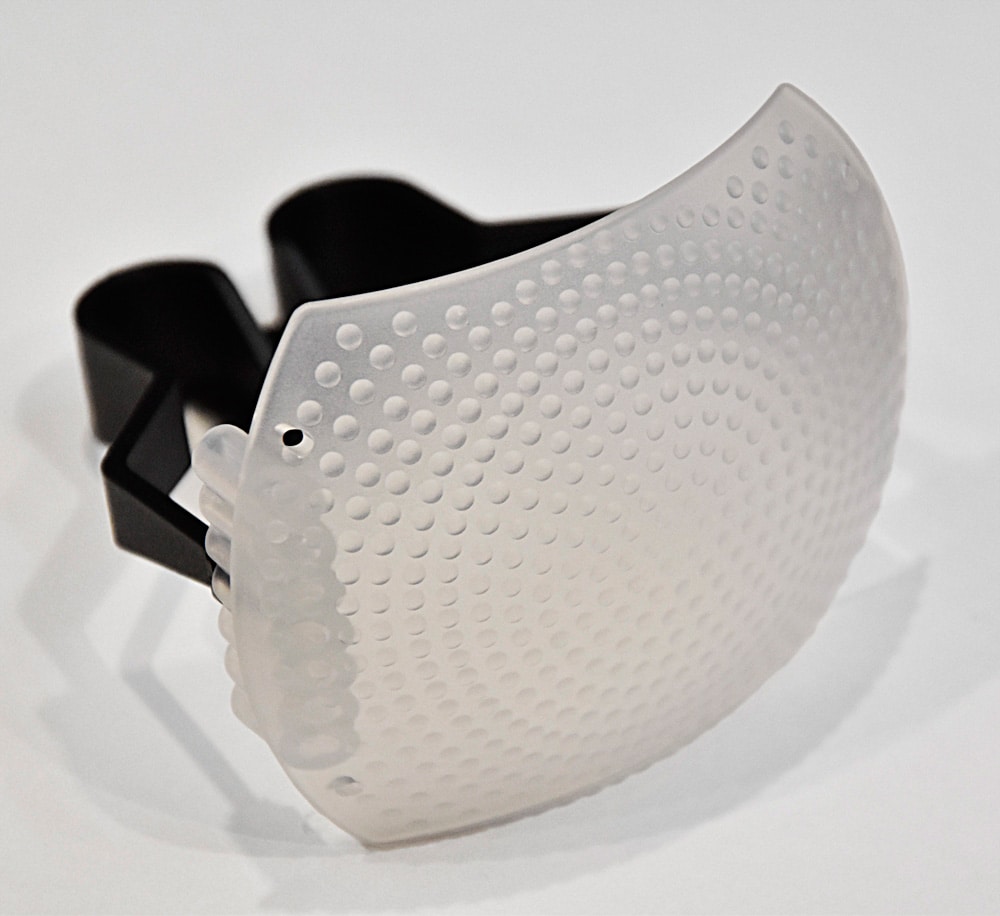
One important aid in macro photography is a flash—ideally one with soft, diffuse light. The simplest road to that light is to use a camera-mounted system flash and supplement it with a diffuser (a plastic screen costing five or ten dollars). There are of course lots of other ways to go here, but in terms of usefulness and simplicity this is the ideal variant.
Equipment for Macro Photos
- A camera with an exchangeable lens
- A set of extension tubes
- A reverse ring
- A flash with a diffuser
Setting up Your Macro Set
Fit your extension tubes onto your camera body. They generally come as a multi-tube set so that you can easily set the magnification ratio you need. The more tubes you use, the higher the magnification ratio. But this does cost some loss of image quality, so think well about how many tubes you use. You snap the reverse ring onto the extension tubes via a bayonet mount. You then screw your lens onto the camera’s finely threaded filter screw. Use a fixed 50 mm lens if you can, but any similar lens will also work.
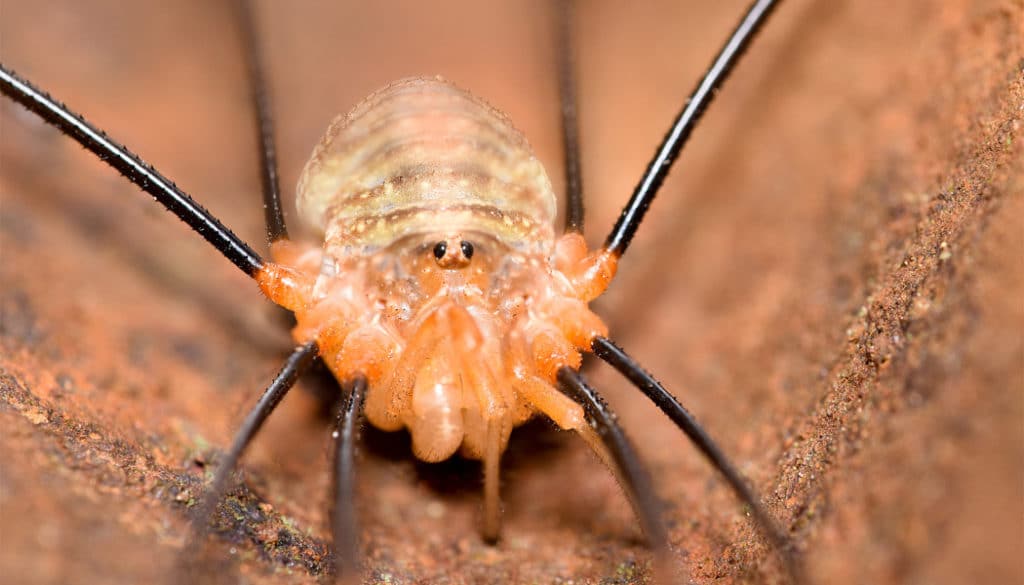
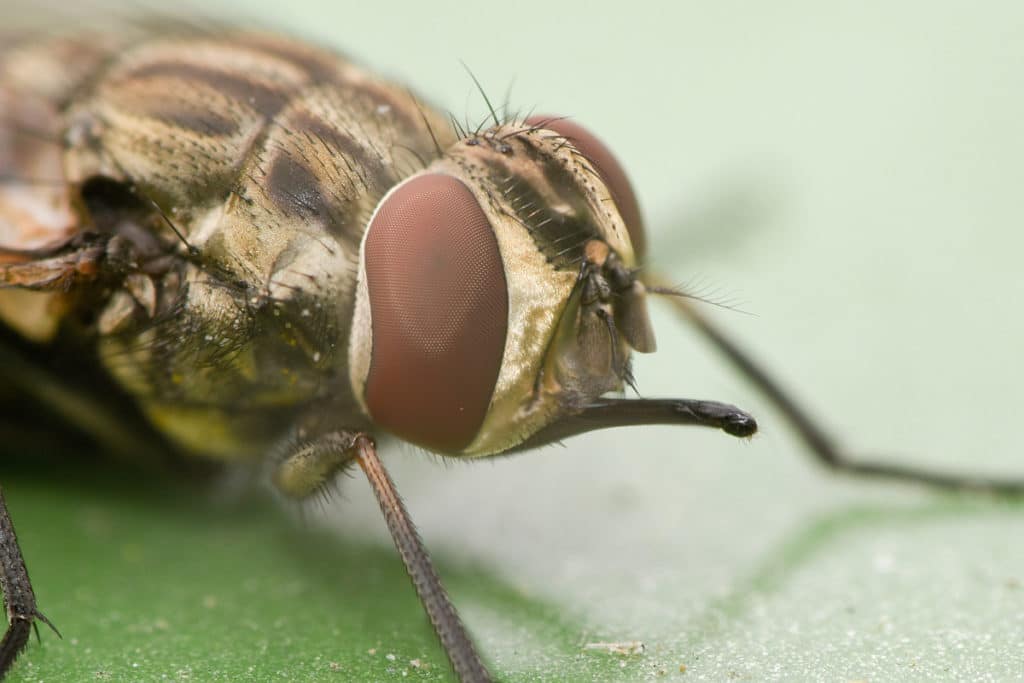
Nikon D5500, Nikkor 35 mm, 1/60 s, ISO 1200
Creativity Counts
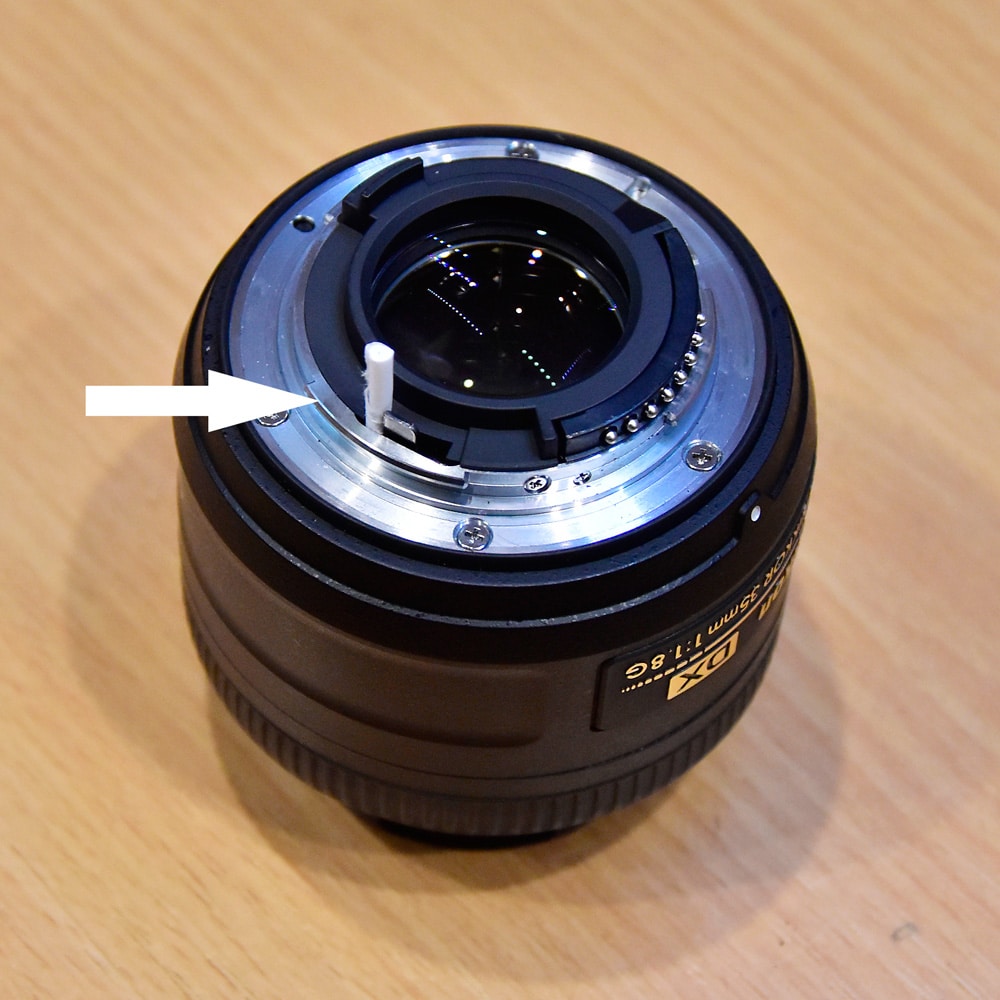
Since I don’t own a lens with an aperture ring, I also had to struggle with one other detail—setting the aperture. With the lens turned around like this, you can’t set the aperture using the camera electronics—they’re not hooked up to the lens.
You can buy an adapter that makes up for the lack of an aperture ring, but I prefer a cheaper solution. Use a small roll of paper or piece of toothpick to prop up the aperture lever at the outer end of the lens, to at least partially open up the aperture. Just take care to keep it from falling into the lens—that would mean trouble.
Then set the focus to the maximum distance. Which will still only be a few centimeters.
Setting up the Camera
And now you just have to set up your camera.
Since your lens is reversed, you have no choice but to focus manually. After all, your camera thinks your lens isn’t there.
Your exposure length should be as long as possible, so that you don’t have to raise the ISO, which would pointlessly add noise. I generally use 1/60 s. As for the aperture, your roll of paper is handing that, so you don’t have to think about it. Now there’s just the question of ISO.
Since I don’t have an external flash, in my case I had to use high ISO values, roughly 800 to 1,600 (depending on the weather), and use the tiny built-in flash that everyone loves to hate. To make that light less knife-sharp, it’s good to shield the flash with something. For example a cleverly attached strip of paper or a plastic diffuser.
Head out on a Macro Safari
Now everything’s set up, and you can go straight to your field photography. First find a suitable subject—like a spider, fly, or grasshopper—and then get straight to work.
Because you will really be zooming in a lot, you can count on having a tiny depth of field. While you might object that my depth of field would be a lot higher if I weren’t propping the shutter open with a roll of paper, if I weren’t doing that then I wouldn’t see anything in the viewfinder, because the aperture would practically be all the way shut. So you have to go for a compromise here. Your minuscule depth of field means you’ll have to photograph your subject several times, moving the lens a tiny bit closer to your little “predator” between shots.
Calling them predators isn’t really that inaccurate—when you’re looking at a three-millimeter spider at maximum magnification across your whole viewfinder and it steps towards you, it’s hard to resist the urge to run screaming. But keep calm, because at the distances you’ll be using, 3 to 5 cm, every millimeter counts, and so you don’t want to scare the insect.
Be patient and try not to get too frustrated by the fact that the objects of your interest are always in motion. After all, they’ll eventually stop for a moment, and that’s your moment.
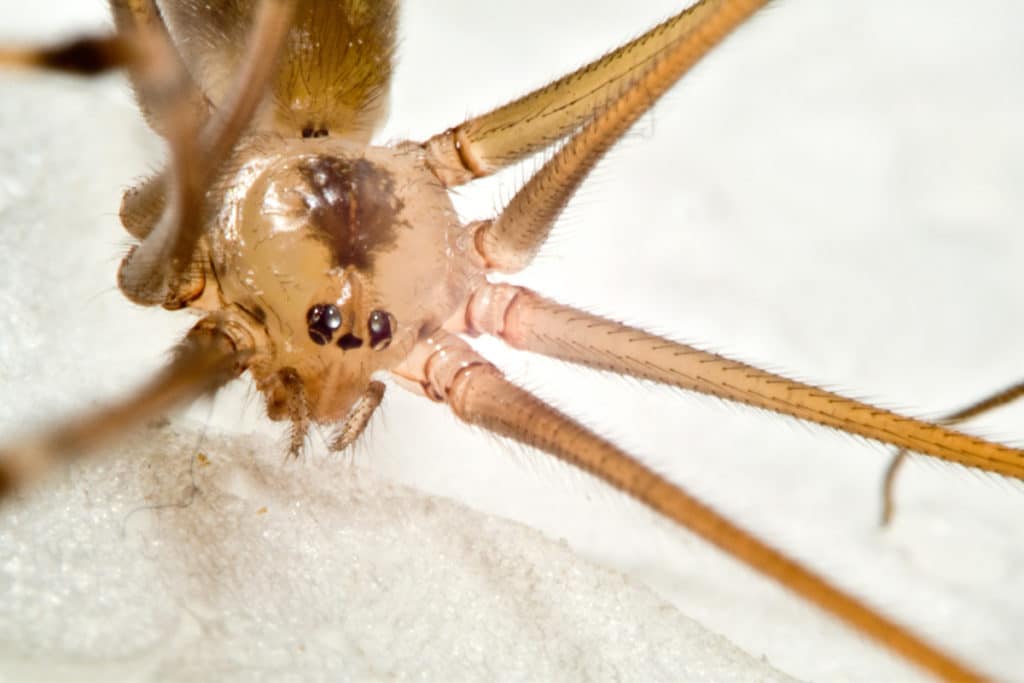
Nikon D5500, Nikkor 35mm, 1/60 s, ISO 1200
Nikon D5500, Nikkor 35mm, 1/125 s, ISO 100, Nissin flash
With this technique, when you’re taking pictures under sharp sunlight , you can encounter very strong chromatic aberration, which will strongly influence your final picture quality. Watch out for unwanted light. If you’re using a live preview on your LCD display, and the weather’s sunny, then light can pass through the viewfinder into the camera body and unpleasantly affect your picture. In this situation I recommend covering the viewfinder with its cover, or even just with black tape. Your pictures will look much better.
If possible, lean the lens on something stable. Your pictures will end up sharper, and you’ll also have less trouble straightening them in an editor.
If you have an external flash, don’t be afraid to use it. It increases your chances of getting pretty pictures.

Nikon D5500, Nikkor 35mm, 1/60 s, ISO 1200
Watch out for dust. When your lens is reversed, it’s unprotected, and the very low depth of field increases the risk of leaving dirt on your lens. But don’t worry. With a little respect for your equipment, everything will be OK.
But not every photo turns out right. Generally one or two out of ten tries turns out well, but those one or two are worth it. The picture-taking itself is a bit of an adventure, and if you come to like it, then you’ll always be glad to come back to your little monsters. If your pictures don’t look like you imagined, don’t worry—tomorrow is another day. You can head out to hunt macro photos again and again until your pictures are perfect.
And now it’s a time to edit your macro photos!
There are no comments yet.