Use Your Tripod Right!

A tripod is among a photographer’s most typical tools. You might think that with a tripod, you only need to plop your camera onto it to get attractive photos. But things don’t always work out, and sometimes you get unnecessarily blurred pictures. You might be surprised how many things can spoil your efforts. And meanwhile it just takes a bit of configuration to get a much better photo.
I was inspired by fireworks to write these words. I had gone out to photograph a fireworks show, and even though I thought that I know how to shoot from a tripod, many of my photos had problems like what you see here:

Canon 5D Mark III, Canon EF 70-200/2.8 II + Canon Extender EF 2x III, 4 s, f/11, ISO 100, focal length 252 mm
Here you can really see the vibrations. Naturally it’s not the fireworks shaking, but rather the tripod and camera. Part of the problem is that it was all photographed from about 3.5 km away, forcing me to use a telephoto lens about 250 mm long. With that length, every tiny movement is noticeably multiplied and detracts from a photo. Here you see just a close-up from the picture; in the real picture the shakiness isn’t this visible, but it’s still about 15 pixels wide, which is a lot.
To find the source of the trouble, I headed back home to run some tests in peace and find out how strongly different shooting techniques affect vibrations. You can do the same experiment with your own equipment and learn the ideal approach for your next shoot.
How I Tested
I’ve prepared a video that “simulates fireworks.” It’s very technical and oriented towards giving you a general idea. It has two simple white dots, with one running across the screen horizontally, and the other vertically. To give you an idea, and to enable you to run similar tests, I’ve put it on YouTube (or use this service for infinite looping).
Now you just need to place your camera on a tripod, point your camera at the screen, and photograph it with a long exposure. I used 1.6 seconds. The longer the focal length you use, the better, because that will highlight any possible problems. Here I stayed near the maximum for my lenses: 400 mm. The aperture and ISO don’t matter, so you can use whatever gives you a long enough exposure.
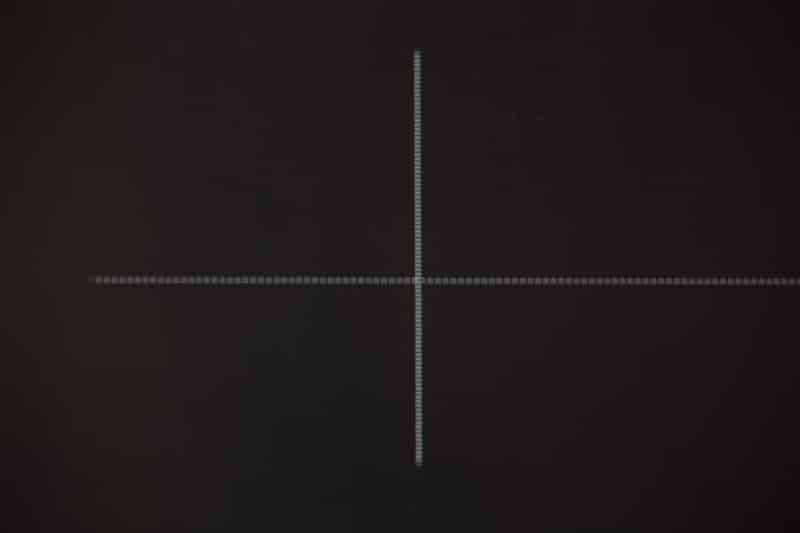
If all goes well, you should get a picture like this:

Although the white dot is emphasized in one spot, this is only due to an error in the video playback, which froze on one picture for part of a second. As far as technique goes, this photo is excellent.
The next photo, however, displays problems:

The camera’s vibrations are clearly visible—the shooting method used definitely is not ideal. So let’s go over the things that affect tremors in a setup.
Ordinary Shooting—Pressing the Trigger Manually
I’ll start with a method everyone knows—put the camera on the tripod, press the trigger, take the picture. Nothing special.
Unfortunately the touch of a hand on the trigger makes the whole setup vibrate, and this motion is also visible in pictures. The result of this is the picture we showed above as a bad example:

Since you know that the middle dot moves from the bottom to the top, you can tell that the vibrations were the strongest at the start and gradually weakened throughout the exposure.
Shooting with a Delay
Fortunately this problem is well-known, and so camera manufacturers include a function to delay a shot (self-trigger). After you press the trigger, there’s a short delay where you can move your hand away before the shot begins. This delay either is customizable or has a predefined length. In Canon cameras for example it can be from 2 to 10 seconds.
Here’s the result if you use a two-second delay:

The vibrations are greatly reduced, but the situation still isn’t perfect. So I’ll try a ten-second delay:

The vibrations still haven’t disappeared. Why not? The human factor is not the only thing that can set a scene into motion. In this case the camera made its own self vibrate by moving its mirror out of the way just before the shot.
Mirror Lock-up
The snapping of the mirror may seem like a tiny motion, but it happens fast. In the example above, you can also see its effect on the camera, which, together with the lens, weighs 2.5 kilograms.
Owners of compacts and mirrorless cameras don’t have to worry about this, but the rest of us can be thankful that manufacturers have thought of this problem, and so DSLRs include a function called Mirror Lock-up. This setting is usually used together with the above-mentioned delay, and when it’s active, the mirror is released immediately after the trigger is pressed; the shot delay—typically the two-second period above—only starts after that. That’s enough time for the vibrations from the mirror and your hand to both disappear.
Then the picture looks like this:
Very good, but still not perfect. Especially on the vertical, a minor tremor is still visible. You see, we still have one step left.
Turning off Stabilization
Stabilizing mechanisms in a camera lens or body are meant to keep scenes from shaking, but if there’s nothing to stabilize, then their tiny movements can actually destabilize.
So when you’re using a tripod, I recommend turning the stabilizer off. Then you get an ideal result:

In that last step it may seem like I’m nitpicking, but actually I was surprised that the stabilizer didn’t cause worse problems than it did. You see, it’s been my experience that when I use it outside, it can really go crazy and cause terrible results. Probably some feedback is happening and the stabilizer is amplifying microscopic wind movements.
Take a look at this picture of a forest stream with the stabilizer turned off:

Canon 5D Mark III, Canon EF 70-200/2.8 II, 25 seconds, f/16, ISO 320, focal length 70 mm
And with it turned on:

Canon 5D Mark III, Canon EF 70-200/2.8 II, 25 seconds, f/16, ISO 320, focal length 70 mm
Some stabilizers are able to turn off automatically if they determine that the camera is on a tripod. But it’s not safe to rely on this.
Above All, Stay Calm
Even if you handle all of this like a pro, you can still ruin a picture on your own. Look at what happened when I tried walking around the tripod:

At this point the mirror lock-up and the stabilization setting aren’t worth mentioning—their positive effects have been loudly outshouted by my motions, which the floor transferred to the tripod.
What Went Wrong With the Fireworks
But I knew all this and tried to respect it, and even still my opening fireworks photo looked the way you saw. It turned out that the ideal settings I mentioned (stabilizer off + two-second delay + mirror lock-up) only work in the tripod’s most stable position, and unfortunately I had it in a less stable one. You can see the difference in the picture below.

In the inferior position it took longer for the vibrations to die down, and now I know that instead of a two-second delay, I’d have to use ten seconds here. For fireworks that’s impractical. A remote trigger could also be an option. And indeed, I tested this variant, and an infrared trigger along with a two-second delay worked without visible vibrations. So… a lesson for the next time.
It’s Not Complicated
Even though this article is a little long, these are all simple actions that you can easily do on-site without spending much time. The key is knowing where the individual settings are located on your camera and if they can even be changed. So it’s best to go through its menu or study its manual and calmly find the relevant options at home. Better pictures are worth it.