5 Adjustments to Make First in Every Photo
Do you edit every photo differently and sometimes feel lost halfway through, only to go back and start over? You may be using the wrong order of adjustments. In this article, we show you five adjustments you should make first and explain why this sequence makes working with RAW files and final tweaks much easier.
In this article, you learn:
- Why white balance is a logical first step.
- When and why to apply lens corrections and remove chromatic aberration.
- How to handle exposure, highlights, and shadows when working with RAW files.
- Why reducing noise should come before more significant adjustments.
- When to straighten the horizon—and when it’s better to wait.
- Which editing sequence minimizes loss of image quality.
- How to effectively combine the Develop and Editor modules in Zoner Studio.
Today, there are more ways to edit photos than ever before. Sliders, local adjustments, retouching, effects… With so many options, it’s easy to take the wrong first step and unintentionally complicate your work or reduce image quality. That’s why it helps to follow a simple editing workflow that works for most photos and keeps you in control of the entire process.
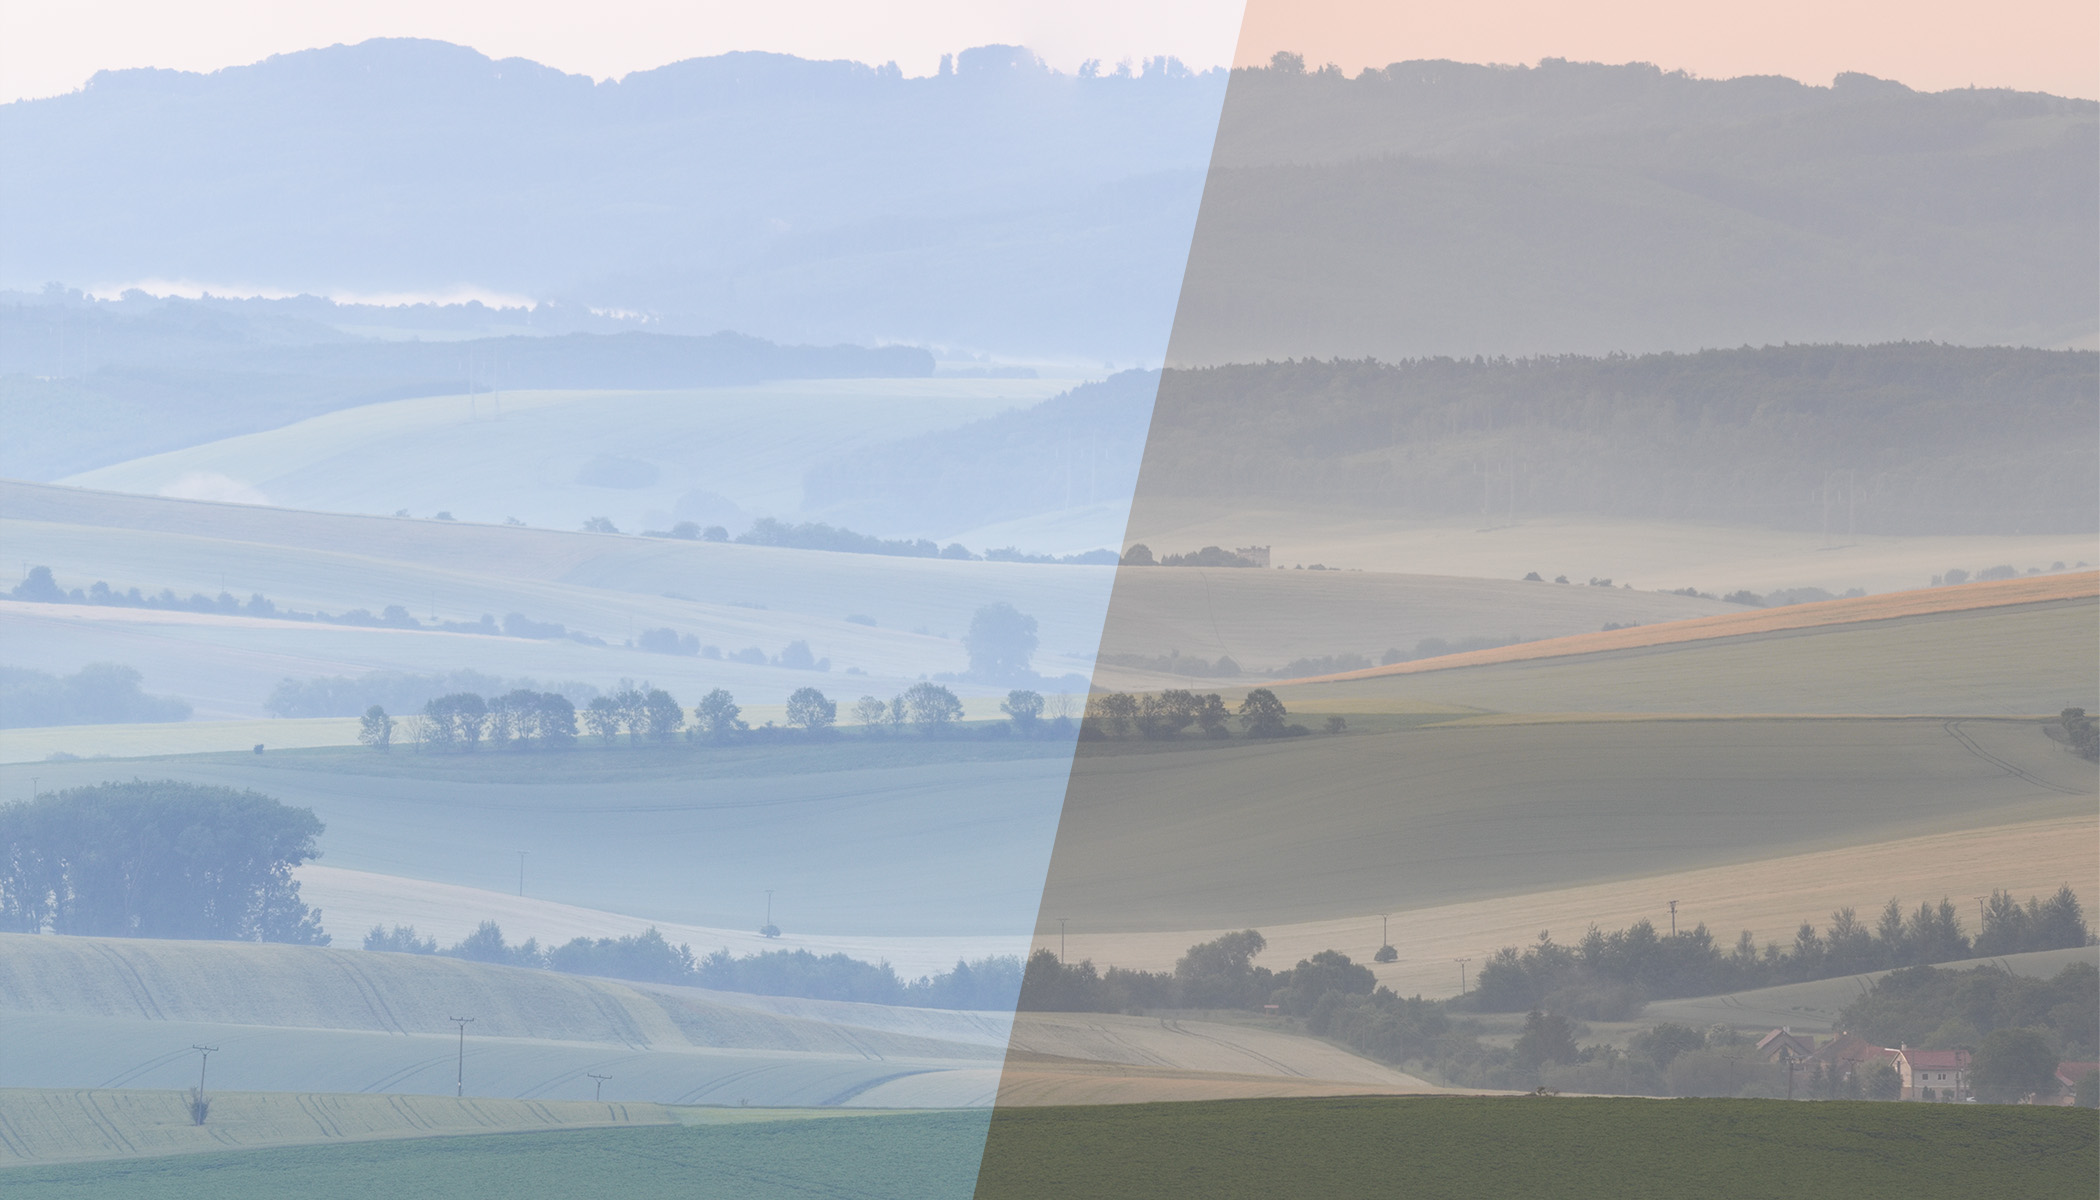
White Balance: The foundation of photo editing
The most important first step is setting the correct white balance. You can find it as the first slider in the Develop module of Zoner Studio. You don’t need to get the perfect tone right away. But the closer you are to your intended result right at the start, the easier the rest of the process will be.


Different white balance settings produce very different color renditions. In this example, neither option is objectively wrong. You might prefer neutral tones, or you may want to emphasize the warm glow of a sunset, like in the second photo.
There are several reasons why white balance is such a priority when editing:
The overall color balance is important not only for the aesthetics of the photo, but it also affects the exposure of the photo. Depending on the white balance settings, the image can appear too bright or too dark.
If you shoot in RAW format, which I strongly recommend, white balance adjustments in the Develop module work perfectly and let you fine-tune the colors to your liking. However, once you move from the Develop module to the Editor module, your adjustments are permanently written to the image data. Any further adjustments to white balance can reduce image quality. Small tweaks may not be noticeable, but larger corrections can cause certain colors to fade and the image to lose depth.


White balance problems appear after adjustments were already made in the Editor module. The “yellow” photo from above was edited first, and there was an attempt to shift it back to more neutral tones after (left). This kind of correction is difficult, and the colors appear faded. Notice also that the image is brighter than the comparison version (right), where white balance was set to neutral at the very beginning while processing the RAW file in the Develop module.
Even if you process everything in the Develop module only, the previous issues would be partially solved because the sliders can be adjusted at any time without loss of quality. However, white balance still affects all other color adjustments. If you play around with blue or yellow separately in Color Shift, there is still a major difference in which parts of the image are changed.
Correct lens defects and remove chromatic aberration
At the beginning of processing, it is also worth correcting visible lens defects. While this may not be crucial for landscape photos, it’s especially important for architecture photography, where pincushion or barrel distortion is often noticeable and needs to be corrected.


Some lenses are designed with later lens correction in mind. Without them, you get a significantly different image.
In addition to geometric distortion, check for and correct chromatic aberration, the blue or purple fringing along high-contrast edges.


Chromatic aberration appears as colored fringing in places where it shouldn’t be. Sometimes it’s not visible at all, but it is clearly visible and distracting in places where light and dark areas meet.
Chromatic aberration is much easier to remove straight from the camera. After color or contrast adjustments, removing it becomes more complicated.
All of the corrections described above help you with any retouching you may need to do in the next steps. In addition to correcting optical errors, you may also need to correct vignetting. Vignetting is dark corners that affect the brightness of the photo. That’s why it makes sense to do this step at the beginning.
Adjustments to exposure, highlights, and shadows
Now it’s time to balance the light in the photo. At this stage, I don’t try to make the photo look perfect. Instead, I focus on two things:
- Rescue overexposed areas using the large amount of image data stored in the RAW file.
- Brighten the image if it’s too dark.
You mainly work with the Exposure, Lights, and Shadows sliders.


With a bright sky, it would be difficult to continue editing, but lowering the Lights slider is enough, possibly the Exposure slider, and the result is much more usable for further processing. The goal isn’t perfection, but a balanced starting point.
Some images require minimal work. In those cases, you can proceed to further corrections and retouching in the Editor module, and return to the Develop module at the end, working with the retouched file (TIFF, etc.) to fine-tune overall brightness and color.
This approach allows you to experiment later. If you decide on a different color toning a month from now, you still have a properly retouched version ready for further experimenting.
Reduce noise before further adjustments
Reducing noise becomes more difficult after further editing than it is at the beginning. Algorithms for reducing noise are optimized for camera output, so they don’t work as well after major changes are made.


The noise is visible in the original photo, which is why I reduced it at the beginning of the editing process.
Straighten the horizon and crop: Why it’s better to wait
If your photo is crooked, it’s a good idea to straighten it, but the timing matters.
Straightening early has its advantages: Some adjustments may be easier, and the final result is easier to imagine.
But what if, after using the Clone Stamp a few times, you decide you need to widen the image on one side or change the composition? Straightening the horizon deprives you of valuable data that you could use.

There’s not one perfect time to straighten the horizon, though it’s often good to leave it to the end.
Similar arguments apply to cropping. Once you crop a photo, it’s difficult to go back. I recommend saving cropping for the last stage, when you can evaluate the fully processed image.

Further Reading: Cropping Photos: Guidelines for Professional Results
What if you only use the Develop module?
If you stay entirely in the Develop module while editing, you don’t have to follow the sequence as strictly. The order is not as critical in Develop, because you can return to any slider at any time. Even so, it’s still practical to start with white balance and other basic corrections. You never know when a more complex adjustment requires switching to the Editor module.
It’s always better to keep a consistent workflow in mind and proceed similarly with all photos, as it reduces mistakes and saves you from constantly second-guessing your next step.
FAQs
Why adjust white balance first? White balance affects overall color rendering and how exposure is perceived. Changing it after other color adjustments can disrupt your previous settings.
Why reduce noise at the beginning? Algorithms for reducing noise work best on original image data straight from the camera. After strong contrast and color adjustment, it becomes less effective.
Does it make sense to only edit in the Develop module? Yes—if you don’t need layers, for example. Editing in the Develop module is non-destructive, and you can always go back without losing quality.
Why correct lens distortion? Barrel or pincushion distortion can affect architectural lines and horizons. Correcting it right away makes further adjustments easier.
Is it better to edit in RAW or JPEG? RAW format contains more image data, allowing better exposure, color, and shadow adjustments without loss of quality.