Flash Photography Step by Step
This is the story of one night photograph. We’ll be using it to show step-by-step how to get the most out of flash photography, and what special steps the pros take.
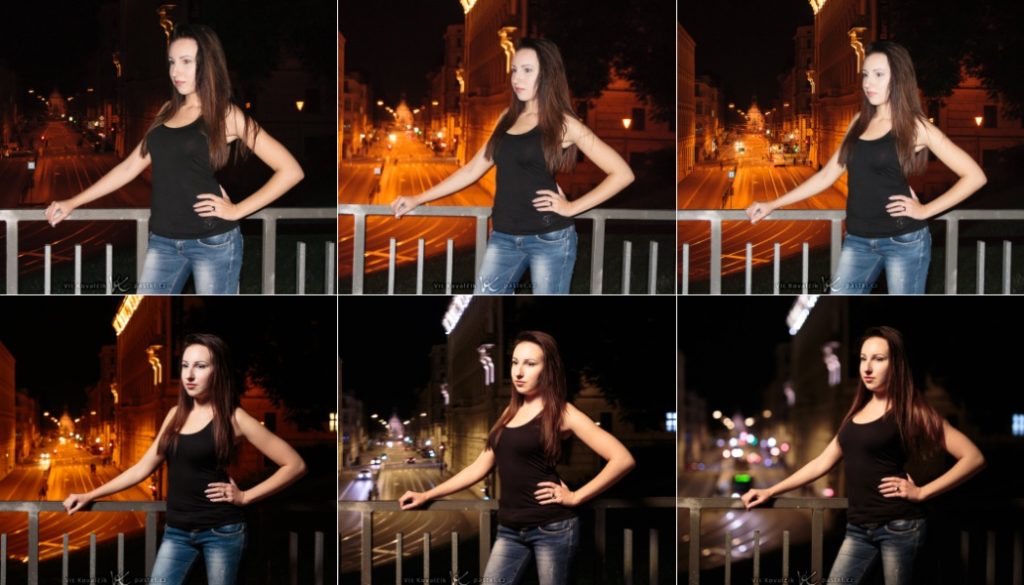
This photo series was taken one summer night, for the purpose of being used in this article. We’ll be looking in depth step-by-step at various “levels” of flash usage.
Level 0—No flash

Canon 350D, Canon EF-S 18-55/3.5-5.6, 1/60 s, F5.0, ISO 1600, focus 37 mm
This isn’t a picture that anyone would normally want to take. It’s just here to illustrate how dark this location was in reality.
Level 1—A normal picture

Canon 350D, Canon EF-S 18-55/3.5-5.6, 1/60 s, F5.0, ISO 1600, focus 37 mm
Cameras’ Automatic modes don’t know the exact lighting situation, but they know it’s dark. The camera chose the same exposure that we did in step 0: ISO up to 1600 since that’s the limit, aperture at F5 since it’s the minimum for the given focus, and 1/60 s because it’s a long exposure, but still doable by hand. The camera tries to make up for the rest with its integrated flash.
Level 2—The Slow Sync technique

Canon 350D, Canon EF-S 18-55/3.5-5.6, 1/8 s, F5.0, ISO 1600, focus 37 mm
Use the slow sync technique to brighten dark backgrounds. It lets you use a long exposure time (here it’s a whole 1/8s instead of the 1/60s above) to gather light from the background, while using the flash to “freeze” the position of the model.
This technique has one occasional downside—background blurring, as you can see in this picture.
Level 3—An external camera-mounted flash

Canon 350D, Canon EF-S 18-55/3.5-5.6, 1/8 s, F5.0, ISO 1600, focus 37 mm
I’ve only included this here to illustrate that replacing an internal flash with a powerful external flash makes almost no difference. There’s less redeye due to the larger distance between the flash and the lens, but otherwise the effect is practically nil.
This step does however illustrate that with steady enough hands, you can avoid blurry backgrounds. Perhaps this shot was helped a bit by the weight of the external flash (over a pound) steadying my hands. Greater weight is in fact a surprising advantage of large cameras overall for shots like these.
Level 4—External non-camera-mounted flash

Canon 5D Mark III, Sigma 50/1.4 Art, 1/8 s, F5.0, ISO 1600, focus 50 mm
Although I used a camera with a larger sensor this time, giving me a smaller depth of focus, that’s not the important thing. The important change here concerns the light. This time around, the flash is controlled remotely and is mounted on a stand to the left of the model. Also, an open white umbrella is mounted in front of the flash, transforming its normally sharp light into soft light, which better illuminates the model’s skin.
Level 5—Recoloring light via flashes

Canon 5D Mark III, Sigma 50/1.4 Art, 1/8 s, F5.0, ISO 1600, focus 50 mm
Much better light than in the last step, but it’s still clear that the model and the city are illuminated by different lights. This is because the flash’s color temperature is close to 6500 K, while the street lights are very orangeish, with a color temperature below 3000 K.
We can’t influence the city lights, but we can influence the flash, by using colored gels. Using CTO (Color Temperature Orange) gel gets us a similarly extremely orange hue. Now all we need is to do white balancing to neutralize this strong, but now uniform, tinting.
(If we don’t want the hassle of gels, there’s always the option of escaping to black-and-white and pretending to be artsy.)
Level 6—Minimizing aperture

Canon 5D Mark III, Sigma 50/1.4 Art, 1/125 s, F1.4, ISO 1600, focus 50 mm
This level mainly concerns the lens and its light throughput. Here, my 50/1.4 lens, along with my full frame sensor, have let me blur the background and highlight the model. But you don’t need to use such an expensive solution. Even type 50/1.8 lenses, which are available and affordable for most systems, can work magic.
Intrigued by all this?
It may seem overwhelming, but I’d say only one of my “levels” is key: it’s the use of the remotely fired flash. External flashes are the key to a lot of camera creativity, and so we’ve written several articles about them already. The starting point I can recommend the most is our article on flash firing options.