Framing a Picture

Paper photographs are much less common than in the past—today, most photos get viewed on a screen. They are still, however, the best-looking way to present your work. And a simple frame can make them look even better.
Pre-print finalization of a photo generally includes at least surrounding it with a one-color rectangular frame and sometimes more elaborate framing. It’s to give photographs, if nothing else, at least a thin frame to accentuate the feeling they give off.
Just like when adding a signature to a picture, for framing too, less is more. Stick to traditional colors—black and white or a combination. Zoner Studio provides two quite different ways to add a frame—the Envelopes feature and the Canvas & Borders window. We’ll look at Canvas & Borders here.
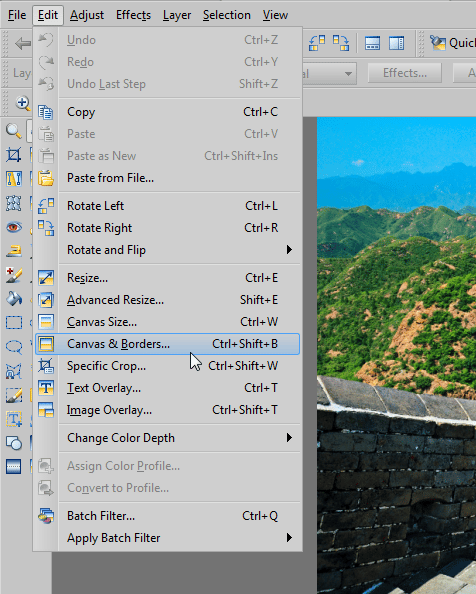
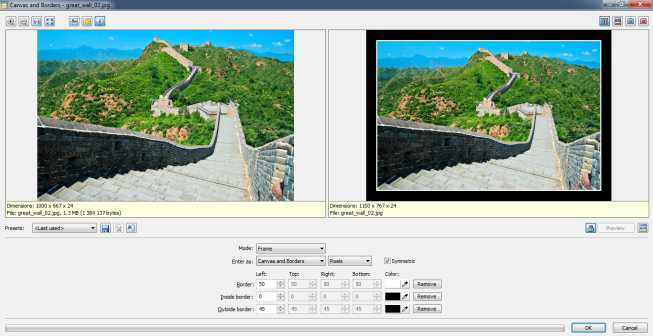
To frame a picture, open it in Zoner Studio’s Editor, and then use Edit | Canvas & Borders… (Ctrl+Shift+B). A new window appears. Its top section shows before and after previews for the edit. Stretch this window across the whole screen so the previews can be as large as possible. This makes it easiest to properly judge how good your frames look.

Framing from the Inside or from the Outside
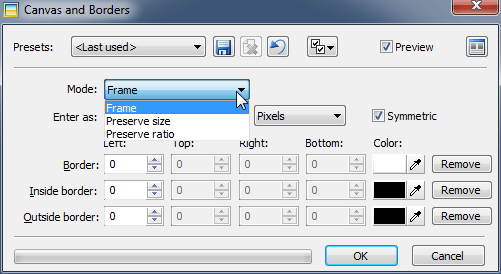
Before setting the frame’s size, make sure that it’s being applied in the way you want. Canvas and Borders offers three options for this, under Mode; they are Frame, Preserve Size, and Preserve Ratio. Frame adds a frame around the edge of the picture, so its overall size increases by the size of the frame. Preserve Size adds the frame from the outside in, covering part of the existing picture, but keeping its original size. Preserve Ratio covers part of the picture with a frame in a way that ensures that the picture will still have the same ratio of sides as it did before framing. The least destructive for the picture’s contents is Frame.

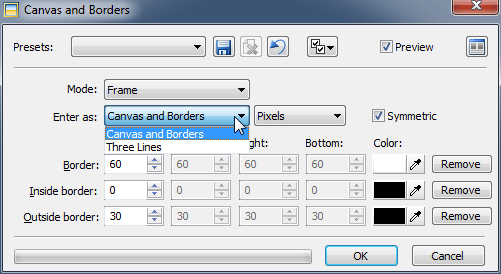
The next setting down, Enter as:, is equally important. The options here are Canvas and Borders and Three Lines. Next to this, enter which units to use for expressing the frame thickness—pixels, percent of height, or percent of width. The simplest is to use Three Lines and use pixels as the unit.
Tell Me the Parts Or Tell Me the Whole
Setting the frame size itself is easy. Before setting it, though, check out both options for Enter as:. Neither one is best for all situations. For Three Lines you are setting the width and color of individual lines leading from the edge of the picture outwards. For Canvas and Borders, meanwhile, you are setting an overall border width, plus thicknesses for an inner and an outer frame. The border is thus at least as thick as the inner and outer frame added together.

A few numbers to explain: If you want to make the first frame white and 5 pixels wide and the second one black and 10 pixels wide, then for the Three Lines method, use 5 pixels for the first line and 10 pixels for the second. For the Canvas and Borders method, use 15 pixels and black for the border and 5 and white for the inside border.
The Symmetric option, which is active unless you turn it off, makes the program automatically change all sides to the same width. When it is on, only the “left” value can be worked with, and the other values are taken from it. But if for example you want the bottom of the frame to be wider than the rest, turn Symmetric off. Experiment a bit and you’ll find you’ve greatly improved the look of your picture!
