How to Choose a Photo-friendly Monitor

Hobby photographers aren’t shy about investing into their equipment. An average photographer’s camera bag can hold equipment worth thousands of dollars. And yet they often forget that for good results, they’ll also need a high-quality, photo-friendly monitor.
Obviously it’s very hard to make quality edits to the photos coming out of today’s cameras if you’re using hardware or software that’s fifteen years old. For advanced work with photos, and especially RAW photos, you need a photo-friendly PC. And naturally you’ll need a good monitor as well.
To Edit Photos Right You Need a Photo-friendly Monitor
A low-quality monitor can’t reproduce colors and brightness faithfully, and so you won’t see how your pictures really look. That’s why it pays to use a high-quality, photo-friendly monitor. But what do we mean by photo-friendly?
Don’t trust a salesman’s words on this. Just because they say a given monitor is good for photographers doesn’t mean that it really is. The first thing to be aware of here is what you should expect from a monitor like this, and what demands you’ll be placing on it.
In short, a good monitor has to reproduce an image faithfully from corner to corner and also let you comfortably view that image. So its basic job is to reproduce brightness and colors at high quality.
When Choosing a Monitor, Focus on Its Panel
The foundation for a good choice of monitor is its panel. The panel determines how well the monitor will be able to provide the specs that I’ll be suggesting below.
Modern photo-friendly monitors have one of these panel types:
- PVA,
- IPS,
- or OLED.
You can forget about plasma and TN LCD screens, as the march of technology has turned away from these.
Insist on Good Brightness and Contrast
Contrast is a key parameter for any high-quality photo-friendly monitor. It determines the ratio between the darkest and brightest colors that it can display.
Both of these limits are critically important, because once a monitor has been turned on, even its darkest pixels shine at least a little. Its overall contrast, meanwhile, sets the maximum brightness at which its pixels can shine. And also how large a dynamic range it can show.
While an office monitor can get by with a contrast of 600:1, for high-quality work with photos, you’ll need a contrast ratio of at least 1,000:1.
Brightness is expressed as cd/m2, a unit that’s also called the “nit.” Your monitor’s upper brightness limit should be from 150 to 200 nit. The minimum brightness value for the white point (with a static luminous intensity) is also important. A high-quality monitor will have a minimum brightness of less than 60 nit (and ideally 40 nit). Unfortunately, manufacturers often don’t state this value.
Don’t forget that the best settings for both of these values will depend on how the monitor will be used and on the intensity of the surrounding light. You’ll need different settings for a monitor placed next to a window than for a monitor in a dark room.
To get good contrast, you’ll need the lowest black-point brightness possible. While office monitors can get by with a value of 0.25 nit here, top-of-the-line photo-friendly monitors have a minimum value that’s up to ten times lower, that is, 0.025 nit.
Watch Out For HDR
You’ll often hear about HDR monitors, which have a brightness of 400 to 600 nit, enabling extreme contrast values on the white-point side. But watch out!
There’s a fundamental difference between the static contrast value—the contrast achieved when a monitor can turn any pixel on or off freely—and the dynamic contrast value. Dynamic contrast is based on the monitor’s locally adjusting the panel’s brightness based on scene type.
Dynamic contrast is good for video playback but definitely bad for photos. Also, HDR works with different optical transfer characteristics than photographs do, and the high contrast also influences color perception.

Colors and Photo-friendly Monitors
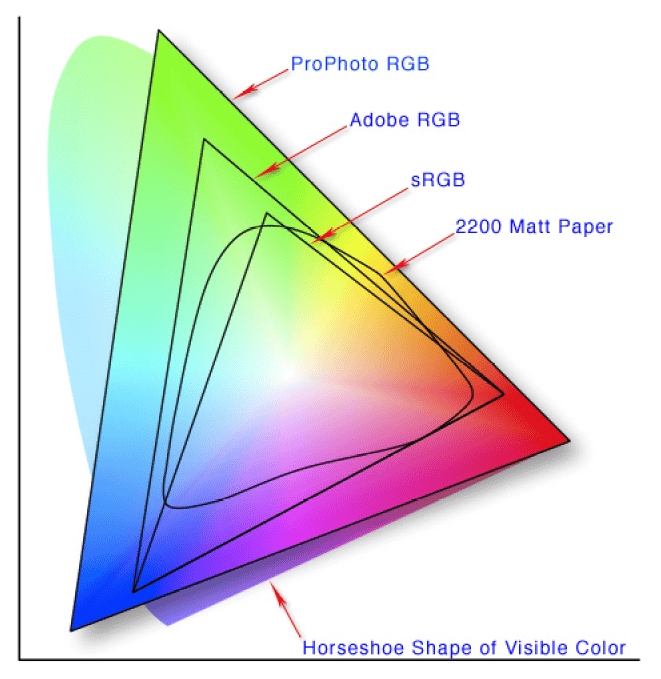
When examining the color reproduction abilities of your future “photo monitor,” don’t think about how much you like or dislike its shining colors. Instead, watch its color gamut. That’s the overall range of colors that it can actually display. Naturally it should be as wide as or wider than the range of colors that you’ll be sending to the monitor.
Meanwhile, RGB values are always provided in relation to a standardized color space. For photographs, this primarily means
- sRGB
- and AdobeRGB.
Your monitor’s gamut should cover the widest possible range within the given color space. If it’s too narrow, then during your editing work, you may only see a part of a photo’s color range, with the rest of that range squeezed to fit—with the monitor showing a range of different colors as if they were one color.
Every percentage point under 100% robs the user of a part of pictures’ color information. At 98% you probably won’t notice a difference, but at 80% you definitely will.
Gamut information is not always available on dealers’ websites, and sometimes you won’t even find them on manufacturers’ sites. Stay away from mystery monitors like these.
The important thing is to edit your photos in the same standard that you’re shooting them in. Definitely don’t try to edit photos shot in the AdobeRGB gamut on a monitor with 80% sRGB coverage. Any work done in conditions like that is doomed from the start.
We’ll come back to the subject of color spaces in one of our future articles.

Use the Standards to Compare
Color standards are important so that you can display a photo on different monitors in the same way. If you have monitors with different gamuts or different settings, a photo that you’ve edited wonderfully on one monitor can look completely unusable on another one.
Although it’s true that you can never know what kind of monitor your audience will be using to view your photos, with a well-configured monitor you can at least be sure that you’ve done your own work well. And even though most people will see your photos at reduced quality, it won’t be tragically bad unless their monitor is absolutely misconfigured.
In any case you need to keep in mind that a monitor’s quality will change over time. And even the best monitors need profiling and calibration. Ideally you’ll be doing this directly through the monitor itself—by working with its settings. That’s the only true guarantee of seeing an image on your monitor the exact same way a year from now as you see it today.
And to be sure that everyone else will see also your results in (almost) the same way, print your photo out.
Photo printing is connected with another major topic—achieving perfect harmony between the image on your monitor and in your prints… in short, with color management during image reproduction. Just like monitor calibration and configuration, we’ll be covering this topic in a future article
Matte Screens Are Ideal for Work With Photos
Viewing angle is also important when you’re choosing a monitor for your work with photos. With a high viewing angle, you’ll see your pictures the same no matter whether you’re standing in front of your monitor or off to one side. Modern panel manufacturing technologies enable viewing angles as high as 178°.
Horizontal and vertical viewing angles are actually separate—and you can test this for yourself. Just display a monochromatic image on your monitor and view t from a variety of angles. You’ll notice the low vertical viewing range on a low-quality monitor quite quickly.
Your monitor’s surface affects its viewing quality as well. Matte surfaces are a favorite among photographers. While colors don’t look as shiny on them, they’re immune to glare, and so they interfere less with a picture’s brightness and colors. Incidentally, this is also important for white-point calibration, because a calibration probe “sees” the same things as an observer sees.
So watch out for any flaws in your monitor’s backlighting and its individual pixels’ brightness and color temperature, which can also vary depending on its brightness and white-point settings. If there’s trouble with these, areas with similar colors can melt into blotches of one single shade. Here again, the best way to uncover any trouble is to display a monochromatic image on your monitor.

Don’t Forget Video Editing
When you’re choosing a monitor, don’t forget to also pay attention to its refresh frequency and response time. Bad values for either of these can lead to “ghosts” in moving images.
It’s true that photos are static images, so it may seem that you don’t have to care about these values. But work with camera outputs today also involves video editing more and more often. So it does pay to also pay attention to any parameters that can impair video playback.
To ensure problem-free playback, go for a monitor with a 60 Hz refresh rate and a panel response time of 10 ms or less.
True connoisseurs may also want to look into monitors with a 10-bit display. Those two extra bits compared to traditional 8-bit monitors make them better at displaying color gradients, because they let the monitor show 64× as many different shades.
One disadvantage of monitors like these is that they’re expensive—and so are the graphics cards and the software that are needed to work with them. So at present this technology practically only sees use in work with X-rays, where a high brightness resolution is essential.
The Physical Characteristics of a Photo-friendly Monitor
A monitor’s physical properties—its diagonal and its resolution—are important as well.
A simple rule applies for both: the bigger, the better. A larger diagonal makes your work more convenient, and a higher resolution broadens your options for things like customizing your photo editor’s interface.
Still, you can reach a point of diminishing returns. And keep in mind that the photos from today’s cameras have dimensions that are even larger than a large monitor’s resolution. So even a 4K monitor won’t show them at 1:1 size.
All the same, when you’re browsing and editing them, you’re usually working with a reduced-size version that has seen some compression. And the greater the size reduction, the more the picture may be distorted. So 2K and 4k monitors theoretically offer somewhat more faithful representations than monitors that are FullHD or below. And how well that smaller image is displayed also depends on the software you’re using.
Your Monitor Matters
A computer’s monitor plays a fundamental role in your work with photo processing. So I’ve tried here to at least briefly describe what a photographer should focus on when choosing a monitor if they’re at all serious about their work. Unfortunately, there’s no such thing as one monitor for every job. And if anyone tells you there is, that’s nonsense.
One final piece of advice. No matter what you use your computer for, steer clear of cheap solutions.
Recommended Parameters
for a Photo-friendly Monitor
- Panel: PVA, IPS, or OLED
- Static contrast: at least 1,000:1
- Dynamic contrast: not important for photo editing
- Minimum brightness: 0.025 nit (often not listed by manufacturers)
- Maximum brightness: at least 150–200 nit
- Gamut coverage: as high as possible—at least 95% of sRGB
- Surface type: matte
- Resolution: at least Full HD
Other parameters:
- high viewing angles
- Refresh rate of at least 60 Hz
- Response time of at most 10 ms
- Support for calibration (ideally through the monitor’s own settings)
If the manufacturer leaves out some of the above parameters (other than minimum brightness), it’s very likely that the given monitor will not be photo-friendly. Turn to a different one instead.