How to Create HDR Photographs in a Few Easy Steps
Creating HDR images is quite easy—you just lay the source photos down on top of each other (or get some software to do it for you). And the results from HDR can be surprising. So in this article, we’ll be taking a look at how to create and edit HDR images using Zoner Studio.
HDR (or sometimes HDRI) is the acronym for High Dynamic Range imaging. This is a technique that you can use to create a picture with an extremely broad range of light and dark tones.
Compared to film, digital cameras have less exposure flexibility, as well as a smaller dynamic range. This is one reason to create HDR images—in certain situations, ordinary photographs simply can’t capture everything that the human eye can see. The other use of HDR is to create pictures with very high local contrast, giving them an almost dreamlike atmosphere and quite striking colors. Some even say that HDR images feel like drawings.
Speaking of which, I’m no stranger to overdoing HDR. But you learn from your mistakes.
Shoot to RAW, Save to TIFF
If you want to create HDR images in Zoner Studio, then I recommend shooting to RAW—that makes it much easier to set up different exposures than if you were shooting to JPEG. Then export different exposures for the RAW to TIFF files. TIFF is a lossless format with no threat of your picture “falling apart.” Take care to have the same white balance in all the exposures. In Zoner Studio, you can work from RAW directly and save to TIFF afterwards.
Two Ways of Creating HDR in Zoner Studio
To create an HDR image, you need at least two pictures that are identical except for their exposure. One picture is underexposed to preserve the details in the lights; the other is overexposed to preserve the details in the shadows. Joining these two pictures produces an HDR image.
Zoner Studio includes tools for creating HDR images directly. They’re available in the Manager > Menu > Create.

There are two basic routes you can go: HDR via Exposure Blending and HDR via Tone Mapping.
Both of them have the same first step. In it, you choose pictures that are identical except for their exposure. The picture then automatically assembles the HDR image for you using selected parts of each of these pictures. The remaining steps vary.
In this article, we’ll be looking at both routes. These three photographs will be the foundation for our HDR image. We’ll be using Zoner Studio to join them together:


HDR via Exposure Blending
When we use HDR via Exposure Blending, a window for choosing photos appears. If our photos weren’t lined up exactly against each other, then in the next step we’d need to align them. But in this case, we can continue straight ahead since the pictures differ only in exposure.
Once we reach the step with the sliders, we can begin setting up the HDR in earnest. The settings here are divided into three basic groups: lights, shadows, and contrast. The settings for lights and shadows identical—just for two different sections of the histogram.

Here are some notes on the sliders for lights and shadows:
- Transition threshold sets how much detail from the lights / the shadows is placed in the final image.
- Transition smoothness sets how smooth the transitions between the areas taken from the different source pictures are. In our case, we need to work carefully with this value and avoid creating an “aura” around the runner.
- Mask blurring sets what parts of the photo are affected by the HDR effect. With less mask blurring, the HDR is stronger—but the image is also shorter on contrast. You might say that it weakens a photo’s lights or shadows, or even both.
- Intensity is the effect’s strength.
We fine-tune the Contrast last (and so should you). As the very last step in the HDR wizard, you can either save the result or open it in the Editor, where you can put any needed finishing touches on it.

HDR via Tone Mapping
Another way to create HDR images in Zoner Studio is the HDR via Tone Mapping function. This function tends to produce a fairly strong HDR effect. It has two basic editing options. You can either work via Brightness or via Contrast.

You have the same sliders available for both options:
- Intensity sets the effect strength.
- Compression alters the picture’s level of compression, but also the amount of detail in the photo. In practice, Compression works basically the same as Intensity.
- The Light slider sets the strength and intensity of light.
- Gamma sets the pictures’ brightness overall.
- Saturation sets the picture’s colorfulness. We recommend that you go easy on the saturation.
- The other sliders set the black point and white point.
- Use the last two sliders to set the intensity of lights and shadows.

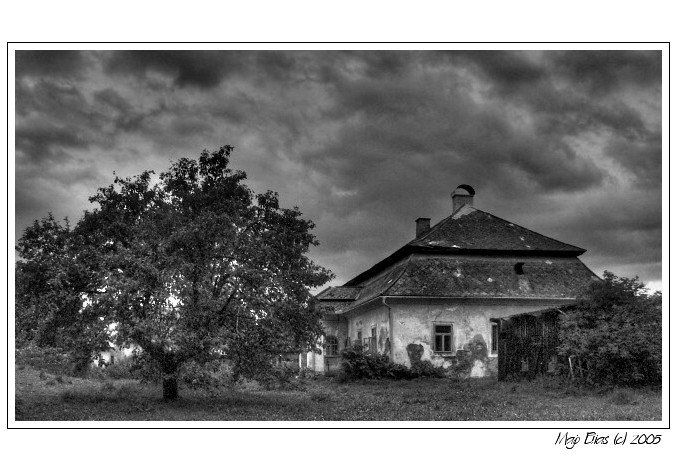
HDR Isn’t for Every Photo
The HDR effect is fairly conspicuous. So think carefully about when and where you use it, and what strength to use. Otherwise, you’ll do more harm than good. But if you do HDR well, then the results are worth it—take a look for example at the HDR images in this album on Zonerama.
Want to experiment with HDR edits too? Check out Zoner Studio for 7 days for free and try doing this edit on your very own photos.