How to Replace a Person’s Background
Taking a person from one photo and putting them in another. And thus placing them in a different situation. That’s one more thing you can do with advanced editing tools Work with layers and selections will help you to merge two photos into one like this. Take a look at how to do this kind of merging of one image into another.
The guide below summarizes the steps commonly used to merge images like this. You don’t always need to use them all, even though sometimes you might get into such a difficult situation that even all these steps won’t be enough. But that does depend on your experience and particularly on your first key step—choosing the photos to work with.
This article is meant for an advanced beginner. That means: photographers who already know the basics of work with layers and have mastered selections.
Choosing the Right Photos to Merge
Not all photos are good for merging! In general, often your chosen pairs of photos can’t be combined, or doing so will give a poor result. So you’ll need to match up a background and a person (or an object) to pair it with that will be similar in these three aspects:
- The height from which the photo was taken.
- The angle and style of lighting.
- The distance from the camera.
The bigger the difference in any of these factors, the stranger the result. And the bigger the effort you need to put in masking its issues.
If the light has a different color (bluish vs. yellow), it doesn’t matter much. But if the heights of the two shots strongly differ, that’s an almost unsolvable problem.
In many cases you can make your work easier if you don’t need to put the whole person into the background. With no legs in the shot, you don’t need to worry about shadows on the ground or interactions between the person and the background overall. So believably merging the two photos into one is much easier.

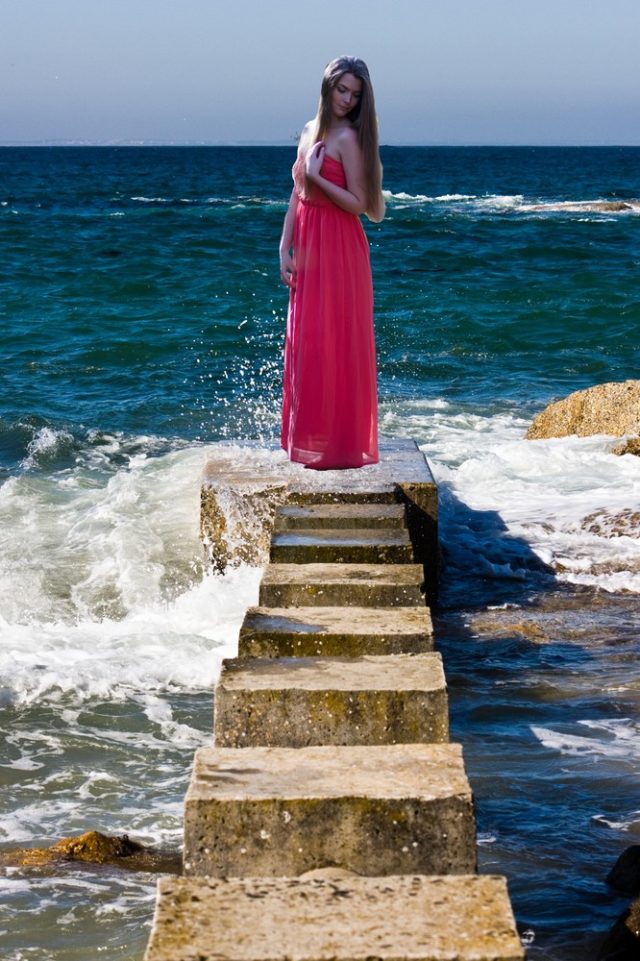
For my demonstration, I’ve picked photos where the height and distance are almost the same, but the lighting is noticeably different—the sun is illuminating the sea from the left and behind the camera, whereas the model is clearly lighted using a source shining directly at the lens.

Placing the Model Against the Background Photo
The fastest thing to do is probably to first open the photo with the background in Zoner Studio and then select the item Paste from File in the Editor’s Edit menu. The image will appear as a new layer with the Move and Transform tool turned on, so you can immediately move it and place it. However, you’ll need to activate the Resize mode. It’s best to immediately adjust the Layer Opacity to 50% in the Layers controls. That will let you see where the model is located. It’s best to do this first because once you start your size adjustments, you won’t be able to change the layer opacity. After finishing your transformations you can of course revert your layer opacity back to 100%.
Next move on to Rectangular Selection (M). Select the model and their nearest surroundings only, click Invert Selection (Ctrl+Shift+I), and erase the unneeded parts of the layer (Del).

Making a Precise Selection
When you’re selecting your model to separate them from their background, your choice of tools is up to you and to the specific situation. Fortunately you don’t need to be pixel-perfect, because you can fix your mistakes later. Even so, it’s good to be at least a bit precise in this step. I used the Lasso tool (L), and I created the full outline by gradually combining smaller selections.
Tip: If you hold down Shift while using the selection tools in Zoner Studio, your new selection will be added to the current one. Meanwhile it will be subtracted when you hold down Ctrl.
If you don’t insist on total accuracy, it’s better to leave the border between the model and their background “inside” the model—for example here nobody will notice if her skirt is a little slimmer, but if they could see an outline of reeds around her, then my selection would be in vain.
After finishing your selection, right-click on the layer with the model in the Layer controls and then use the Mask menu’s Reveal Selection item.

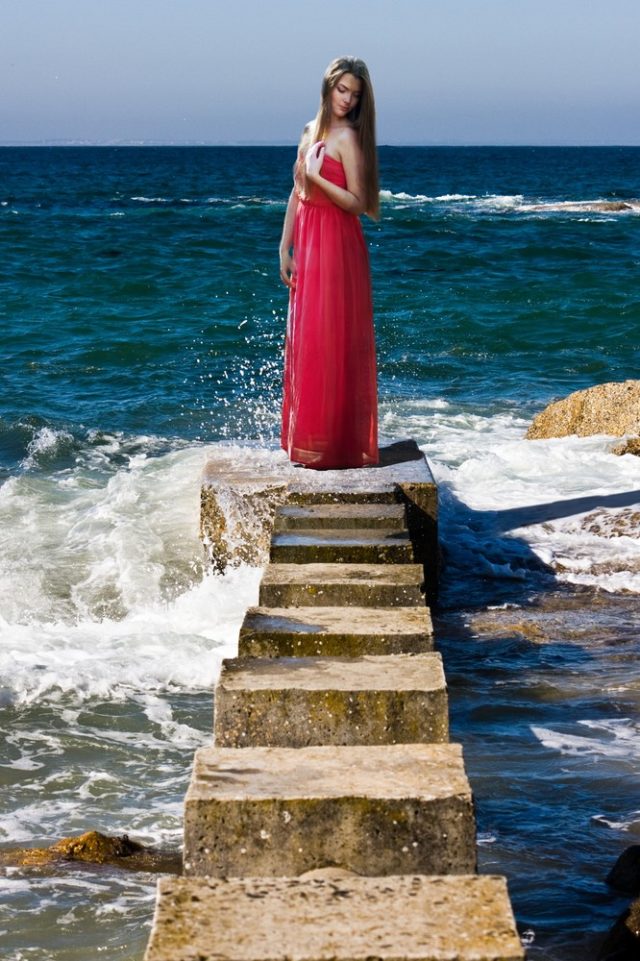
Creating the Shadow Under the Model
Here you’ll take advantage of the already finished layer with the model, by duplicating it (right-click on the layer in the Layer panel and use Duplicate Layer). Now you have two identical layers on top of each other. Select the lower layer and use the Move and Transform tool (V) with the Deformation mode active to rotate and move it so it lines up with the shadows in its surroundings.

Then just use Enhance Colors (Ctrl+1) in the Adjust menu and reduce the Brightness and Contrast to -100. This will turn the shadow completely black.
Actually shadows usually aren’t completely black, so it’s enough to adjust the layer’s opacity to roughly 80%.
In this case I need to trim the shadow so that it’s only visible on the stone cube, which I can do by simply erasing the sections that aren’t supposed to be visible with the Paintbrush (B) set to black. Since the shadow should continue onto the water surface, I duplicated its layer beforehand and I used one layer for the “top” shadow and the other for the “bottom” shadow. The bottom shadow is a bit more blue; you can simulate this via some experimentation with the Curves (Shift+C) tool.

Adjusting the Model’s Lighting
Continue by adjusting the light so that it suits the new environment. Here the original flat lighting should be changed to lighting from the left; you can do this by making certain parts of the layer with the model brighter or darker. It’s easier to work with a drawing tablet in this phase, since it’s faster and more accurate than a mouse.
Below I’ll describe a trick that you can use to brush on any effect you choose. Here it’s the brightening or darkening of an object, but you could use it to make something “bluer,” increase the contrast, or anything else.
You could use the Effect Brush (E) and its Brightness mode, but then the edited spots would lose their contrast. That’s why I used a more complicated, but more broadly usable process.
The trick lies in duplicating the layer with the model and making the changes I want by using Curves, color adjustments, and other tools. Then I hide that layer behind an opaque mask (right–click layer, Hide All). Afterwards I just draw with a white Paintbrush (B) in the areas where the effect is supposed to be visible.
The most practical approach is to overdo the effect (for example make the layer much brighter than needed) but then only use a minimal brush opacity when drawing. That way you can apply the effect gradually and only in the amount that each specific spot needs.
It’s OK to to “color outside the lines” here, since you can erase your mistakes anytime. You just need to “suck” the mask out of the original layer with the model into the selection (right-click the mask and use Add Mask to Selection), invert the selection (Ctrl+Shift+I), select the layer mask with the lines that ran over, and delete these (Del).

For the next step it’s good to know yet another trick. You see, by now the original layer with the model has been broken up into three layers that only make sense when they’re together. You’ll need to piece them back together.
Just using Merge Down would make all the previous work pointless. It would erase everything located outside the mask off of the layer. That would mean that you wouldn’t be able to edit the mask later on. That really isn’t a good idea. So it’s better to use a different set of steps that produces a layer that once again has the model, including their surroundings, and a mask that crops that layer down to just the model.
Here’s how I proceeded: I used the Add Mask to Selection and then Remove Mask functions in the original layer with the model. (In this phase you need to be careful not to accidentally destroy the new selection containing the original mask.) Then, by using Merge Down on both the brightened and darkened layer, I acquired one final layer with the model. Afterwards I created her mask using the Mask menu’s Reveal Selection command.
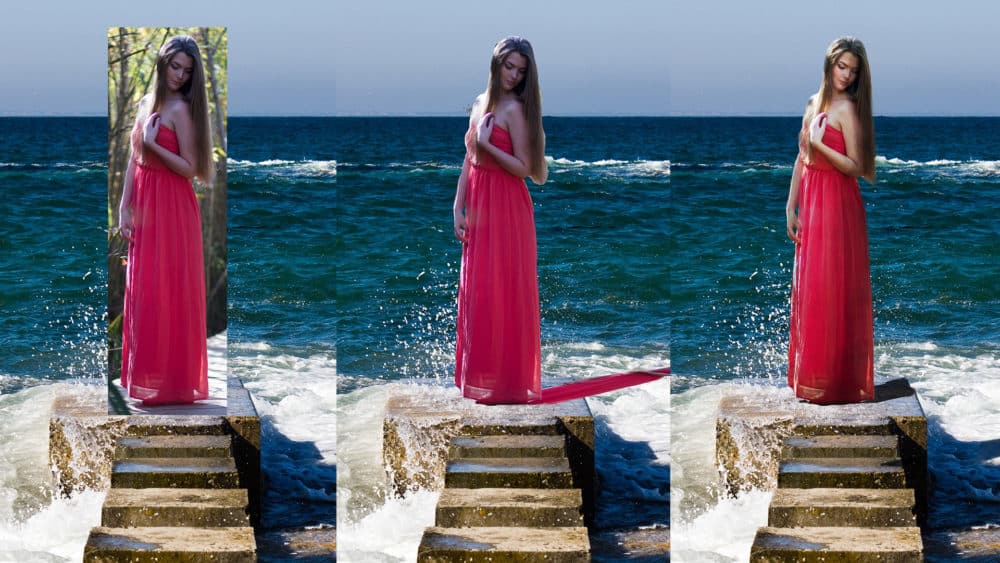
Unifying the coloring of the person and the background
Models are usually shot with lighting that has a different color than your background will have. So you’ll need to unify their colors. In the following photo, the girl is too purple and has too little contrast, and so I used the Curves and Enhance Colors tools to gradually approach the look of the background.

Other Small Adjustments
As my next step, I improved the contrast and the shadows—I made the lower part of the skirt darker. I also erased the lighthouse in the horizon and improved the new shadow’s connection to the water.
When you’re shrinking the photo of the model as you’re bringing it in, it can be too perfect compared to the rest of the image, because the shrinking has denoised it and sharpened it. You might even need to use the Blur (just lightly) and Add Grain functions.
Practice Makes Perfect
As I said at the start, the lighting on the two photos used was considerably different. I recommend that you use images with more compatible lighting for better results. Or you could work more than I did with adjusting the brightness around the head and shoulders. But that’s beyond the scope of this article.
Beginnings are always hard. But with some practice these edits will soon be a piece of cake for you, and you’ll have them finished in a matter of minutes. So don’t be afraid to give this method a try. You just need to download the Zoner Studio 30-day free trial and get started editing!