Master Depth of Field to Get Better Portraits

The aperture you use fundamentally influences your depth of field, and depth of field fundamentally influences your final picture. In this article we’ll take a practical look at a variety of apertures and how they affect background sharpness.
Depth of field is a term that you encounter often in photography. But what does it really mean? Here’s a simple illustration explaining depth of field:
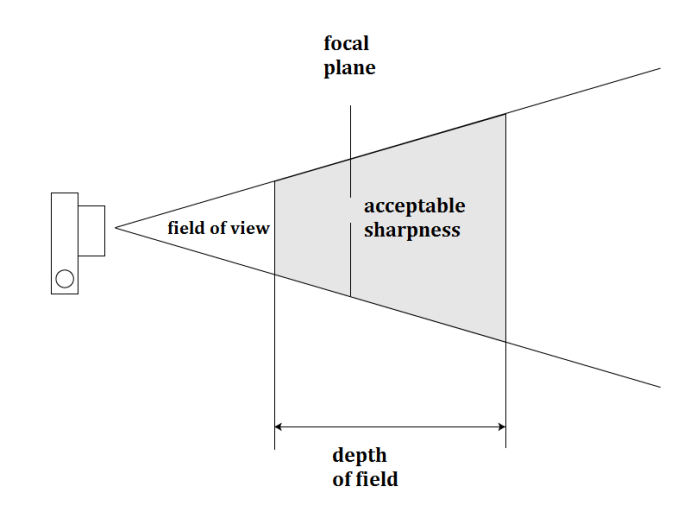
Whatever your focus distance, the picture becomes as you move inwards or outwards from that distance. Depth of field is the range inward and outward where the picture is still “sharp enough.”
Although depth of field can be expressed as a specific number, there are so many variables involved that for everyday purposes, it’s enough to use a relative comparison: “the depth of field in this case is higher/lower than in that other one.” For example with an f/5.6 aperture, the depth of field is higher than with an f/2.8.
But if you really want precise numbers, we can point you to online calculators like this one or a calculator that helps you visualize the final blurring here.
The depth of field in these calculators always depends on the distance from the photographed object and on the focal length and aperture—or at least the aperture values.
They also take into account things like the size of the final printed photo and the observer’s eyesight (really!). Still, sometimes these parameters may be firmly set, unchangeable from the outside.
But in this article, I won’t be talking about precise numbers—it will just be a visual illustration.
What Is It Good For?
The smaller the depth of field, the more strikingly your object in focus pops out, and the blurrier the background is. This often gives pictures a 3-D feel, and makes them have a better impact on your audience. Even if they don’t actually know anything about these technical affairs.
Portrait
In the following photos, note how the depth of field changes as the aperture changes. All of them were taken with a full frame camera and an 85 mm focal length.
f/1.8 aperture:
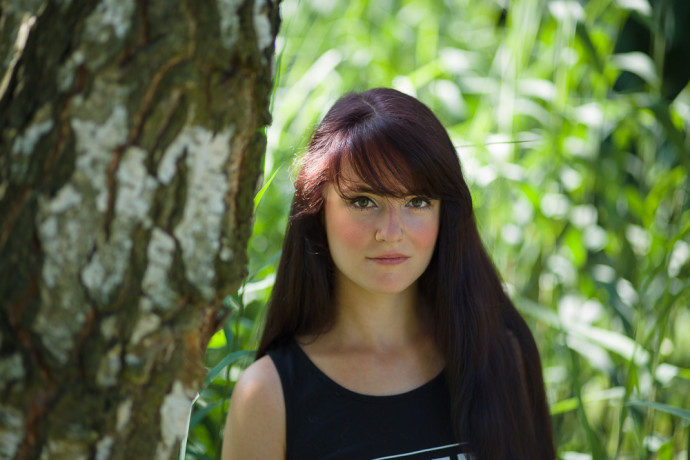
Canon 5D Mark III, Canon EF 85/1.8, 1/250 s, f/1.8, ISO 100, focus 85 mm
f/2.8 aperture:
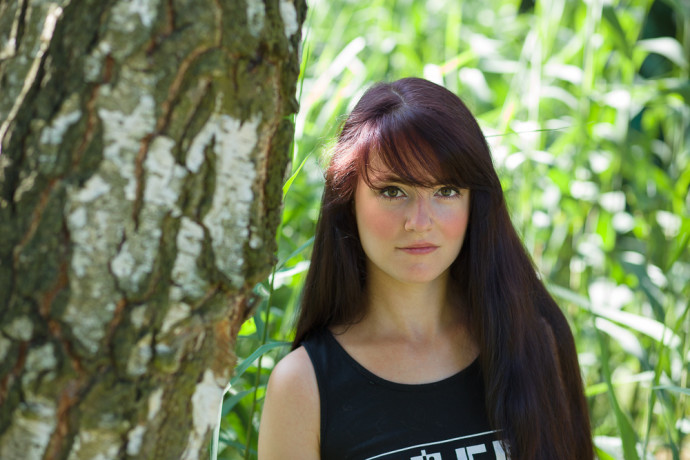
Canon 5D Mark III, Canon EF 85/1.8, 1/160 s, f/2.8, ISO 160, focus 85 mm
f/4 aperture:
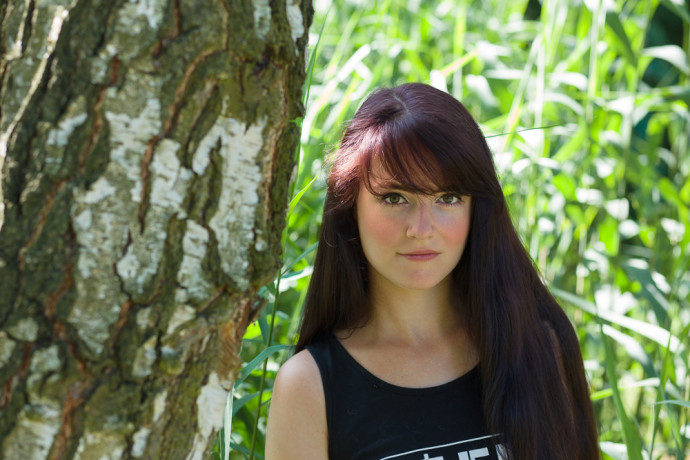
Canon 5D Mark III, Canon EF 85/1.8, 1/160 s, f/4, ISO 320, 85 mm focus
f/5.6 aperture:
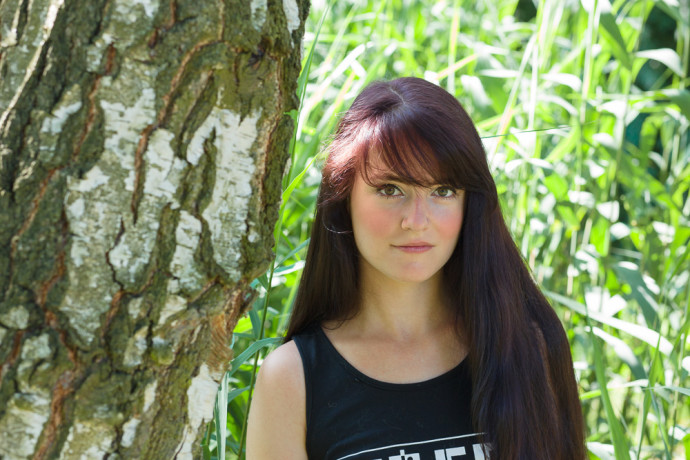
Canon 5D Mark III, Canon EF 85/1.8, 1/160 s, f/5.6, ISO 800, focus 85 mm
f/8 aperture:
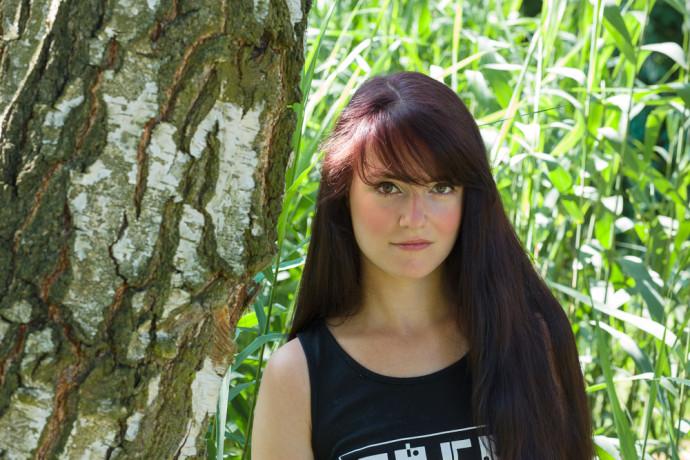
Canon 5D Mark III, Canon EF 85/1.8, 1/160 s, f/8, ISO 1250, focus 85 mm
f/11 aperture:
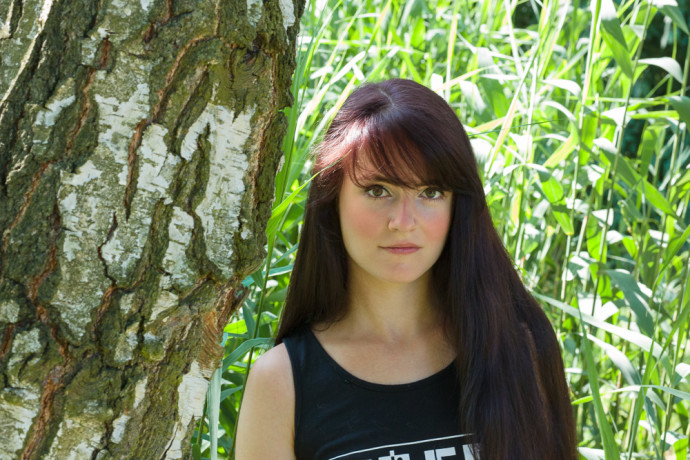
Canon 5D Mark III, Canon EF 85/1.8, 1/112 s, f/11, ISO 2500, focus 85 mm
f/16 Aperture:
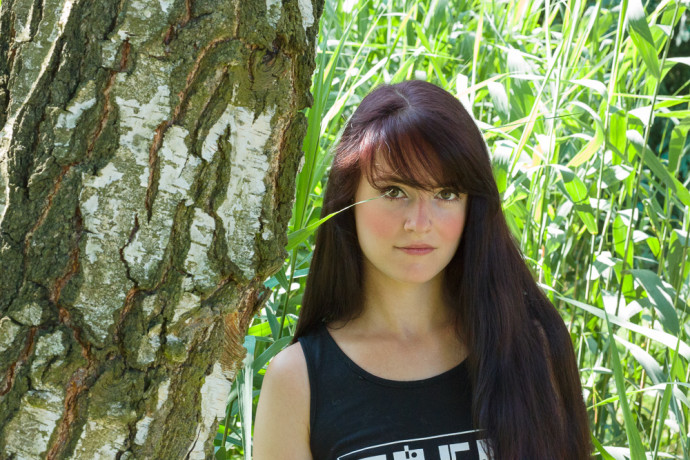
Canon 5D Mark III, Canon EF 85/1.8, 1/160 s, f/16, ISO 5000, focus 85 mm
These illustrations would have been even more illustrative with a faster lens (I didn’t have one around), but they’re still very enlightening. If your camera system has a small chip, then you can recalculate lenses and their apertures using e.g. this calculator. Here you’ll discover that if, for example, you use an APS-C camera with a typical 50/1.8 lens, it roughly corresponds to the 85/2.8 shot in the pictures above.
Moving on to cell phones with their tiny sensors—e.g. if you convert the lens of the iPhone 6 to full frame, then you get roughly a 29 mm lens with an f/16 lens speed! That’s why you can never create use a phone to create the kind of blurred background that you can get with a camera.
To get blurrier backgrounds, you can buy a lens with a higher lens speed, or switch to a system with a larger sensor. The series of pictures above can serve you as an illustration of what you can expect. (The “road” doesn’t end here; larger sensors exist, and even with a full frame sensor, there are larger lenses than the one used here.)
You can also get more blurring by using a larger focal length. In that case it doesn’t even have to matter if you’ve used a higher f-stop number. I’ll include one more photograph taken from farther out, but with a 200 mm focus and an f/2.8 aperture, which is probably blurrier than the very first picture above—the one with the 85 mm and the f/1.8 aperture (even though, in this case it’s not a clear example):
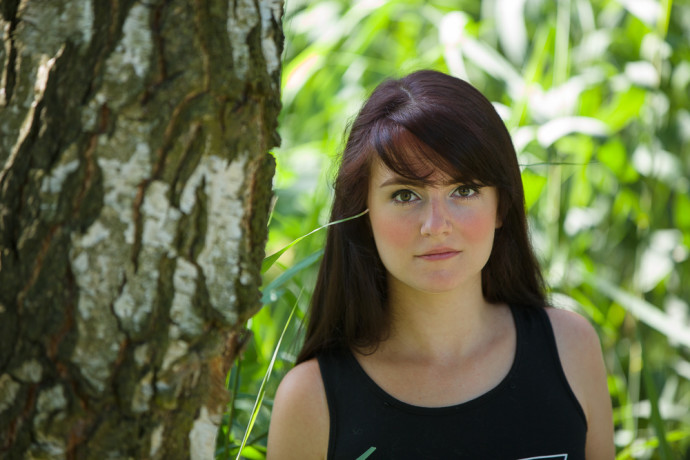
Canon 5D Mark III, Canon EF 70–200/2.8, 1/125 s, f/2.8, ISO 200, focus 200 mm
Whole-body Portraits
When you’re taking pictures with a wider lens, the depth of field is visibly different. I took this photo with a 35 mm lens from the same distance:
f/2.8 aperture:

Canon 5D Mark III, Canon EF 16–35/2.8 II, 1/125 s, f/2.8, ISO 100, focus 35 mm
f/5.6 aperture:

Canon 5D Mark III, Canon EF 16–35/2.8 II, 1/125 s, f/5.6, ISO 400, focus 35 mm
f/11 aperture:

Canon 5D Mark III, Canon EF 16–35/2.8 II, 1/125 s, f/111, ISO 1600, focus 35 mm
Here we see a general trend—going wider with the same aperture means more depth of field.
The Smaller the Aperture, the Better?
Fast lenses are in demand precisely because they optically separate a photograph’s subject from the background. It’s a great tool in situations where there’s a complicated, distracting background. Just blur it away!
But absolutely minimizing the aperture is not always the ideal solution. For example in portraiture you can end up with only the eyes in focus. It is sometimes a positive, but sometimes it’s a negative. Especially when you are photographing a group, it’s almost impossible to get them all in focus without opening up the aperture.
And meanwhile in a studio shot where you’re trying to get good detail on clothing, it’s nothing unusual to even use f/16.
Respect the Situation
If you want elegant portraits in absolutely any environment, then you’ll want to use the smallest practical aperture, to eliminate any distracting elements in the background. But if you want good detail on, say, a fancy building in the background, then open up the aperture.
If you’re not photographing people, then base your aperture on the scene and on your aim. There are a lot of possibilities here… but we’ll cover these in an upcoming article.