Restoring White Snow in Your Pictures
Learn to make the snow white again in your winter pics and to repair their exposure, just like we’ve done in today’s sample picture.
Photographing large surfaces that are all one color can really confuse a camera’s automatics, and if you don’t use the right scene mode or if you don’t manually correct exposure, you can end up taking an underexposed photo with strong blue tinting. However, you can easily repair such a photo in Zoner Studio.
Analyze the Picture

This winter picture was taken on a phone, and it’s plagued with the technical defects that are so common in this situation. The snow functions as a giant surface that reflects the light from the blue sky. Because of this, the camera’s automatics falsely assess the white snow as blue, because they register the color of the sky that’s being reflected in the snow.
On top of that, the camera’s built-in exposure meter expects for a photographed scene to have the average distribution of brightnesses. And in this situation, it doesn’t—the white snow forms the majority of the scene. The large amount of light reflected from the bright snow confuses the exposure meter, and the meter then underexposes (darkens) the photo.
You’ll need the following tools for this editing work: Edit Color Temperature (Ctrl+2), Exposure (Ctrl+3), and the program’s Preferences (Ctrl+M).
Approaches to This Edit in Zoner Studio
There are two basic approaches you can take towards this kind of edit in Zoner Studio. You can use the tools in the Editor, or you can use the Develop section to edit photos instead. For our picture, we’ll start with an edit using the Editor.
Using the Editor
In the Editor, we roll out the Menu, go to the Adjust menu, and choose Adjust Color Temperature. (We could also press the Ctrl+2 keyboard shortcut.) In the panel on the right, we choose “By manually setting a neutral color” and then click on a place in the picture that contains a neutral color. A neutral color is one that, in the real world, contains the same amount of red, green, and blue color. So essentially this means any shade of gray, including gray’s two extremes—white and black. In our sample photo, the snowy area is the one with the neutral color.
After correcting the bad colors, we need to correct the underexposure. For this we use the Enhance Exposure item (Ctrl+3) in the Adjust menu. By dragging the “Exposure” value to the right, we increase it, brightening the snow until it’s as white as it should be. We also check the histogram to make sure we didn’t overdo our edit and cause blowout (loss of detail in the bright tones). The histogram curve should end almost at the right edge, without actually touching it.

After the brightening, the picture is a little short on contrast, and so we add some contrast by raising the “Black Point” value.

With these steps, we’ve quickly and easily fixed a typical winter picture in the Editor.
Using the Develop Section
The Develop section in Zoner Studio 18 has some advantages over the Editor when doing basic edits like these. You can adjust both white balance and exposure in one step, and you can go back and change your edits later.
After we open the photo in Develop, our editing steps will be basically the same in the Editor, but with the difference that we have all the tools together in one panel.

Conclusion
When photographing winter scenes, don’t rely on automatic white balance in your camera. Manually set your camera’s daylight white-balance setting instead. Also, turn on its scene mode for taking pictures in the snow, or correct the exposure by +2/3 to +1 EV when shooting in automatic, semi-automatic, or manual mode.
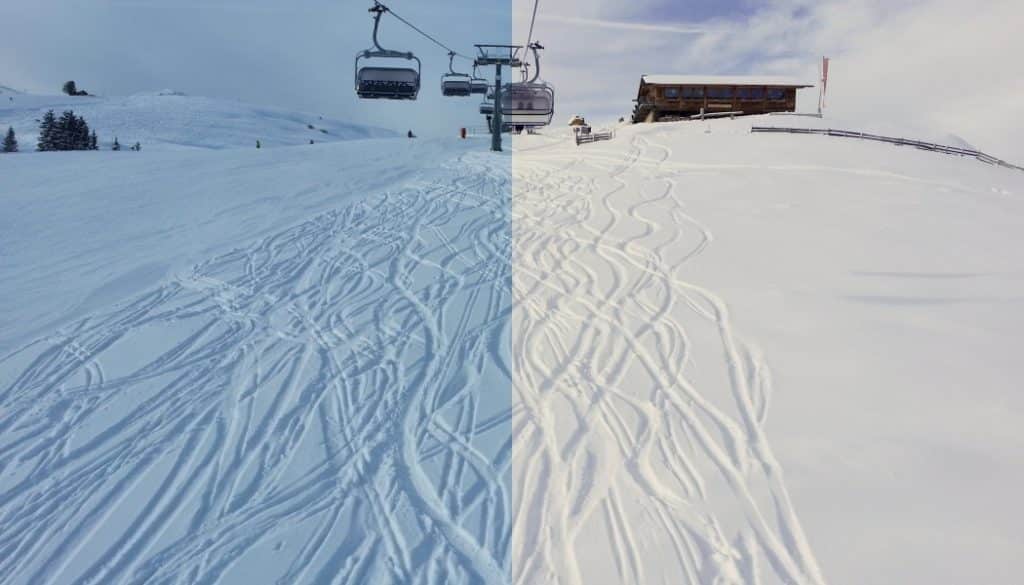
Our photo before and after edits.


Our original and the edited picture. To see the changes, move the slider between the pictures.
Have you found a photo in your archive that needs edits like these? Download the 30-day trial of Zoner Studio 18 and try them out live!