Shoot Like a Pro with Camera Customization
Cameras are sold ready for you to use them right away; about all you need to do after buying one is charge the battery. But over time you’ll find that there sure are some things you’d improve if you could. Maybe you can. Let’s take a look.
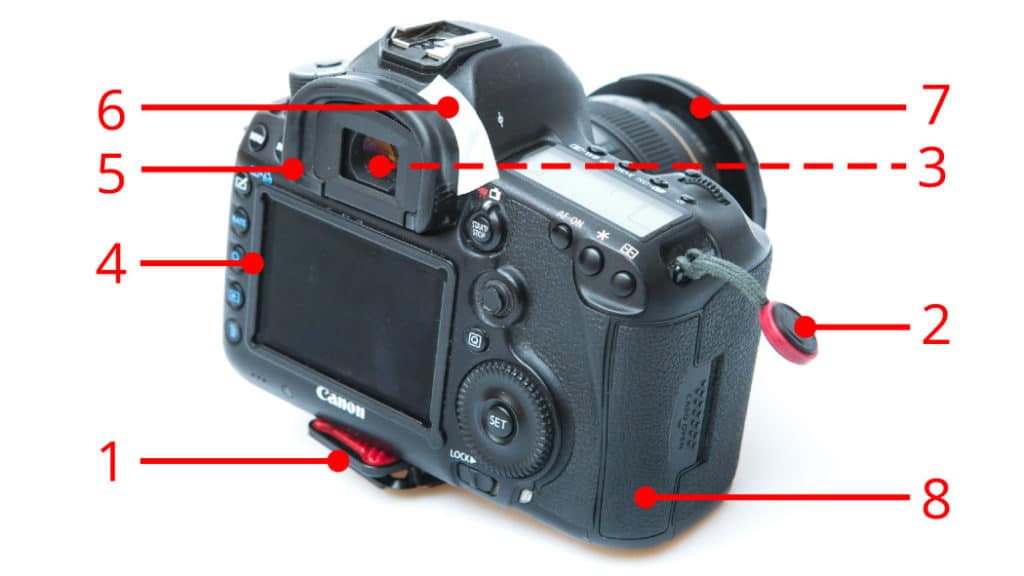
For a lot of the illustration photos in my previous articles, I’ve had to remove a few things from my camera to keep them from stealing all your attention. Here’s a picture of my camera as it looks during my day-to-day work:

Here are the details on my customizations:
1. Tripod quick-release plate
I don’t want to have to constantly screw in my tripod plate, and so I have it permanently attached to my camera. In my case the plate also serves as a belt clip that I can use to “snap the camera onto me” to free up my hands. There are many systems like this; I personally use Capture Pro from Peak Design. Here’s a video explaining how it all works.
If you often switch among a variety of pieces of photo equipment on your tripod, you may want to acquire multiple plates:

2. Strap clip
Neck straps got in my way, so I abandoned those. But sometimes I’m up, say, standing on a rock to take my shots, and at those times I do worry about my equipment.
I’ve ended up using a compromise. The round end you see in this article’s introductory photo is fastened, when I need it, to a strap around my wrist, and my camera no longer has a chance to fall. A neck strap can be made just as easy to unfasten; in that case, just place the second anchor point on the opposite side as well.

3. Precision focusing screen
This customization is hidden deep inside the camera body. In a DSLR, you actually are not looking directly through the lens, but rather, the image from the lens is projected onto a focusing screen, and you’re watching the focusing screen in the viewfinder.
The reason why I swapped mine out is that, while standard focusing screens are nice and bright, they don’t show depth of field correctly when using very fast lenses—ones with speeds of f/2.5 or better. Higher-precision focusing screens preserve depth of field at the price of being dark when used with slower lenses (generally f/4 or worse).
Sometimes the manufacturer themselves supplies these focusing screens; sometimes you can get them from third parties. You have to swap them yourself. This process usually isn’t complicated; it just takes nerves of steel sometimes—you’re working right next to the main sensor, which you should never, ever scratch.
4. LCD viewfinder
An LCD viewfinder is useful when you want to be able to examine your pictures even under sharp daylight:

The viewfinder’s dark walls eliminate environmental illumination so that pictures stand out well. Although landscape photographers can get by with just reading the histogram, a special viewfinder is useful when e.g. you’re mixing daylight and a flash and you need to get their ratio exactly right.
The viewfinder can get in the way when actually taking pictures, so it usually gets swung away and left unused until during the final check-over of photos. Then it’s swung back onto magnets on the metal frame that hold it in place. These have to be taped around the LCD in advance.
5. Improved eyepiece
The pictures show the manufacturer’s eyepiece, because improved eyepieces collide with the above-mentioned viewfinder. So here is an illustration of how a different eyepiece can look:

The much broader edges block light and are more comfortable, especially in the great outdoors, where the sun shines into your eyes from the side.
6. Taped-over diopter wheel
It’s great that digital cameras have eyesight correction… but I find it far too easy to end up nudging the wheel when taking my camera out of my bag. That leads to a blurry viewfinder (even though it doesn’t blur my photos).
To prevent this, I just put some tape over the wheel. Looking around, you might find some web guides for unscrewing this wheel. Ignore them. An empty wheel slot is a hole through which dust and moisture can get inside your camera.
7. Adapter ring
Strictly speaking this isn’t a customization, but I’ll mention it just in case. I have a what’s called a step-up ring mounted on this lens. It turns the 58 mm thread at the end of the lens into a 77 mm thread, so that I can attach filters that are larger than the lens end. This trick lets me use the same 77 mm filters on all of my lenses, so I never have to buy a smaller size. Note that if you install this kind of ring on your lens permanently, you’re going to want to buy a new lens cap, because your old one won’t fit.

Conversion rings exist for any combination of sizes, including “step-down rings” that enable you to use a small-lens filter on a large lens. But since that means placing part of the front lens in shadow—usually causing vignetting—these aren’t as widely used.
8. Rubber-grip repairs
With my current camera I ran into a problem where all the rubber exterior pieces adhered to the body came off of it after a couple of years. So now I have acrylic glue sheets readied in advance in a drawer, and if something like that happens again, I’m ready to fix it quickly.

Got Your Own Tips?
Those are the camera customizations that I use. If you have other tricks of your own, I’ll be thrilled if you share them in the comments.