Stack Light Trails in Zoner Studio
Light trails from passing cars are among the most striking nighttime subjects. But on busy roads and city intersections, a single long exposure is often not enough. In this article, I show you how to combine multiple shots into one impressive image in Zoner Studio, remove unwanted distractions, and gain full control over the final result.
In this article, we cover:
- why it’s better to combine multiple shots instead of relying on one long exposure for light trail photography.
- how to prepare for light trail photography on location.
- how to choose the right images for stacking.
- how to unify adjustments in Zoner Studio before stacking.
- how to use the Lighten blending mode to combine light trails into a single image.
- how to remove distractions using layers and masks.
- how to fine-tune the final image non-destructively.
Simple scenes, such as the light trail of a single car on a forest road, can often be captured with a single press of the shutter button and an exposure of up to 30 seconds. But this approach doesn’t work for busy city traffic. You would need exposures lasting several minutes, which could be impossible. But it’s usually far better to shoot a series of 10-30 second exposures and combine them later.

We already released an article long-exposure car photography: Lights in Motion: Photographing Cars Using Long Exposures. The article you’re reading now builds on that, focusing on post-processing.
Why shoot multiple images instead of just one
There are two reasons for this approach:
Very long exposures of several minutes capture many light trails, but they also tend to overexpose nearby buildings, billboards, or anything else that’s bright. Technically, you could use an ND (neutral density) filter to darken the scene, but this would weaken the car lights too much. A series of shorter exposures solves this problem and keeps the highlights under control.
Using multiple short exposures lets you decide which light trails to keep and which to remove. Maybe a car changes lanes and creates visual clutter. Or a brightly lit bus passes through. Or you want to hide a light that comes out of nowhere and stays there until the end of the exposure.
Basic shooting tips
In the field, you need the sturdiest tripod you can manage. Choose your location carefully. You shouldn’t shoot from a vibrating bridge, for example. The goal is to get images that overlap perfectly.
You also shouldn’t touch the camera at all during the sequence. It’s best to set your camera to take a series of shots automatically. If your camera doesn’t support this, another option is to use a remote shutter release or mobile app.
Switch to manual mode so that shutter speed, aperture, and ISO (which should be as low as possible) remain consistent across all shots. Always shoot in RAW format to avoid compression artefacts that can occur with JPEG.
Selecting your images
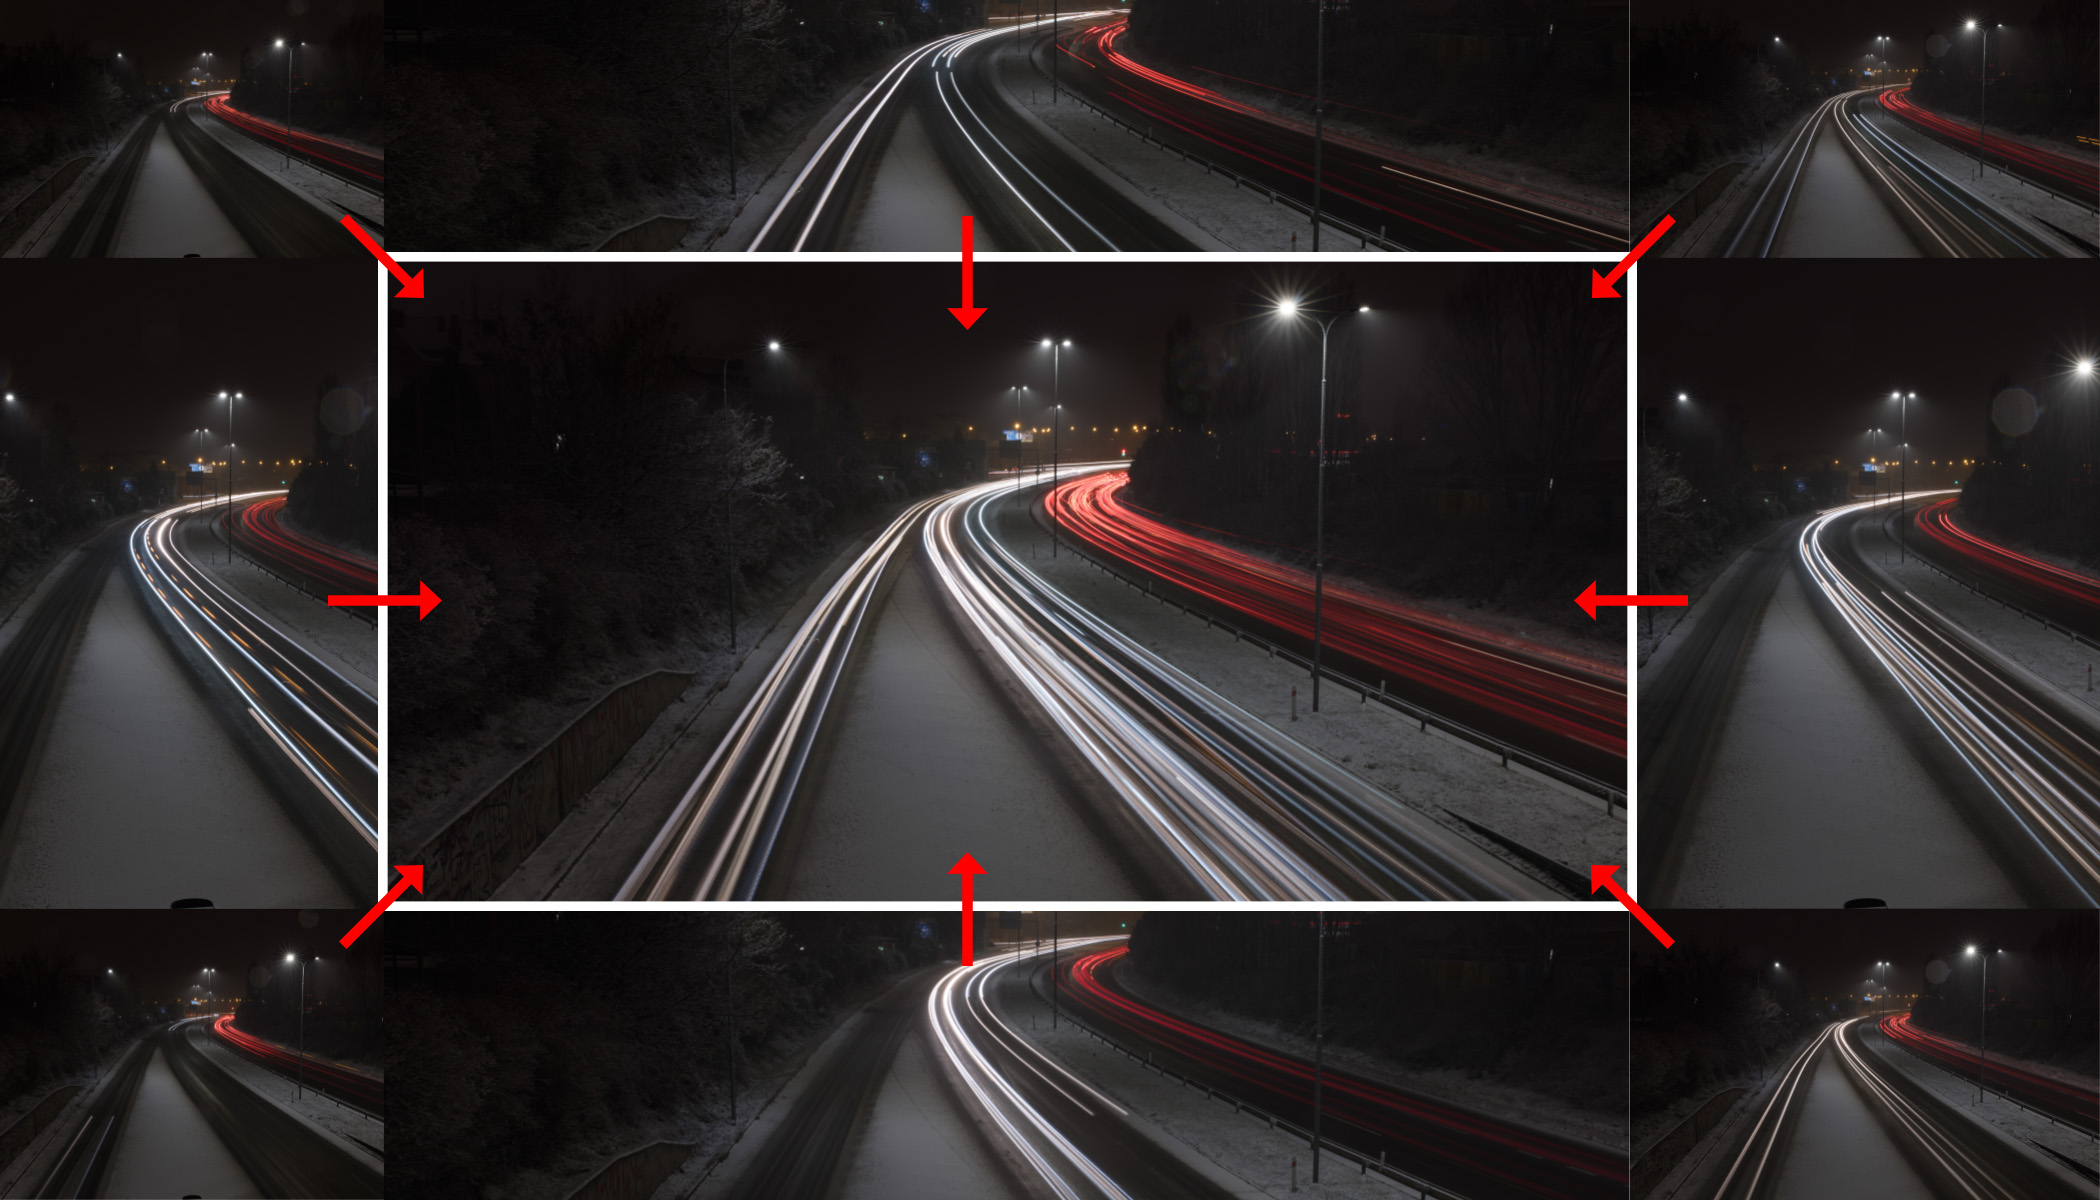
Before you start processing, it’s a good idea to select only the images that add something to the final result. There’s no point in stacking ten nearly identical shots of the same light trail. Look for variety and interest instead. In theory, you could include everything and sort it out later, but all selected images will be loaded into a single file as layers. Too many images can make the process slow and confusing.
In this example, I selected just 10 photos of the 29 I took.
Preparing your photos in the Develop module
You can fine-tune everything at the very end. However, it’s smart to make basic adjustments first in the Develop module of Zoner Studio. Some corrections are much harder to fix later.
This is important for white balance. If you used automatic mode, each photo may look slightly different. All images should look consistent before stacking.
It’s also a good idea to make basic brightness adjustments if your images are too bright or too dark.
In some situations, you may want to correct lens defects or chromatic aberration.
The key rule is: all images should have identical adjustments before stacking. The easiest way to do that is to edit one representative photo first, then copy the adjustments (Ctrl+Shift+C), select the remaining images, and paste the adjustments (Ctrl+Shift+V).
Stacking in the Editor module
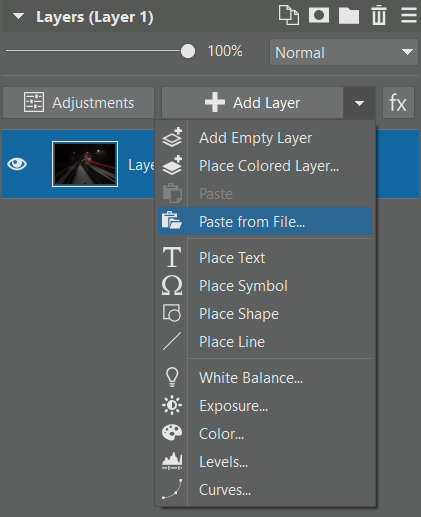
In the Editor module of Zoner Studio, you need to load all your selected images as layers. Start by opening the first photo in the Editor. Then, add the remaining images one by one as new layers by clicking on arrow next to Add Layer and choosing Paste from File.
Once all the layers are stacked on top of each other, it’s time for the key step of the whole process: change the blending mode for all layers to Lighten. To do this, select all the layers in the layer list: click the first layer, then hold the Shift key and click the last layer. With all layers selected, change the mode from Normal to Lighten.
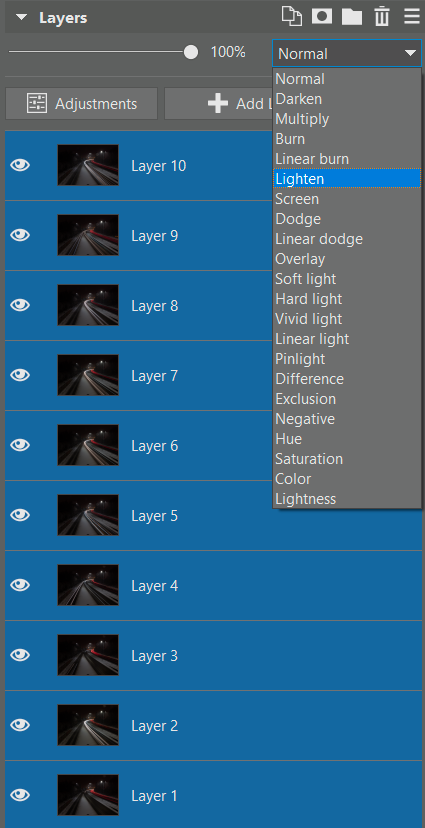
The reason this works is that in Normal mode, each layer simply covers the one below it. You could use Opacity to reveal light trails from multiple layers, but the result would look washed out. In Lighten mode, however, only pixels that are brighter than the pixels beneath them are kept from the upper layer. That means every light appears at full intensity, while the darker background stays clean.
At this stage, you should already see a strong stacked image. But we’re not finished yet!
Remove unwanted trails (or parts of them)
Sometimes photos contain distracting details like flashing orange turn signals. Other times, you may want to avoid cars changing lanes to keep light trails clean and follow a clear direction. There are two main ways to deal with this.
The simplest option is to hide a problematic layer by clicking the eye icon.

More precisely: Hiding a layer is easy, but finding the right one can get tricky. Often, you need to go through the layers one by one and test which image contains the unwanted element. Clicking the eye icon while holding the Ctrl key works well. This hides all other layers and leaves only the clicked one visible. Use the same process (Ctrl+click eye icon) to restore the previously visible layers.
However, hiding an entire layer is a fairly major change. It removes a large portion of the light trails, and if you’re working with only a few images, the loss can be noticeable. In these cases, it’s better to remove just the unwanted parts using a layer mask.
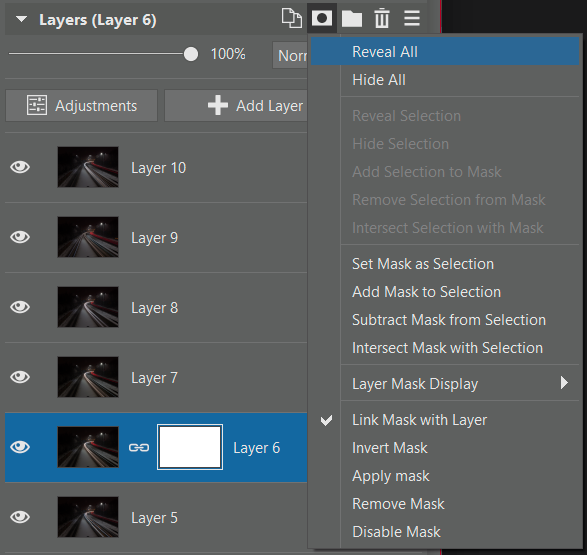
Create a layer mask by clicking the mask icon in the layers list and choosing Reveal All.
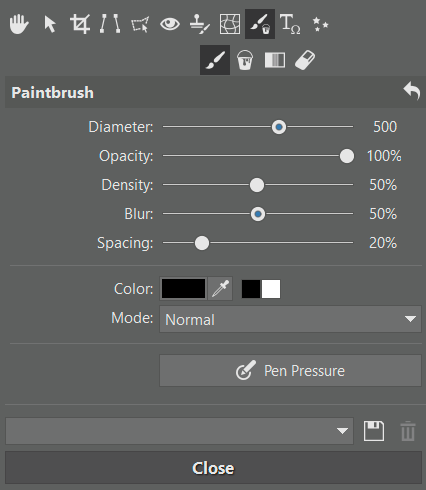
The mask is white at first, meaning the entire layer is visible. You can then paint the mask with a black brush to hide specific parts of the layer. Choose the brush size based on the size of the image and problems you’re fixing. Blur to at least 50% for smooth transitions. I usually set Opacity to 100% so the unwanted elements disappear completely rather than being partially visible. Don’t forget to make sure the mask is selected in the layers list—you should be painting in the mask, not directly on the image layer.
Finishing touches in Develop
And that’s the core principle. You can continue refining the image in the Editor, but the Develop module offers many additional non-destructive adjustments. This back-and-forth workflow—basic adjustments in Develop, more advanced work in the Editor, and fine-tuning back in Develop—is something I regularly use for any photo that passes through the Editor.
Using this technique beyond light trails
The process described here isn’t complicated, and it lets you create images that would be difficult or impossible to achieve otherwise. In addition to car light trails, you can use the same approach for other types of moving light such as light painting at home or New Year’s Eve fireworks over a city. These scenes can also be stacked and refined to match your vision.
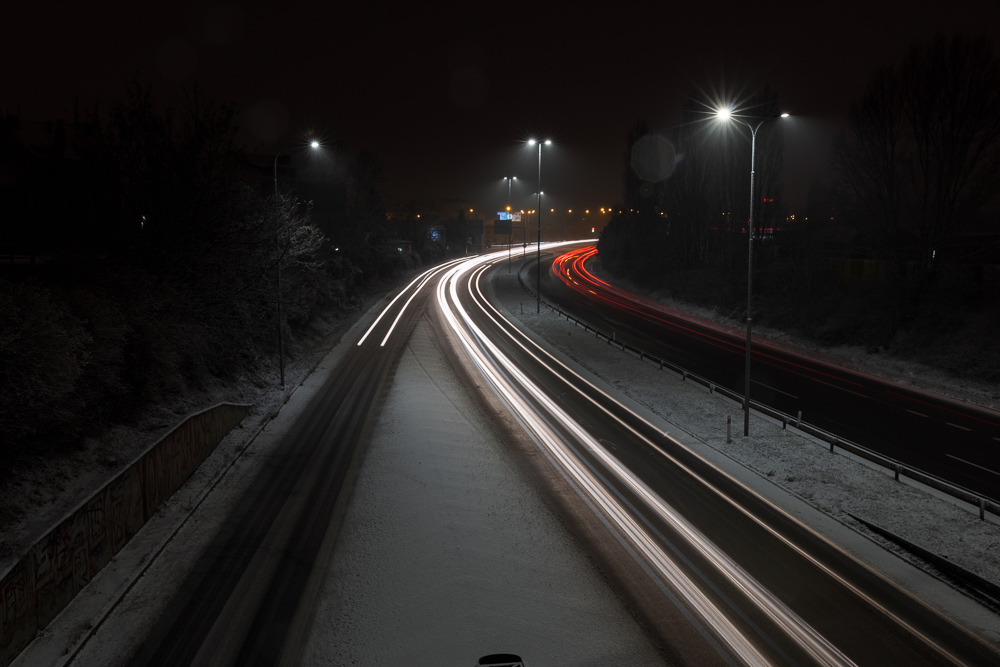
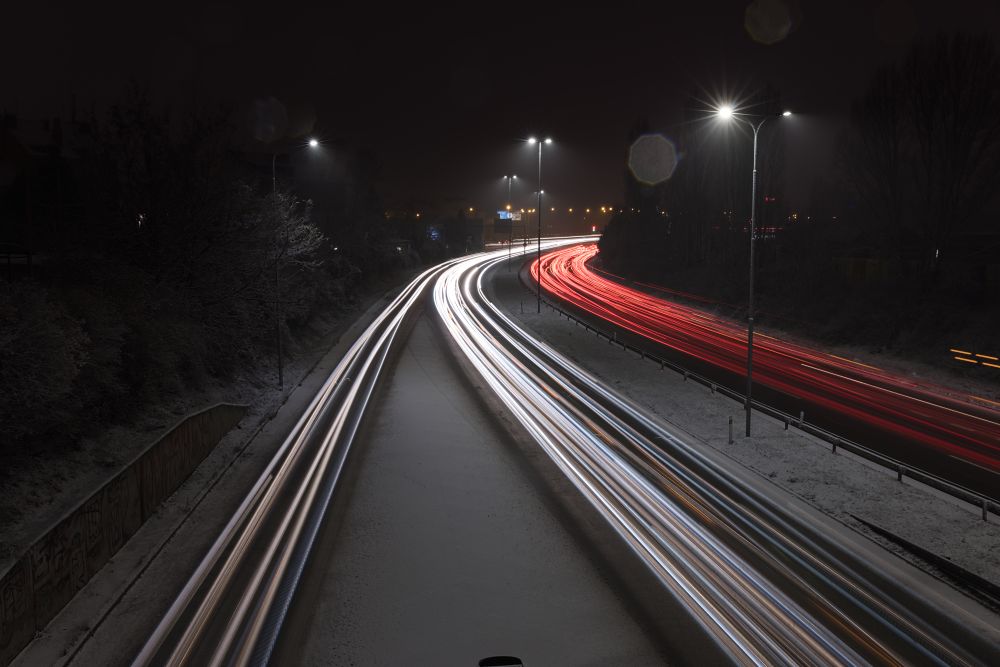
In closing, here’s the final image after removing turn signals, blurring the snowflakes, and softening sharp edges around the cars:

FAQs
How many images do I need to stack light trails? It depends on the traffic and the scene. In practice, 5-15 images are usually enough if they’re varied and complement each other well.
Do I have to shoot in RAW? Yes, RAW is strongly recommended. It allows you to unify white balance, exposure, and other settings without losing quality.
Can this technique be used for subjects other than cars? Yes. The same principle can be applied to light painting, fireworks, and other moving light sources.
What if my images don’t overlap perfectly? Small shifts can be corrected manually in the Editor. Larger shifts usually point to a problem during shooting, such as an unstable tripod or vibration.
Is it better to hide a layer or use a mask to remove distractions? Hiding a layer is quick but rough. Masks are more laborious, but they let you remove only the specific problem areas without losing useful light trails.