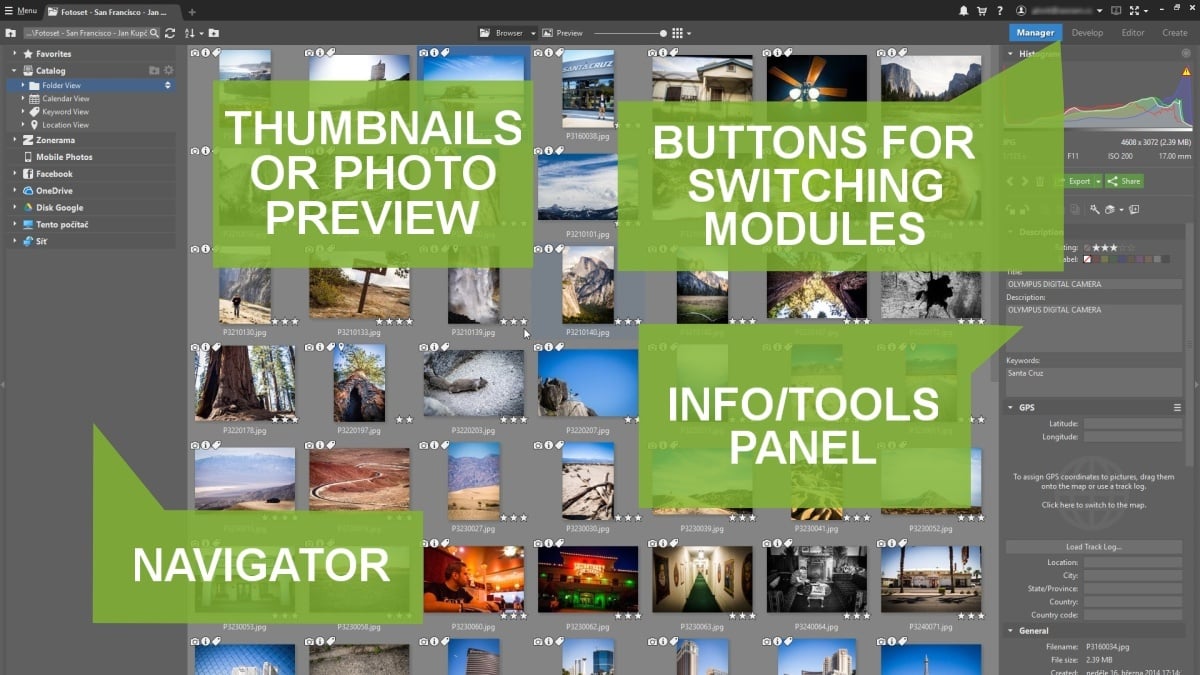
The basics of the Zoner Studio interface

Let’s have a look at the program interface, so that you know what features can be found in each section.
Use the Navigator to reach your folders and albums fast. Its most important section is the Catalog, which makes working with photos much quicker—thumbnails load instantly, and you can immediately search in your photos.
We definitely recommend using the Catalog, since it will make browsing photos a breeze.
The space in the center focuses on the central reason you’re here: your photos. Use it to browse your photo folders in the Browser, preview a photo at a nice large size, compare photos side-by-side, or even tag them using a map.
On the right is the Side Panel. Turn to it for photo information and editing tools. The contents of this panel change according to where you are in the program.
What can you do in each module of Zoner Studio?
![]() Use the Manager to manage your photos and their information—titles and descriptions, shot locations, and even your camera’s technical parameters. Some information can even be edited straight from the Side Panel.
Use the Manager to manage your photos and their information—titles and descriptions, shot locations, and even your camera’s technical parameters. Some information can even be edited straight from the Side Panel.
![]() Use the Develop module for non-destructive work with your photos. Every edit you make here can be changed or taken back at any time. Cropping, horizon alignment, white balancing, exposure edits, contrast, and noise reduction—you can do all this and even more.
Use the Develop module for non-destructive work with your photos. Every edit you make here can be changed or taken back at any time. Cropping, horizon alignment, white balancing, exposure edits, contrast, and noise reduction—you can do all this and even more.
![]() For more complex edits such as portrait retouching, removing unwanted objects, or cloning, the Editor is the place to go. You can turn your photos completely upside-down with dozens of tools and effects.
For more complex edits such as portrait retouching, removing unwanted objects, or cloning, the Editor is the place to go. You can turn your photos completely upside-down with dozens of tools and effects.
![]() You can turn your own photos into a photo book or calendar in the Create module. Order them straight from Zoner Studio, and we’ll take care of the rest. Delight your loved ones, and yourself as well. New to Zoner Studio—be sure to check it out!
You can turn your own photos into a photo book or calendar in the Create module. Order them straight from Zoner Studio, and we’ll take care of the rest. Delight your loved ones, and yourself as well. New to Zoner Studio—be sure to check it out!