5 Basic Edits to Improve Photos From Your Phone

It’s always at hand. That’s the main advantage of a cell phone, a mobile phone, or whatever they call it where you live! And photographers capturing moments that would otherwise escape them also appreciate this tool. But your work isn’t done when you’ve taken your pictures. You then have to sort them and edit the best ones. And meanwhile, often it’s enough to make a few basic edits that will reliably improve your phone photos.
First you copy them over to your computer and pick out the ones you like the most. Here things like ratings and colored labels will help you get them sorted out.
Then get to work editing.
Ideally you’ll have the photos on your phone in RAW. Then you have a lot more image data available than when you’re working with JPG photos.
1. Crop to adjust the composition
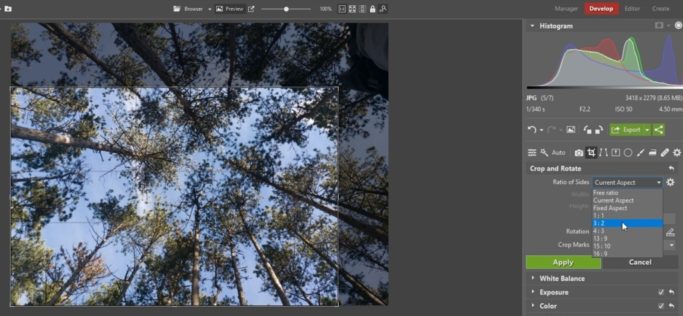
Open a photo that you want to edit in Zoner Studio, in the Develop module. Adjust its composition first. The Crop and Rotate tool will help here. With its help you’ll get rid of unwanted elements around the edges of the photo and at the same time straighten it by rotating it.
This step isn’t always needed, of course. It depends on how satisfied you are with the composition you got.
2. Take Care of the Color Temperature
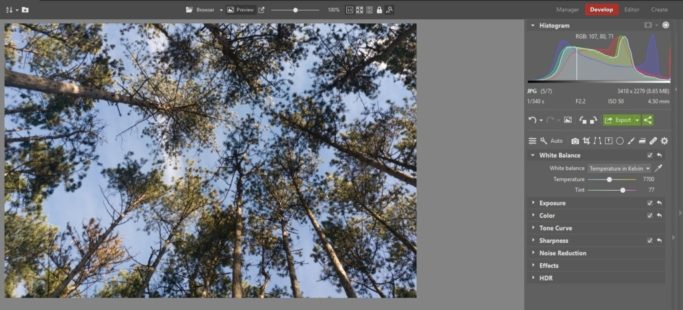
As soon as you have the composition fixed, fine-tune the white balance. Adjust it in the White Balance group using the Temperature and Tint sliders.
If the picture is tinted blue, increase the Temperature. If meanwhile the colors are too yellowed, push it leftward. Then fine-tune the tinting using Tint.
The eyedropper tool will make your white-balancing work easier. Click it and then click in the picture on a spot that should be white. Zoner Studio will automatically adjust the Temperature and Tint settings appropriately.
3. Fine-tune Exposure and Contrast
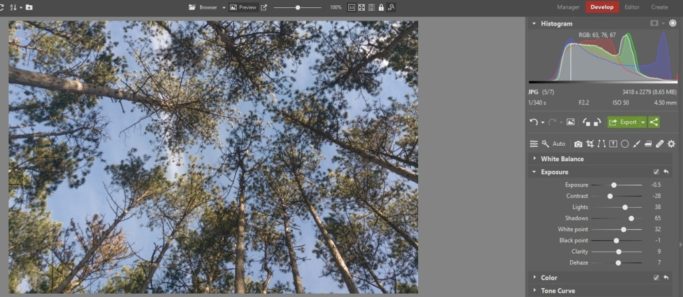
Once you’re satisfied with the picture’s colors, head over to the Exposure group. Here’s where you’ll be making your most noticeable edits. You’ll have eight tools at hand:
- Exposure – the basic slider with which you brighten or darken the picture.
- Contrast – increases the contrast between individual areas.
- Lights – this will help you dial back overexposure or emphasize light areas.
- Shadows – good for brightening or emphasizing dark tones.
- White point – use it to set what brightness level corresponds to white in the picture.
- Black point – sets the brightness level for black.
- Clarity – emphasizes contours and gives the picture more internal contrast and a feeling of action.
- Dehaze – helps you add or remove fog and mist.
During these edits it’s good to work with the sliders from top to bottom. First adjust the overall exposure.
Once you’re satisfied with it, you can add contrast to the picture, ease up on the lights, or perhaps brighten the shadows. Depending on what the photo needs.
Use the White Point and Black Point sliders mainly when there’s a lack of black or white in the picture even after your adjustments. The histogram will help guide you here.
Then just add any special effects you need via Clarity and Dehaze.
4. Set Colors’ Saturation
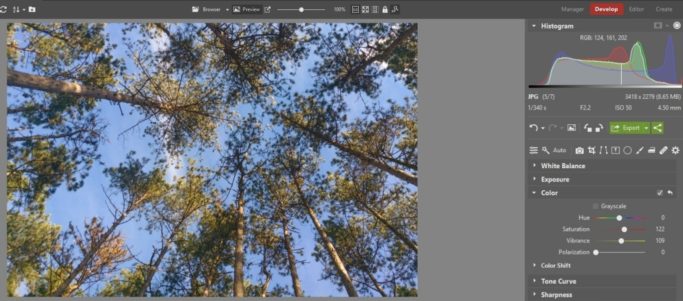
Now’s the right time to fine-tune the strength of your photo’s colors. You’ll find everything you need in the Color group.
The important sliders here are Saturation and Vibrance. While the first of these affects all colors, the second mainly affects warm colors.
For both of them, pulling to the right adds saturation, while pulling to the left removes it.
Meanwhile it all depends on you whether you’d rather emphasize the picture’s colors or moderate them. If you use these sliders tastefully, either approach will find its audience.
5. Don’t Forget to Sharpen
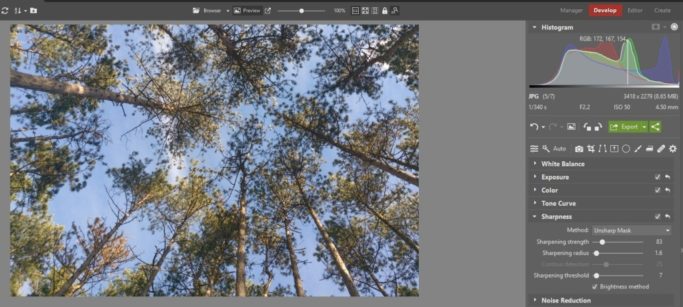
Wrap up by double-checking the picture’s sharpness. If you find that it’s not completely perfect, go to the Sharpness group.
Generally you can get by with the default Method, that is, with Unsharp Mask. It offers three sliders.
- Sharpening strength sets the strength of the sharpening at contours.
- Sharpening radius sets how far away from contours the effect is expressed.
- Sharpening threshold sets how different from each other the original colors at contours have to be for the program to sharpen them.
The first two options are the most important. You’ll mainly use the third on pictures that have heavy noise.
Zoom the picture in to 100% zoom before sharpening. That way you’ll have everything better under control and you’ll be able to easily set the values that best fit the given picture. But don’t overdo sharpening, or else you’ll turn your photo into a bad imitation of a Roy Lichtenstein painting.
Impress With Your Result
Remember, the Develop module doesn’t save changes directly to your picture so that you don’t lose your original. So now click Export to create a new file with your edited picture. Now’s also the time to upload your picture to social networks! Just click Share and choose whether you want to share to:
- Facebook,
- Twitter,
- or other social networks.

You can see for yourself that it takes just a few simple edits for photos from your phone to gain depth and vibrance. Try it on your own pictures as well. Download Zoner Photo Studio X, try it free for 7 days, and let us know how satisfied you are.

