Put an End to Depth-of-field Dilemmas: Discover the Magic of Focus Stacking

Low depth of field. It’s the biggest downside of closeup and macro photography. But it has a solution: the technique called focus stacking. It lets you increase your depth of field without reducing the quality of your photos. Take a look at how to take advantage of this technique.
Focus stacking is a technique in which you combine multiple shots with differing focal planes to get a picture with as much depth of field as possible. It’s used for example in macro photography, landscape photography, and—above all—science photography.
Your first thought may be to increase the depth of field by simply increasing the f-stop, perhaps to f/32. But that won’t quite work. With f-stops this high, you can run into blurriness caused by strong light diffraction. So this will likely reduce the picture’s detail and sharpness rather than increasing it.
That’s why it’s better to use focus stacking.
How to Take Source Photos for Focus Stacking
This technique does have one disadvantage. The shots that you’ll be using for your final picture have to tie into each other, and can’t have been taken from different angles. Also, the subject of your photo has to be motionless.
A focusing rack will help you to get the right source shots for focus stacking. It lets you shift the camera in small, precise steps and take pictures that tie into each other precisely.
It’s also important to take good-quality pictures of your subject using unchanging light. So when you’re using a flash for your shots, make use of manual mode and keep the flash at the same strength. Also, don’t change your camera’s exposure values while you’re taking your pictures.
To take good source photos, you’ll need:
- a DSLR, or another digital camera with a macro mode (some modern DSLRs and compact cameras even have a focus stacking function),
- a macro lens,
- a flash or unchanging light,
- a focusing rack (if you don’t have one, you can also take the source photos by hand, but only if you have exceptionally stable hands),
- a tripod,
- and software that you can use for joining layers with different depths of field (for example Zoner Studio).
Shoot From the Closest Place
Take the pictures of your subject from start to finish, and always start with a shift from yourself towards the subject. That way, you’ll photograph the part that’s closest to you first.
This especially pays off when you’re photographing insects. Even if the insect moves while you’re taking your shots, you’ll have a much larger chance of getting at least a few source shots for focus stacking of its head.
Always maintain the same angle while you’re taking your shots. Meanwhile try to move your camera so that the pictures with different depths of field tie into each other as well as possible. Ideally the places in focus should overlap by 5%. That way you can be sure that the pictures will fit with each other in the way that you need.
Aligning the Photos on Your Computer
Next, upload the source photos onto your computer and get started with assembling your picture. The Editor in Zoner Studio will help you with this.
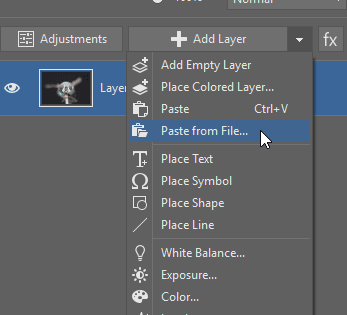
Open the first shot in it, and then add the other shots you’ll be using for your final picture, in different layers, one for each shot.
Then hide layers by clicking the eye icon. Leave only the first two unhidden. Then click on the second layer and switch its Blending Mode to Difference.
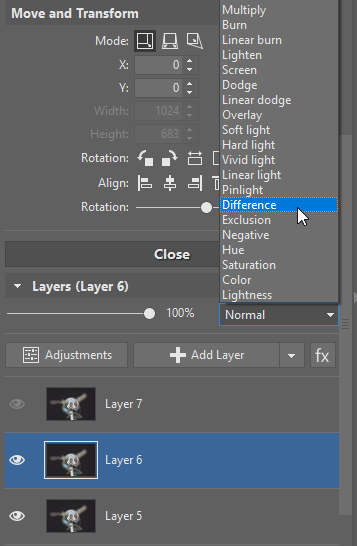
This will turn the whole picture black, which is what you need. Only outlines and details that don’t fit together closely will remain visible.

Now use the Move and Transform tool (V) to align the layers with each other. The better their alignment, the more black you’ll see in the layer you’re viewing.
Align all of the layers in this same way, one by one. The second with the first, the third with the second, the fourth with the third, and so on..

Joining the Shots Into One Picture
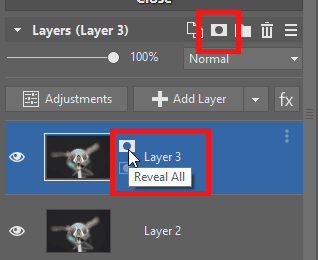
For all of the layers you’ve aligned, add a layer mask with the Reveal All function. Only leave the very first layer without a mask.
Work into this way and prepare your pictures for blending via masking. After you’re done with this phase, only the sharp portion in each layer should remain visible. So together, the individual layers will make up a photograph that will be sharp throughout.
To create masks that are as precise as possible, use the Brush (B). You’ll find it in the Drawing Tools. Use it to mark the places in the mask that you want to hide or reveal. You can also use it repair any masking mistakes at any time.
Now click the mask on the line with the layer. Use the brush, with its color set to black, to draw over the places you want to hide. If you overshoot, change the brush color to white and fix the problem.
Don’t forget that you can change the brush radius as needed as you draw. If you’re hiding material that’s right next to other material that needs to be visible, make the brush smaller. When you’re hiding large areas, meanwhile, feel free to use a larger radius.

When you’re doing your masking, try hiding all of the layers except for the one you’re working with. That way you’ll see which parts of it are out of focus. Hide them to let the sharp parts of other layers shine through.

Final Edits
Once you’ve masked everything the way you want and turned your source shots into a sharp photo, save the picture in the .Zoner Studio format. That way, you can go back to your edits at any time later. You’ll appreciate this if you later notice an error in your masking work.
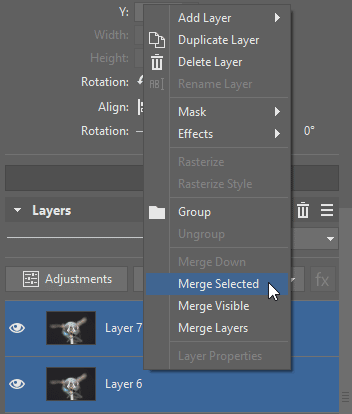
Then join all of the layers into one. Just mark them and then right-click on them. Then click Merge Selected.
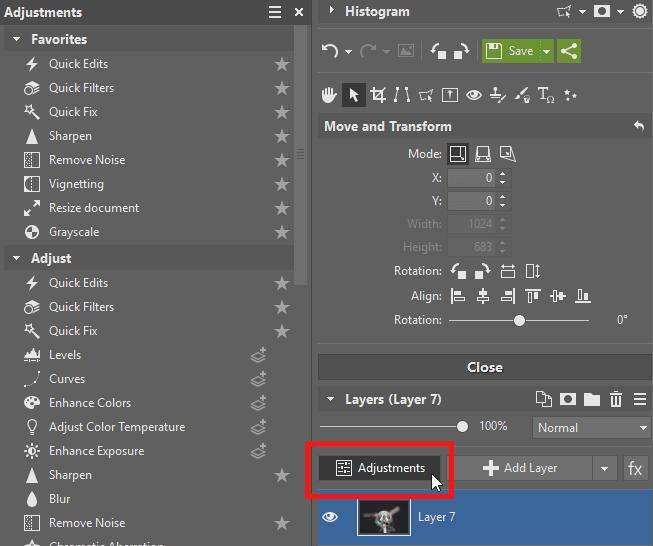
Now fine-tune your final picture’s exposure, colors, etc. The tools that appear when you click the right panel’s Adjustments button will help you out here. Then save your final picture as a JPEG.
More Shots = More Precise Results
You can also harness focus stacking in the same way when you’re editing pictures of for example landscapes or jewelry. Keep in mind, meanwhile, that the more source shots you take, the better. And that what’s most important is moving the camera towards your subject precisely and calmly.
You can try all this out on insects, or on any kind of small objects you have at home. So download Zoner Studio, try it free for 7 days, open your source photos in it, and get started experimenting.
