Learn to Use Selections—Your Key to Precision Edits
Do you ever look at a photo and decide you’d like to edit just a part of it? Maybe darken the sky, blur the background, or change the color of some object in it? The selection tools will help.
The selection tools help you to set a particular area in a picture to edit without affecting the rest. But you can also do the reverse—make a selection and then invert it, to basically set what not to affect. There are several selection tools in Zoner Studio. You’ll find them in the Editor’s right panel.

The Selection Tools and Selection Modes
There are several tools you can use to select specific parts of a photo:
- Rectangular Selection (M)
- Elliptical Selection (O)
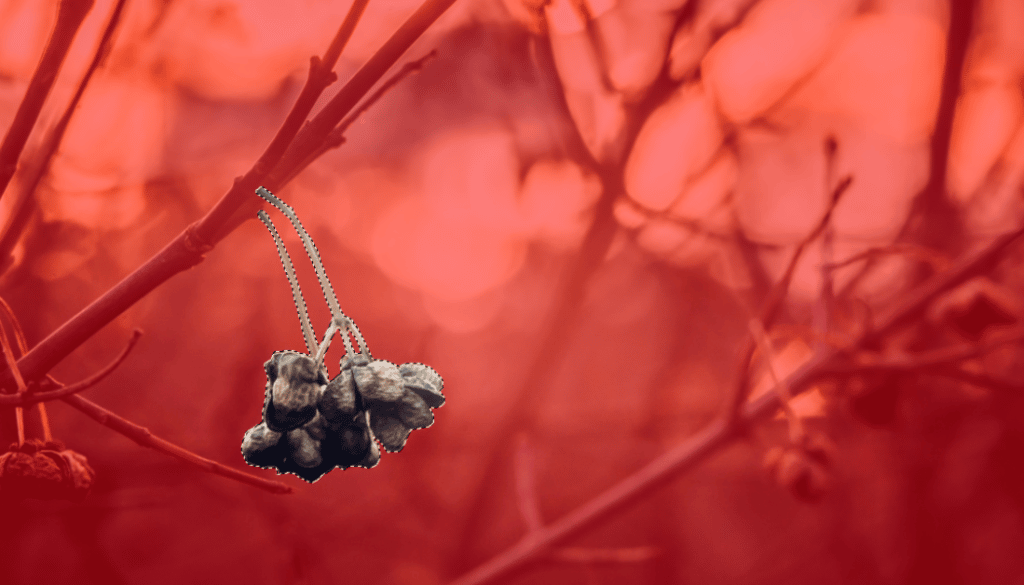
- Lasso (L)
- Polygonal Lasso (N)
- Magnetic Lasso (A)
- Magic Wand (W)
- Selection Brush (Shift+Q)
Each is a good fit for a different kind of edits. When you activate one of these tools, several settings appear in the side panel. These differ for the different tools. Note that these settings only affect future work with the selection tools—they don’t change the existing selection. The exception is the Refine Selection controls, which affect the current selection. We’ll get back to these at the end of the article.
Among the most important settings is the choice of selection modes. You’ll find these modes above the other settings for each selection tool.

To switch to a different selection mode, click its icon or use the Shift, Ctrl, etc. shortcut keys—more on that below.
- Normal mode is made for the initial simple selection of a part of a photo.
- With Add to Selection mode, you can add an area to the one you’ve already selected. (To turn on this mode temporarily no matter what mode you’re in, hold down Shift.)
- Remove from Selection mode, on the other hand, eats into your existing selection. (To turn on this mode temporarily no matter what mode you’re in, hold down Ctrl.)
- The last mode, Intersection, selects an area made up of the overlap—the intersection—between your existing selection and the new selection you’re making. You can think of Intersection as a cookie-cutter, or as the inverse of Remove from Selection. (To turn on this mode temporarily no matter what mode you’re in, hold down Ctrl and Shift.)
Selection Settings
Another setting that’s often used when you’re working with selections is Blur. It sets how sharp the selection edges will be. A higher Blur means a smoother transition between the selected and unselected parts of the picture. Important note: if the Blur is too high, then the selection loses its precision and any sharp edges become rounded, and in the extreme case, it can become impossible to make a selection, especially if the selection size in pixels is small. However, often blurring will save you from minor imprecisions in a selection.
Use Invert Selection (Ctrl+Shift+I) to make the selected parts of an image unselected and vice versa. This ability is especially useful when you want to work with a picture’s background, but selecting the background directly would be much harder than selecting the subject.
Selection Display Mode
Click the triangle next to the “arrow-and-dashed-line” icon above the histogram to choose the selection display mode.

Use display modes to get a better idea of whether or not your selection is precise enough. The default display mode is the None mode, which just shows a dashed line around the selection. Use the other modes to display the selection coverage in translucent red or blue, or just as a black-and-white mask.
If you have the selection’s Blur set higher than zero, then the blurred part of the selection fades out to nothingness, and this fading is visible in every selection display mode other than None.

To invert the selection, click the corresponding button in the right panel or press the Ctrl+Shift+I shortcut key.
Rectangular Selection and Elliptical Selection
Use Rectangular Selection and Elliptical Selection to click and drag out selections that form regular geometric shapes. Use rectangular selections for selecting objects that have a rectangular or square shape. For a square selection, press and hold down Shift after you start dragging. To set the clicked spot as the center of the selection, press and hold down Ctrl after you start dragging. Elliptical selections work the same: hold down Shift to create a circle.
The Lasso, Polygonal Lasso, and Magnetic Lasso
Use the Lasso to hand-select an area with a non-geometric outline. Just click and drag to draw that outline. Use selection modes cleverly to get the most out of this tool.
Use the Polygonal Lasso to select an area by clicking out line segments around it. Your first click in the picture sets the starting point. Each further click creates a new segment. If you make a mistake, press Delete to delete the last segment you added. To close the selection, double-click, press Enter, or click on the starting point.

The Magnetic Lasso is similar to the polygonal lasso, but it works by finding the nearest object in the picture and snapping to its nearest edges. The Magnetic Lasso is ideal for separating a photo’s foreground from its background.
Use the side-panel Sensitivity slider to set how deep into the surroundings the Lasso should seek contrasting edges. Line smoothing modifies how the selection line is bent to follow edges. The higher the value you set, the smoother the line. But be careful; with high Line smoothing, if the object’s edges are too jagged, then the Magnetic Lasso may not precisely copy the outline.

The Magic Wand and the Selection Brush
The Magic Wand selects the area whose colors, etc., resemble the spot where you click. The Magic Wand can either select all the similar parts of a picture, or only those that form one unbroken area leading to the spot where you clicked. Use the Continuous option to choose between those two options. Use Matching mode to set whether the Magic Wand seeks similar colors (RGB), brightnesses, or hues.

Use the Selection Brush for fine control over your selection. Like the Paintbrush tool, this brush has a Diameter, Opacity, Blur, and Spacing. These settings affect, in order, the brush size, how “strongly” the brush paints a selection with each touch, how sharply the brush fades out at its edges, and how much space is skipped between applications of the brush. To work with the Selection Brush, either click and drag in the picture or click repeatedly.
Refining a Selection
Every selection tool (basic selections, the Magic Wand, the Magnetic Lasso, and the Selection Brush) has Refine Selection sliders at the bottom. Refine Selection can practically be considered a separate function—it alters your selection immediately when you change the sliders. It does this by seeking out borders within the selection and intelligently refining it.
Refine Selection is very practical when you’re selecting complex areas that can’t be outlined well by hand, such as hair. The way this works is that you make a rough selection and then use the sliders to fine-tune how intensely, etc., that selection is refined.
For more details on refining selections, read our article Refine Selection: The Easier Way to Work with Hair, Fur, and Other Complex Outlines.
Moving and Copying Selections
To cancel a selection, press Esc or start a new selection in Normal mode. To move a selection, click inside it, hold down the mouse button, and move it wherever you need. To save a selection (not the part of the picture inside it, but the selection itself), use Menu > Selection > Save Selection…. This is useful when you need to edit the same picture again later.
You can also copy part of a picture (Menu > Edit > Copy or Ctrl+C) or paste what you’ve copied (Menu > Edit > Paste or Ctrl+V). Don’t forget to cancel your selection before trying to paste into another part of the same picture—otherwise, it won’t work. A pasted image automatically becomes a new layer.
Try out these tools in Zoner Studio’s 30-day free trial. They make it easy to selectively desaturate a photo, blur its background, and more.