Open New Doors in Photo Editing with Blending Modes
Blending modes are an often-overlooked tool for photo edits. And that’s a shame! Check them out, because they can offer you countless new edits that will give you very original pictures.
Blending modes are an integral part of most photo edits—everything from contrast edits to exposure edits and color toning. Each mode sets the way in which the edited material is blended with the original version of that material—how the two sets of pixels should behave towards each other.
Besides edits, you can also find blending modes for most effects as well, to set how the given effect is blended with the original photo, or layer in the photo, to which you are applying the effect.
In this article, we’ll share a couple of tips with you about how to work with layer blending modes in Zoner Studio. But this will be just a small slice of the many combinations you can create using blending modes!
How Blending Modes Work in Zoner Studio
In Zoner Studio you use blending modes both when working with layers and when working with various edits. These edits work in a sort of “temporary layer,” for which you can set a blending mode and how opaque (how visible) the edit will be. When you click Apply, that “temporary layer” is blended with the layer the edit is on.
When working with actual layers, you’ll find the Blending Mode in the right panel, in the Layers group, just above the layer list.
During edits themselves, on the other hand, you’ll always find the Mode next to the specific effect you’re applying (e.g. Curves, Grayscale, Blur, etc.). But in this guide we’ll be working more with the Mode setting for layers.
The Mode always starts out at Normal, with a layer opacity of 100%.

Zoner Studio offers you over twenty different blending modes. However, not all of them are usable in everyday practice, so here we’ll just explore a few of them in depth. At the end of the article you’ll find an info box where we briefly describe the effects of all the modes. But it’s best to just try them out for yourself.

Multiply—A Dreamy Effect
One way you can utilize Multiply mode is for a half-blurry effect that’s used for example in cinematography to depict dream sequences. In photography you can sometimes see this effect in e.g. portrait or glamour photos.
The first step in this edit is to blur the picture. The best way to do so is via Gaussian Blurring—the simplest type of blurring. It sets values for individual pixels to the average values in their surroundings, out to the radius that you set. It’s usually best to set a blurring value weak enough that it doesn’t blur away any eyes in a picture. For now, leave the effect in Normal mode and leave the Opacity at 100%. It’s best to wait and set these values for the layer itself, since that makes it easier for you to come back and change them later.

Confirm the blurring, and then choose the Multiply mode for this layer and reduce its Opacity a little. This softens the sharp edges slightly, and the photo gets a bit more contrast and darkens a little.

You can also achieve a similar effect with Darken mode, but that only draws out the darkest contours, so it gives an effect that’s more like a pencil drawing.
You can also achieve this effect using Smart Blurring. Nonetheless, thanks to Multiply mode the picture will also be a little darker and higher-contrast. Try it and see for yourself what works for you.
Screen—Custom Lens Flares
By using the Paintbrush in combination with Screen or Lighten mode, you can create various hazy effects and reflections in your photos to give them a bit more magic. With these modes active, only the bright parts of a layer will be visible. This is mainly useful when you’re adding reflections against a black background. After setting one of the above-mentioned modes, the black background disappears.

For more information on adding lens flare, read our article on how to add lens flare to photos—and why not to.
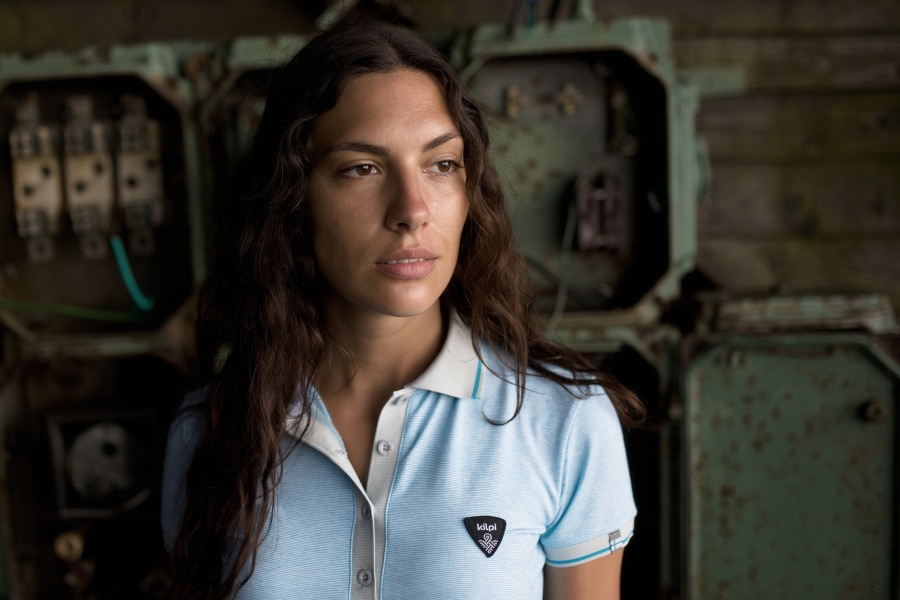
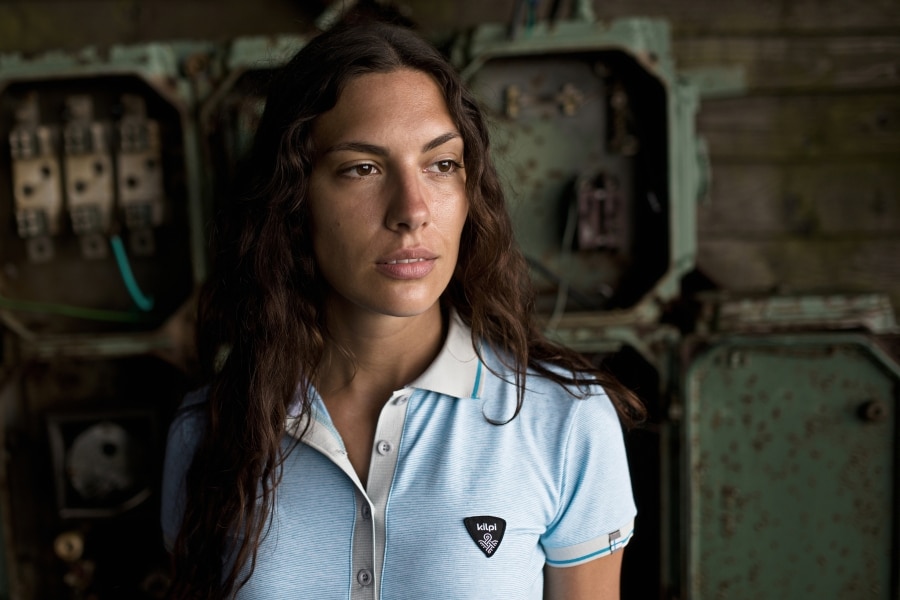
Soft Light—Adding Texture
When you want to photograph a texture of a crackly wall and place it inside another photo for added atmosphere, for example, you generally only need for the light or dark parts of the texture to be visible. A lot depends on how bright the photo and the texture are. For bright textures, it’s best to switch into Darken or Overlay. In our example case, the photo is already very dark, and so it’s better to use Soft Light.
Add the texture picture to the original picture by clicking the + Add Layer button and then Paste from File….

Then stretch the texture across the whole photo, use trial and error to find a mode that works well for the picture (in this case Soft Light), and reduce the layer opacity. You might also want to use Hard Light or Vivid Light in your own work, but in this case they would make the texture stand out too much.

Overlay—High Pass
The High Pass filter is very useful along with Overlay mode—or Soft Light depending on how strong you want the effect to be. With this effect you can effectively increase a photo’s contrast and emphasize its contours.
For example in this photo we increased the contrast using the High Pass effect.
The final picture and the original. Move the slider between the pictures to show changes. Photo: Majo Elias
For more details on high pass, see our article on the subject.
Exclusion—A Vintage Effect
Zoner Studio offers a number of useful color effects. But you can also whip up your own custom effects… for example using the Exclusion blending mode.
Toning shadows towards blue is also very popular. For this edit, you’ll need to lay a single-color surface over the whole photo. To add that surface, click + Add Layer and then Place Colored Layer….

Set a color that works for your purposes, then click OK.

Change the blending mode for the colored layer to Exclusion. This gives you an effect where shadows are tinted blue and lights towards the inverse—yellow.
That creates a vintage effect. Use the Opacity setting to set how much this effect will stand out.

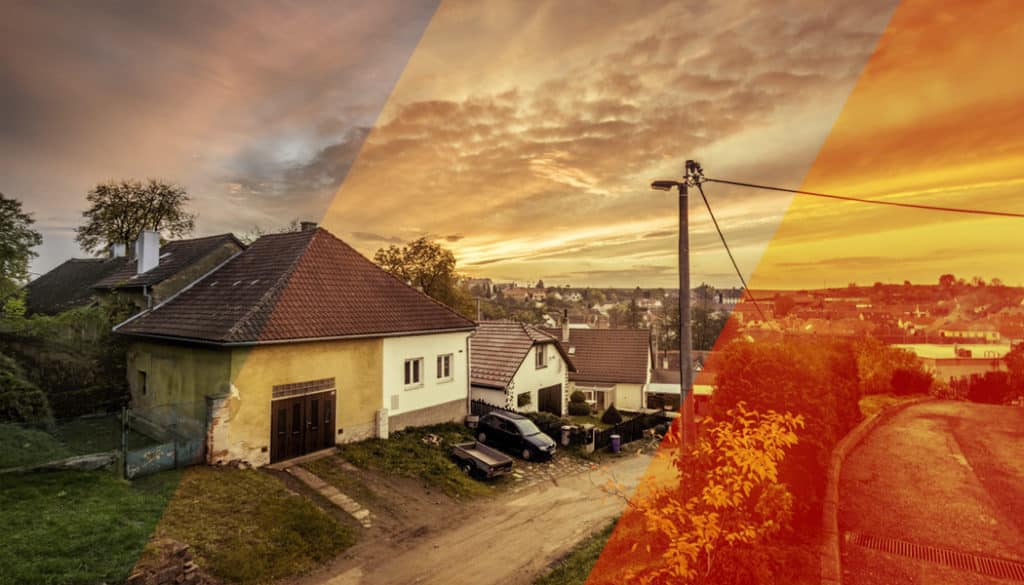
Color—Toning Towards Warmer Colors
Color is another useful mode. Use it in combination with the Color Toning function to create any color combination you happen to need. This edit is handy for example when editing sunset photos. Shifting their colors towards warmer tones make them even more “sunsetty.”
Use the Gradient Map effect for this one.

Duplicate the layer, and in that duplicated layer use Gradient Map to create a red-to-yellow gradient. That will push shadows towards red and lights towards yellow.

Confirm the edit, give the layer the Color blending mode, and reduce the opacity. This leads to something like a halfway-sepia coloring in the vivid warm tones.

So Many Possibilities
By exploring blending modes, you can discover all sorts of new editing possibilities through trial and error. So don’t be afraid to experiment and find out how the different modes interact with different edits.
There are endless fascinating effects out there just waiting to be discovered!
Every mode is worth a mention, so here’s just that:
Normal mode doesn’t do anything special; it just makes your changes replace what’s “underneath” them.
Darken mode only shows dark areas. It’s useful e.g. for replacing skies.
Multiply mode shows dark areas, while darkening more than the Darken mode.
Burn mode darkens every color but white using contrast.
Linear burn darkens every color but white by lowering contrast.
Lighten shows only light areas and is useful e.g. for removing black backgrounds.
Screen only shows light areas, and is more sensitive than Lighten. This mode is useful e.g. when you want to add lens flare to a photo.
Dodge lightens colors by decreasing contrast.
Linear dodge lightens colors by increasing contrast.
Overlay multiplies or screens colors depending on the basic color.
Soft light mode increases contrast.
Hard light mode increases contrast more strongly.
Vivid light darkens or lightens colors by changing contrast based on the new image.
Linear light is like a combination of Linear dodge and Linear burn.
Pinlight replaces light colors only.
Difference mode subtracts colors from each other based on their brightness.
Exclusion mode is the same as Difference, but with less contrast. It’s useful for creating a vintage effect.
Negative mode makes the blended layer serve as a negative of itself. You can use it for example to change black-and-white images to white-and-black.
Hue mode changes saturation and lightness based on the blended layer.
Saturation mode changes saturation based on the blended layer.
Color mode covers the bottom layer with the blended layer’s color, without changing contrast or lightness. This mode is useful for creating all sorts of colored effects.
Lightness mode changes the lightness of the colors in the blended layer. With this mode you can brighten the colors in a photo or suppress its lights.
