Turn Any Photo Into an Instagram-Style Pic in Three Easy Steps

It’s an irony of our digital age that we use the latest imaging technology to make our photos look as if they were taken with an ancient camera. But who are we to argue with progress? The truth is, Instagram is a photographic phenomenon and its boxy, filtered photos are deeply embedded in our culture. More than that, there are dozens of services popping up that can transform Instagram images into magnets, wall art, stickers, and more — all with the unique look that only Instagram photos provide.
Or not.
In fact, with just a little bit of work in Zoner Studio, you can turn any digital photo into an Instagram-style pic. And don’t worry, it’s easy. Here’s how. Before we start, though, it’s important to remember that you should always make a copy of your photo before you apply any edits. This way, if you foul something up and need to delete the photo, you’re not trashing your only copy. Ok, here goes.
1. Find the right kind of photo.
Not every picture is a perfect fit for Instagram since, as you’ll see below, you’re going to have to crop and/or resize it to have the photo fit square dimensions. An Instagram-worthy image will have your subject front-and-center in the picture. You’re going to be shaving off the edges of your photo, so you’ll want to make sure you’re not losing anything important in the process.

2. Crop and Resize.
One of the things that make Instagram unique is the aspect ratio of the image (i.e. its vertical and horizontal dimensions). Unlike traditional photos, which are shot in 4:3, Instagram photos are square, so the sides are symmetrical. Chances are, you won’t simply be able to resize a traditional photo properly, since the resizing process can warp your subject, but you can try first before cropping.
Working in the editor, simply select “resize” and you’ll see a window on the right rail with height and width. You’ll need both measurements to match (i.e. 300 x 300 not 300 x 250) to get the square shape we’re gunning for. Be sure to uncheck the button “keep proportions” when you resize, otherwise Photo Studio will adjust the size of your picture to keep the dimensions proportionally consistent.
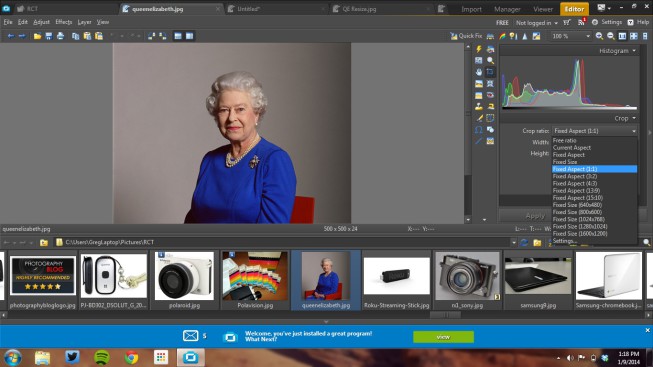
Chances are, this won’t result in a pleasing picture so you’re going to have to crop. Photo Studio makes this cropping quite simple. When you select crop, you’ll have the option to choose a “Crop ratio” in the right rail from a drop-down menu. You’ll want to choose Fixed Aspect (1:1). This will keep both the height and width the same size — exactly what you need for Instagram dimensions. It doesn’t matter how much or little you choose to crop from the photo at this point, just keep in mind that the smaller your crop, the smaller any resulting printed object will be, since you’ll have less resolution to play with.

3. Apply filters.
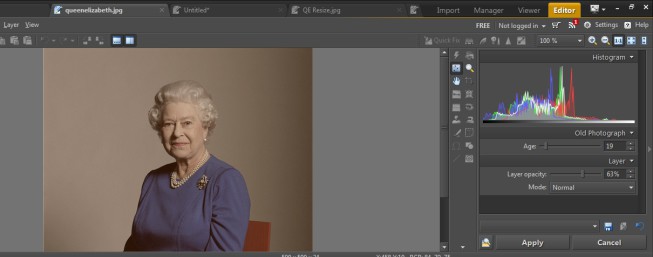
The most popular Instagram filter (for now) is “Early Bird” (examples here) which gives images of a faded Polaroid/orange-yellow cast. In Photo Studio, the closest match is the Old Photograph filter. Simply select that, hit “apply” and you’re done. Or, you can further tweak the filter to suit your taste by adjusting the “age” (younger reduces the strength of the filter) and opacity of the filter. The opacity slider will help restore some of the colors that may get washed out by the filter. You can fine-tune this even further by selecting the “mode” drop-down, where additional filter effects can be found. You may find you need this fine-tuning to get a closer match to Instagram’s style.
(Top image: Beverly & Pack)