What’s So Great About RAW?
Have you ever wondered on Earth you should shoot to RAW files? After all, they’re huge, and they have to be developed on a PC before use. Today we’ll look at some areas where RAW has the upper hand.
From time to time you’ll hear that you should be using RAW instead of the regular JPEG format. The difference between them is that while JPEGs contain normal pictures that have been developed in-camera, RAW files contain only “raw” data—a record of the signals emitted by the sensor chip, which needs to be processed before it becomes a picture. In short, RAW is not an acronym; RAW means this is raw data.
One giant advantage of RAWs is that they contain more information than normal JPEG images, and so you can make major edits to RAW pictures during development without reducing their quality. And what’s more, in some cases RAW can even help you rescue a picture that would otherwise be too light or too dark to save.
Let’s take a look at a few examples of where RAW conversion (sometimes called RAW development) is advantageous.
Blowout
In my mind, this might be the biggest plus. When you are photographing a high-contrast scene, for example one with a bright sky, a JPEG output will often include a large area that all runs together into 100% white. Since there are no differences at all between the pixels in this area, there is nothing you can do with it. Darkening the picture will just make the all-white area all-gray. But for RAW files, darkening can often uncover detail that was never missing, just invisible:
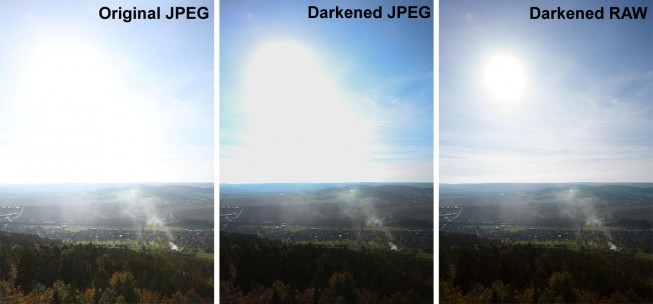
Canon 5D Mark III, Canon EF 16-35/2.8 II, 1/125 s, F8.0, ISO 160, focus 27 mm
Even with RAW, there are limits to darkening. The exact limits vary from camera to camera. But generally you can darken by up to about 1 EV and still have a good-looking picture. So even if you used 1/100 s instead of 1/200 s, your picture will still probably be savable.
White Balance
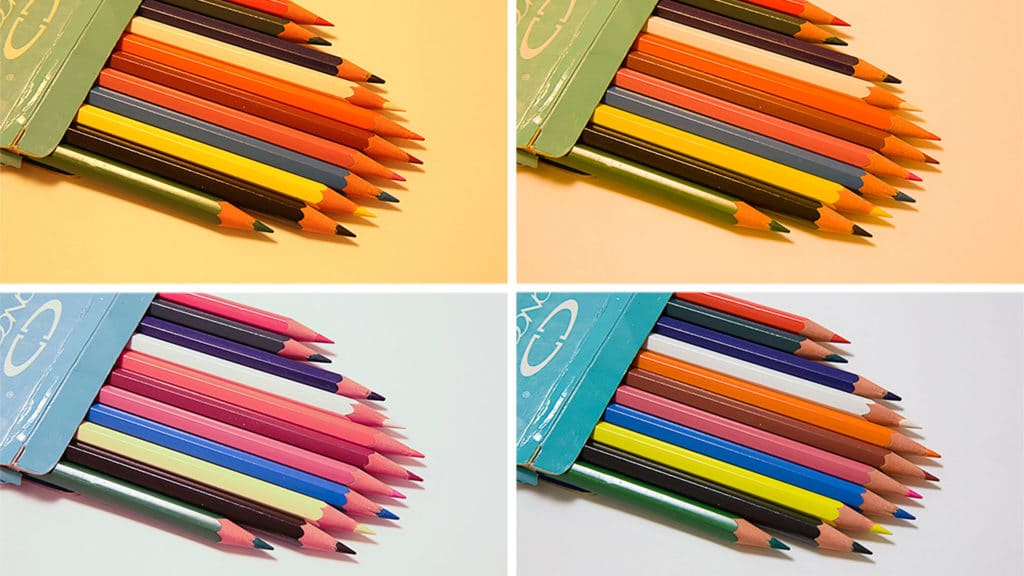
This is another major RAW advantage. As unintuitive as it sounds, white balancing can also cause data loss. When you’re shooting to JPEG, this adjustment is made right in the camera, and if it’s made badly (manually by you, or automatically by the camera), any correction you make on your PC later will mean lost quality.
For RAW output, no in-camera white balancing is applied at all. The camera merely gives information on what settings the camera would use if it did apply white balancing. You can use them if you wish, or use different settings at your leisure.
Here’s an example of damage while fixing white balance:
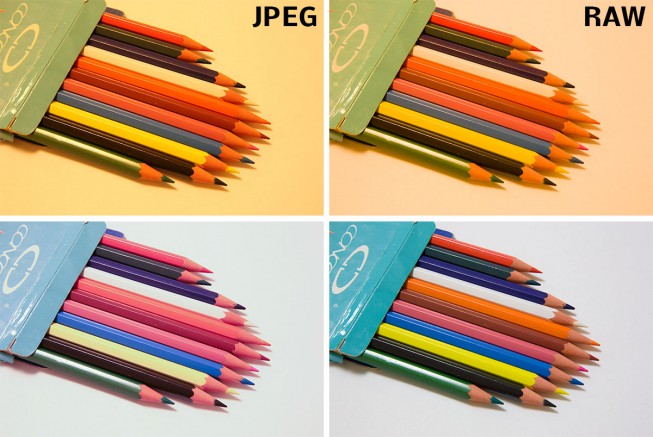
Canon 5D Mark III, Canon 24-70/2.8, 1.0 s, F18, ISO 200, focus 58 mm
Even after correction, the JPEG’s colors are washed-out, reducing the photo’s impact. With the RAW there’s no problem; white balancing on a PC does not reduce its quality.
Control Over the Details
Let’s say you’ve accidentally shot a picture too dark, or with too wide a range of lights and shadows. In any case—a photo where part or all of it needs to be brightened.

Canon 5D Mark III, Sigma 50/1.4 Art, 1/200 s, F10, ISO 400, focus 50 mm
This time for the results of the edit, I’m providing a complicated picture that will need some explanation:
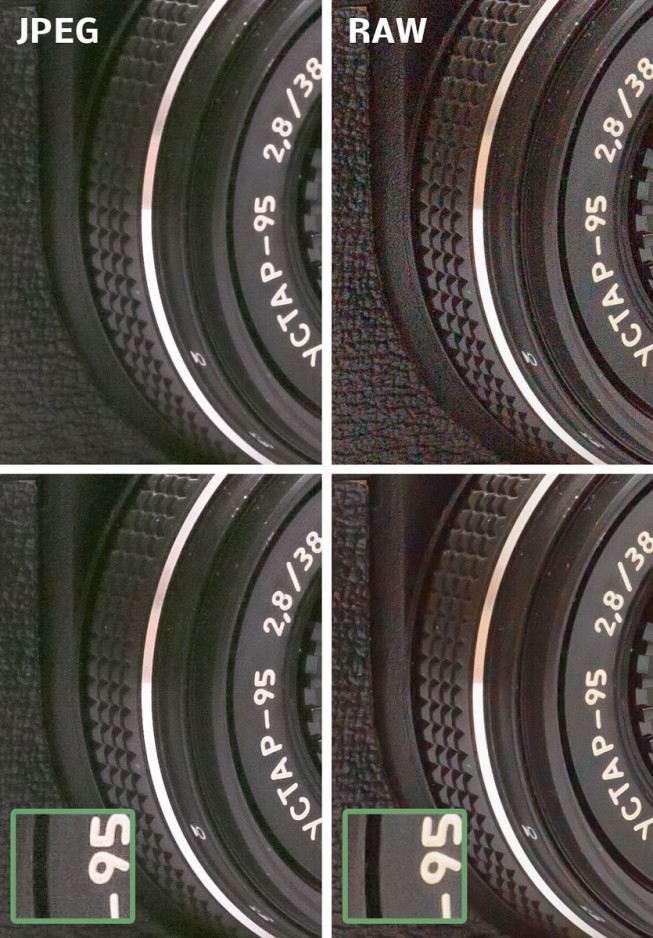
The closeup of the brightened JPEG at the top left shows no noise, but it is blurry, even though I tried to turn off noise reduction. The RAW file, developed with standard settings and brightened (top right) does have noise, but it is considerably sharper. You can precisely choose how to balance noise reduction against sharpness… and you have the option of using different strengths for them in different parts of the picture. The final RAW-based picture can look e.g. like the one at the bottom right. (Unfortunately there is some red moiré here—perhaps a problem of this particular RAW conversion.) JPEGs can also be sharpened and de-noised, but you will be starting from less detailed data, and your edits will uncover the flaws of JPEG compression, so even your best efforts will probably contain unsettling digital noise (bottom left).
Editing at Top Quality
Technically speaking, this is just the previous point phrased differently. In the RAW format, colors are stored with greater precision, which today reaches up to 14 bits for each of the R, G, and B color channels, and so in theory a RAW picture can have for example up to 16,386 shades of green. JPEG pictures, meanwhile, work with 8 bits per channel, so for example just 256 shades of green. Any shades inbetween need to be rounded up or down.
If you make any major edits after that, this difference can become quite noticeable. Clouds are a classic example. They contain sufficient detail overall, but it’s in shades that are very close together, so you need to strongly increase contrast and do local sharpening:

Canon 5D Mark III, Canon 16-35/2.8 II, 1/250 s, F8, ISO 100, focus 33 mm
This detail shot shows the advantage of RAW over JPEG quite clearly:
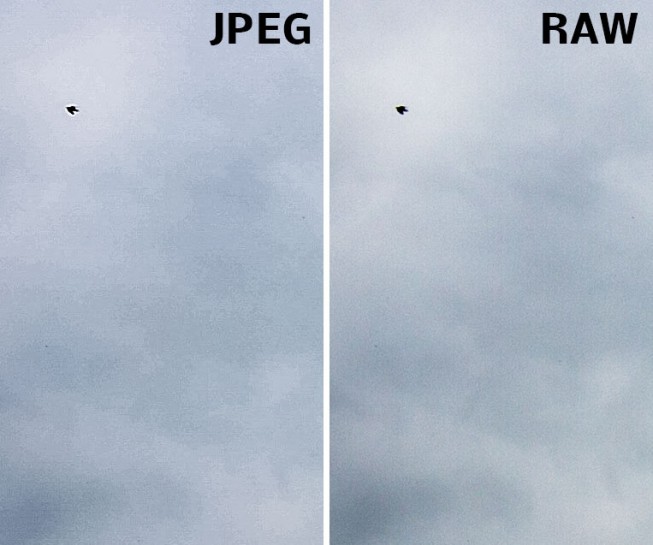
Of course in both cases here we are now getting noise, which we can potentially remove. But notice here that processing the JPEG has also given us strips of a single color where the RAW still contains a smooth gradient.
Correcting Lens Defects
Some RAW converters contain sophisticated profiles for specific lenses (often in combination with a specific camera). You can use these profiles to make a converter automatically repair common defects, or to help with manual fine-tuning.
Here we should mention that you can do similar edits with JPEG files too. But as described above, you’ll be hurting the pictures’ quality, not to mention the fact that profiles for fully automatic edits are usually only available for RAW development tools.

In the illustration above, you can see corrections of three defects:
- barrel distortion (note how the lines on the left are curved, not straight)
- vignetting, i.e. darkening in the corners
- chromatic aberration (look for the hints of violet and green on the left)
Some cameras can, at your request, make these corrections on their own. However, that removes your freedom to make more precise manual corrections—every individual lens has slightly different parameters, and so you might need slightly different edits.
RAW Also Brings Disadvantages
As with everything, RAW has both benefits and costs. In this case, the cost is that you always need to do at least a little PC processing, and so you can’t share your pictures immediately on, say, Facebook. RAWs’ file size—several times larger than normal—may also pose a problem for you. Last but not least, you need to use RAW development software. Zoner Studio, with the DNG converter aiding RAW development is a great option here. But keep in mind that when you buy a new camera, its RAW files may not yet be supported by any converter at all—not even the DNG converter.
Despite all this, I fully recommend using RAW, and I recommend reaching for it whenever you want your photos to be the best they can be.