Put an End to Red Eye!

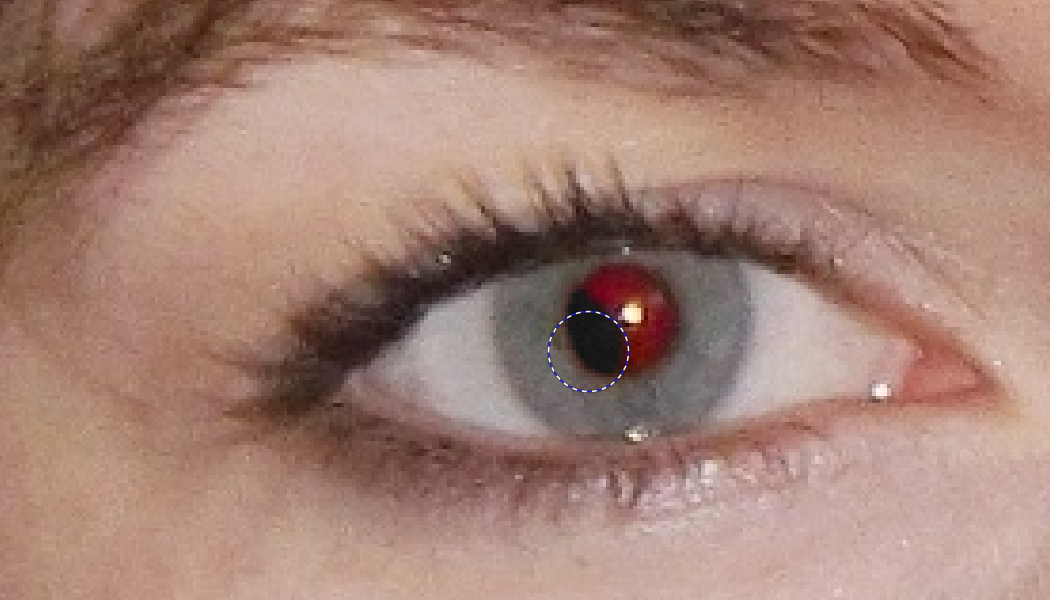
At first glance this night photo might seem OK. But when you look closer, you’ll see that the subject has a red gleam in their eyes. How can you get rid of this ugly effect? With Zoner Studio, it’s easy!
The easiest way to prevent red eyes is to avoid using your camera’s internal flash. But that’s probably not the advice you were looking for! So let’s take a look at how to get rid of this defect.
What Makes Red Eyes Red?
Let’s start with some theory. The red-eye effect occurs when a strong beam of light, such as a flash, is pointed at a person’s eyes at almost the same angle as the camera lens. Their pupils can’t react fast enough to the large influx of light, and their retinas reflect it back into the camera lens.
There are many ways to prevent this reflection:
- Use a pre-flash, if your camera lets you.
- Add natural light—then your subject’s pupils will be narrower, preventing the reflection.
- Place your light source farther from the camera.
- Explain to your model that they should look away from the lens.
Get Rid of Red Eyes with Zoner Studio
Let’s take a look at an example. I took this photo in a darkened room, and so my subject’s pupils stayed dilated during the shot, and their retinas, in turn, reflected the light coming in from the flash.
To eliminate the red eye effect, you need to open Zoner Studio’s Editor module. In the main toolbar in the right panel, click the Red Eye Reduction button, marked with an eye icon—or press the R key.
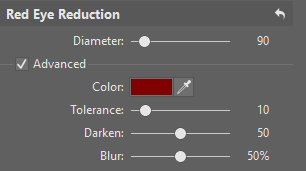
This tool starts out in Automatic mode. That mode doesn’t offer a lot of options, but it’s easy to use. Aim at the red spots in the eyes. Set the Diameter so that it just fits the photographed person’s eyes. Then click on their pupils, and the red color will disappear.
For more precise red eye removal, turn on the Advanced controls. Here you’ll find a color picker and three other controls. The Tolerance sets how broad a range of red shades is considered as red. Usually you don’t need to change this. To “soften” the removal and prevent unnatural-looking pupils, lower the Darken value. Blur, meanwhile, controls how smoothly or sharply the effect fades in around the edges. For better detection you can choose any specific color, which does not even have to be a shade of red. This is mainly useful for animal eyes.
Here we’ve slightly widened the automatically selected area and raised the Darken value a bit. Check for yourself how the person’s eyes looked before and after our edit.
Recommendations
The red-eye effect appears when your subject’s eyes contract too slowly. Because of that, it shows up the most often in children and in people under the influence of alcohol. But also in animals. Think about the last time you saw a deer at night from your car. Their eyes were shiny, right? Your camera’s flash works the same here as your car’s headlights. So you’ll also appreciate this feature for animal eyes. Just use the Advanced settings to set their color.
Try to fix the red-eye effect on your own photos. Just download Zoner Studio now and try it for 7 days for free.


