Diffraction: What It Is and How to Avoid It

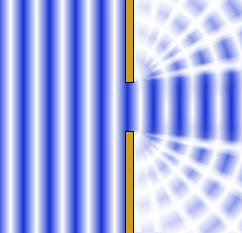
Diffraction, that is, the bending of light, is a problem that’s encountered by many photographers. But they often don’t even realize it. Meanwhile, diffraction can make your photos lose sharpness. And that’s something that most photographers want to avoid. So it’s good to know what causes diffraction and how to avoid it—and also how to take advantage of it.
When you’re starting out in photography, it’s easy to think that raising the f-stop all the way up to f/22 will give you maximum sharpness. But that’s a mistake—and that’s because of diffraction.
The reason here is that at values this high, the aperture blades are shut too tightly. The light then bends around their edges and is diffracted beyond them into their geometric shadow. Although the picture is sharper overall, its details are softer and lack visibility.
Meanwhile, diffraction is easy to prevent. All you need to do is use lower f-stops, for example in the f/4–16 range.
But every lens’ diffraction boundary is different, and it’s good to know where that boundary is. Luckily, you can find the ideal aperture for your lens via a simple test in which you photograph some object that has fine details.
Which F-stops Are Safe?
Take the lens whose diffraction-free range you want to find and mount it on your camera. Fasten the camera to a tripod, set it to aperture priority (the A or Av mode), and focus on an object with fine details—for example the label on a bottle.
Then take a series of pictures with the same focus but different apertures—from the minimum out to a maximum. For a Sigma ART 18-35/1.8, for example, that will mean pictures in the f/1.8–16 range.
Open these photos in Zoner Photo Studio, zoom in to 1:1 (100%) view, and examine them. You’ll see that they’re not all equally sharp.
There are two things about your lens that you’ll learn from this simple test:
- The f-stop that gives the sharpest pictures.
- The f-stop where your pictures begin to lose sharpness.

At an aperture of f/1.8, the text is sharp and high in contrast. Meanwhile at an aperture of f/16, where the shutter blades are nearly closed, there’s visible diffraction. A mild glow effect and blurring of the text appear.


Taking Advantage of Diffraction
Since diffraction reduces a picture’s detail, you’ll usually want to avoid it. But there are some situations where you can take advantage of it as an interesting creative element.
For example, to take night photos with lights that have stars around them, use diffraction. Just raise the aperture until it appears.
You can also use this approach when you’re photographing the Sun, to give it visible rays. Photos like these make really make the Sun start looking like a glowing star.
To give a picture like this a sharp foreground with no diffraction, take two shots. One with a higher f-stop to get the star effect, and one at the f-stop where you have the most detail. Then join those shots into one picture in Zoner Photo Studio using layers.

Diffraction is a word that you’ll encounter in the world of photography more often than you might think. Whenever you hear it, think of the picture above. It’s probably the best and most understandable explanation you’ll find for this complex, physics-based phenomenon.
There are no comments yet.