Focus on Flowers!

Every year when the warm sunrays start waking nature up from its winter sleep, I can’t wait to head out again to meet spring’s first flowers. On two wheels or maybe two legs, but always with a camera. I go straight for the places nearby that are known for having early spring flowers. I hope that you too take the chance this year to get out and photograph nature in the spring. Before you do, read today’s article to learn some flower photography tips, as well as what to take in your backpack.
Flowers can seem like a simple subject. You just go up to the flower and—snap!—right? Well, almost, but not quite, if you want worthwhile pictures. So I’ll try to at least briefly summarize my experiences here and highlight the possible pitfalls you can encounter when photographing flowers from close up. I deliberately avoided the phrase “macro photography” above, because I don’t want to restrict flower photography to just that. You don’t always need to shoot from that close up. Note that my tips are for the general public; I hope that any experienced photographers reading this will forgive my deliberate simplifications of the topic.
Canon EOS 100D, EF-S 18-55 lens, 1/80 s, F6.0, EV compensation−1/3, ISO100, focus (EQ35) 50 mm.
Do I Have the Right Camera for This?
That’s the first question you should be asking here. The cliched advice to give here would be to use a fixed macro lens. But I will take the liberty of saying that you almost certainly can make do with nearly any ordinary lens… though you will want a long (zoom) focus and a good lens speed. I’ll write the reason for that last bit shortly. The only likely downside of a cheaper camera is lower image quality than you’d have with a better lens. But either way, you want to be prepared for the technical specifics of flower photography.
One more thing. Even though I believe that the joy of photography is as important as technical perfection, please, please don’t photograph flowers using your phone. Its lens really is a bit in the wrong league for this work.
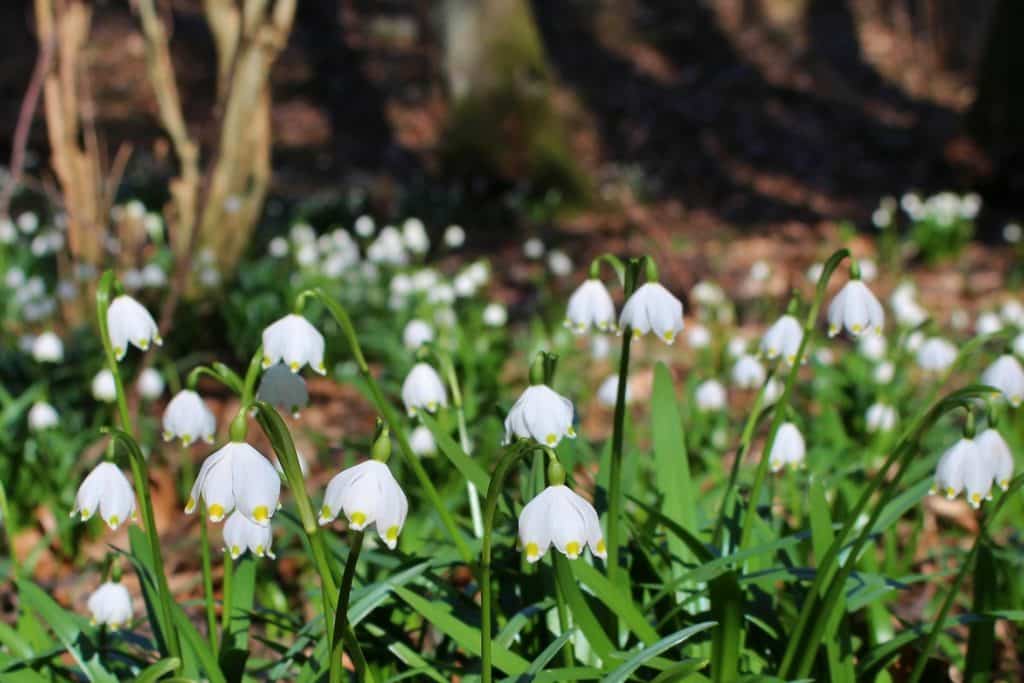
A Fragile Grace
Spring flowers are usually small and light. That leads us to the first problem in photographing them—the wind. Even though they grow low to the ground, even a light breeze can bend flowers, especially in open areas. That’s the last thing we need, since we’re shooting from close up, usually with a low depth of field, and so motion can easily blur fine details.
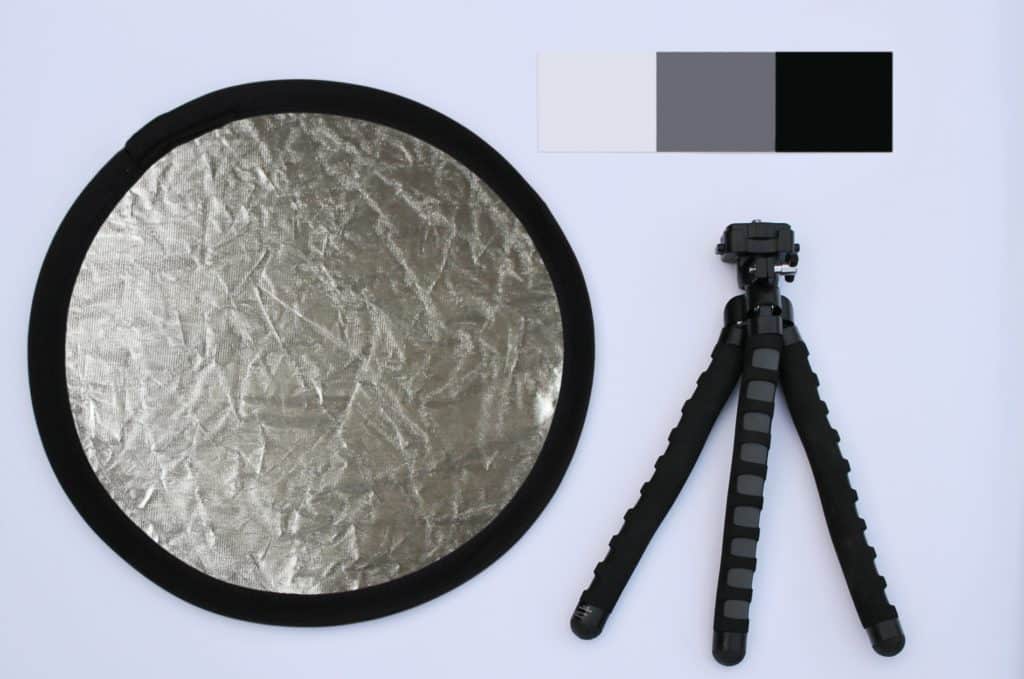
That’s why I recommend bringing something to stop the wind—ideally some white translucent material. A small firm plastic sheet fastened to two or three small posts is fine. Colored and opaque backgrounds are both poor choices, as you’ll see below. For similar reasons, you should avoid shooting without a support, and should use either a remote trigger or delayed exposure. Both elements—the support and the wind-stopper—are equally useful when photographing tree flowers; the only difference is that the support will be bigger and that the wind-stopper will need to be held by an assistant. Since flowers are so low to the ground, what I mean here is a small tripod/monopod with adjustable height, hardy enough to support a heavy camera if you have one.
The Sun and Shade
Spring flowers grow both on the meadows and in the forests. So you may be working in deep or mild shade, or right out under the sun. Both extremes have their problems, but they’re solvable. When shooting in shaded areas, you can use a reflector sheet to direct diffuse light at areas in shadow. The ideal is a white or silver sheet that does not shift the colors of the photographed object. A very compact small sheet with a 40 cm diameter is enough. The reflector sheet will also help when you place the camera too close to the photographed object. Doing this can throw the scene into shadow; in that case, you use the reflector sheet to add light to the darkest places. Speaking of shadows, your easiest work will be on cloudy days, as they give even light and soft shadows.
Don’t Be Afraid of Underexposure
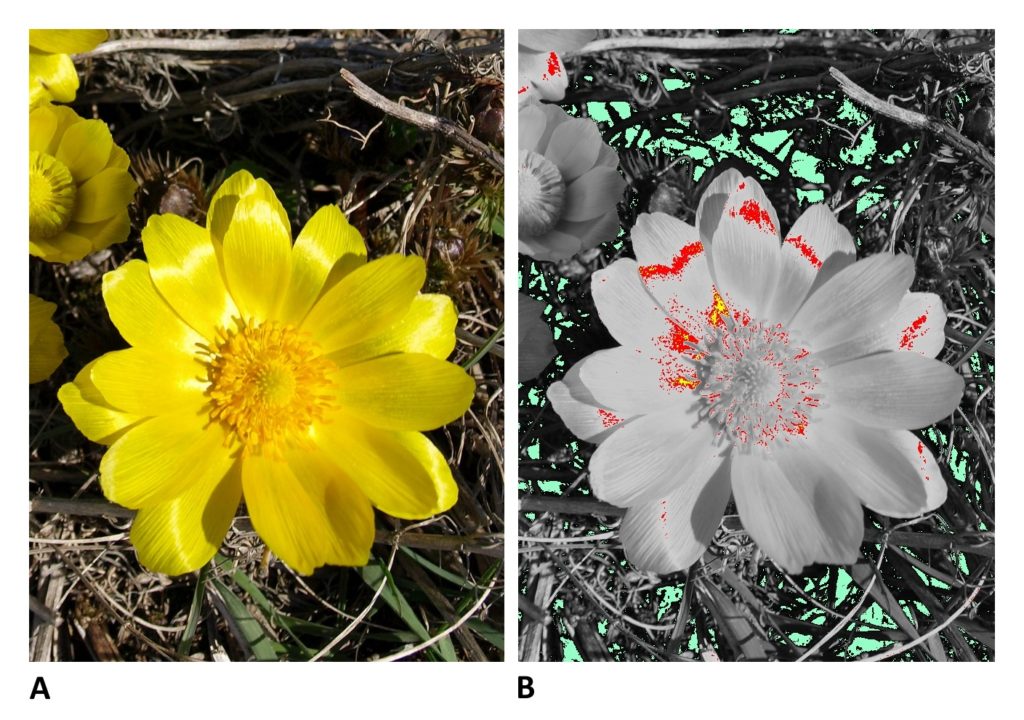
In bright daylight you need to try to avoid the blowout problems that come so easily for bright flowers and leaves. Blowout—overexposure—will mean lost detail. That’s bad even if it’s only in a single color channel. So you should watch exposure carefully using the histogram and preview on your camera display. I recommend underexposing your pictures, compared to what the exposure meter recommends, by up to a whole f-number.
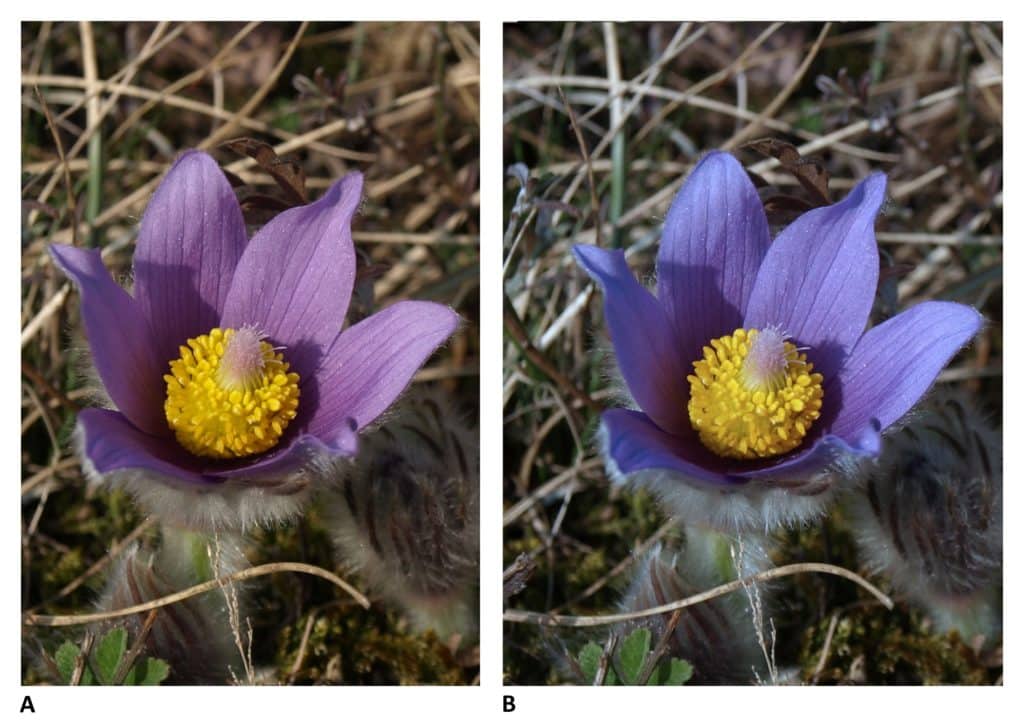
Even when you expose a photograph exactly right, you the time of day when you take it can come into play. You probably have already heard of color temperature and white balance. If you want faithfully colored flowers, you’ll need to set your camera’s white balance correctly. While this is especially true for white flowers like snowdrops and snowflakes, it’s also true for other flowers. For example, the shades of the violet pasque flowers can vary widely (so there’s no one single reference shade to go by), and meanwhile color temperature also influences their final color in a photo. So for correct white balance with these I use a gray card, so that a can set white balance on the camera or later fine-tune it based on a reference photo taken on-site.
Olympus E-510, 14.00–42.00 mm, 1/100 s, F7.1, EV compensation −0.3, ISO100, focus (EQ35) 28 mm.
Another accessory that’s good to have with you when photographing flowers is a polarizing filter. It will help you get better scene contrast and eliminate the reflections that can so easily show up in a flower photo’s subject or background. But polarizing filters also have their “buts.” Under certain conditions, these filters can raise contrast very visibly and influence color temperature. (Photos will have warmer-than-life colors if automatic white balance is used.)
Drive Carefully
Neither nature nor equipment can help if you don’t have your own composition and creative approach. Early spring flowers always grow in huge quantities. So skip past the average flowers and photograph the best. Use a good background, and take time to prepare the image. Backgrounds, by the way, are something that’s often forgotten about. Even though you’ll often be using a low depth of focus and blurred backgrounds, keep in mind that bright flowers look best against dark backgrounds and vice-versa. Remember the basic rules of composition and how to observe or deliberately break them, and think about the very real issue of whether to keep things natural or dress up the scene. Obviously anything downright distracting, such as objects in front of a flower, needs to be removed from the scene. But I’d recommend not adding elements around flowers. In my opinion the most boring spring flower photos come from carefully tended flowerbeds.
There are also some other ways to get creative within this little genre. Spring flowers are tempting for insects, and a bee or a beetle adds life to a picture. However, you need to capture the insect in an appropriate position and place. Also remember that it will be on the move—choose your exposure speed accordingly. Dewdrops after spring rains can also look pretty on flowers and leaves. If you’d like to force the matter a little, bring a water sprayer for houseplants along, and you can easily simulate the dew after the rain. Here too it’s all a question of how authentic you want your photos to be.

Olympus E-510, 14.00–42.00 mm, 1/60 s, F5.1, no exposure compensation, ISO100, focus (EQ35) 62 mm.
Choosing a Lens
Don’t worry, I know this may be the most important thing of all. I haven’t forgotten it.
Having a nice long and fast lens is important for getting good results when you’re manipulating depth of focus. Combine a long lens with a low f-number or your camera’s macro mode to create a blurry background and let the flower itself shine through. Or don’t—it’s not always a good idea. When I want to show a flowers within its environment, rather than just one single bloom from across the scene, I prefer to use a little more depth of focus to capture the broader context.
I should also mention focusing itself. Don’t forget that, depending on how long your lens is, you may need to step back a bit, even a few dozen centimeters. Not every lens will let you “glue yourself” to a flower and still get good focus—that’s just the way optics goes.
To focus well when you have a low depth of focus, you will also need to set your focus points correctly, especially if you are not composing to the center. If you leave the focus on automatic and shoot from a tripod, you might not get anything in focus at all. If your camera doesn’t enable you to set focus points, then all you can do is experiment.

Olympus E-510, 14.00–42.00 mm, 1/160 s, F8.0, EV compensation −0.3, ISO100, focus (EQ35) 72 mm.
Back Home to Edit
Last but not least, I need to mention digital photo edits on your computer. It may seem premature for me to talk about processing photos when you haven’t even taken them yet, but it’s not. When you think about how complicated it is to take a picture that works—well, it’s clear that you want a format that reduces that complication. If you want a photo that really shines, then strongly consider saving the pictures you take to RAW. Working with RAW files improves your work with exposure, color, the scene’s dynamic range, sharpness of detail, and noise compared to when you shoot to JPEG only. I don’t mean to say by this that JPEG photos are unusuable—just that you don’t get as much “bang for the buck” with them.
Even great photo editing software—even Zoner Photo Studio!—is no good when your picture is lacking information; there’s no way to squeeze that information out of it after the fact. So one way or the other, if you have time, make sure to experiment when taking the picture. If you’re unsure of yourself while taking a shot, then just take another and another, at different exposure levels and with different camera settings and composition. Pick out the best shot later in peace and quiet on your computer. You can always delete the bad shots—that’s an advantage of digital photography—but you usually can’t go back and take the shots you didn’t take.
A.Alim
So Nice Picture
Zoner
Thank you! Do you have any of your own? :)
Michael Rhodes
Good advice. I read this AFTER I took a weekend trip from the Dallas, TX area to the “Hill Country” of Texas looking for wildflowers to take pics of. I’m a newbie, just got my first DSLR camera about six months ago (Canon Rebel T3i), and took the pics with my two kit lenses. If you’re interested, here’s all the flower pics I took, experimenting the the manual settings. https://rhodesmk.zonerama.com/Album/630042.
Thanks for the article.
Zoner
Wow, nice wildflower area! :) And some of the photos are good too. Our recomendation is to choose carefully how many pictures you share – try to figure out which are the good ones (and why) and just pick the best pieces. If you use Zoner Photo Studio, use labeling and rating in Manager, it could help.
We’re glad you like our article and keep photographing! :)