How To Merge HDR Photos in Zoner Studio
Do you shoot landscapes but find the sky is either blown out or hidden in shadows? The solution is HDR—merging multiple exposures into one balanced photo. In this article, I show you how to easily create HDR images in Zoner Studio, when exposure blending makes sense, and when tone mapping is the better option. I also share tips for taking the right source photos.
In this article, you’ll learn:
- Which scenes are suitable for HDR photography
- How to shoot a series of images for merging
- The two HDR methods in Zoner Studio—Exposure Blending and Tone Mapping
- Which settings to use and what they affect
- How to save your results and when it’s better to fine-tune them in the Develop module
- How to choose between the two methods so your photos look natural
In this article, we’re referring to the “classic” meaning of HDR: combining photos with different brightness levels in a way that can be printed or displayed on any monitor. The composite is technically SDR (Standard Dynamic Range), but contains details from all the images used.
Another option is True HDR photography, where the file actually contains full information from the darkest shadows to the brightest highlights. The problem is that without a modern HDR display, most people won’t see the difference— and forget about printing.
Scenes suitable for HDR photography
You don’t have to merge multiple exposures every time. Often a single shot is enough. Other times, more exposures would help, but the scene is changing too quickly to combine photos taken even fractions of a second apart.
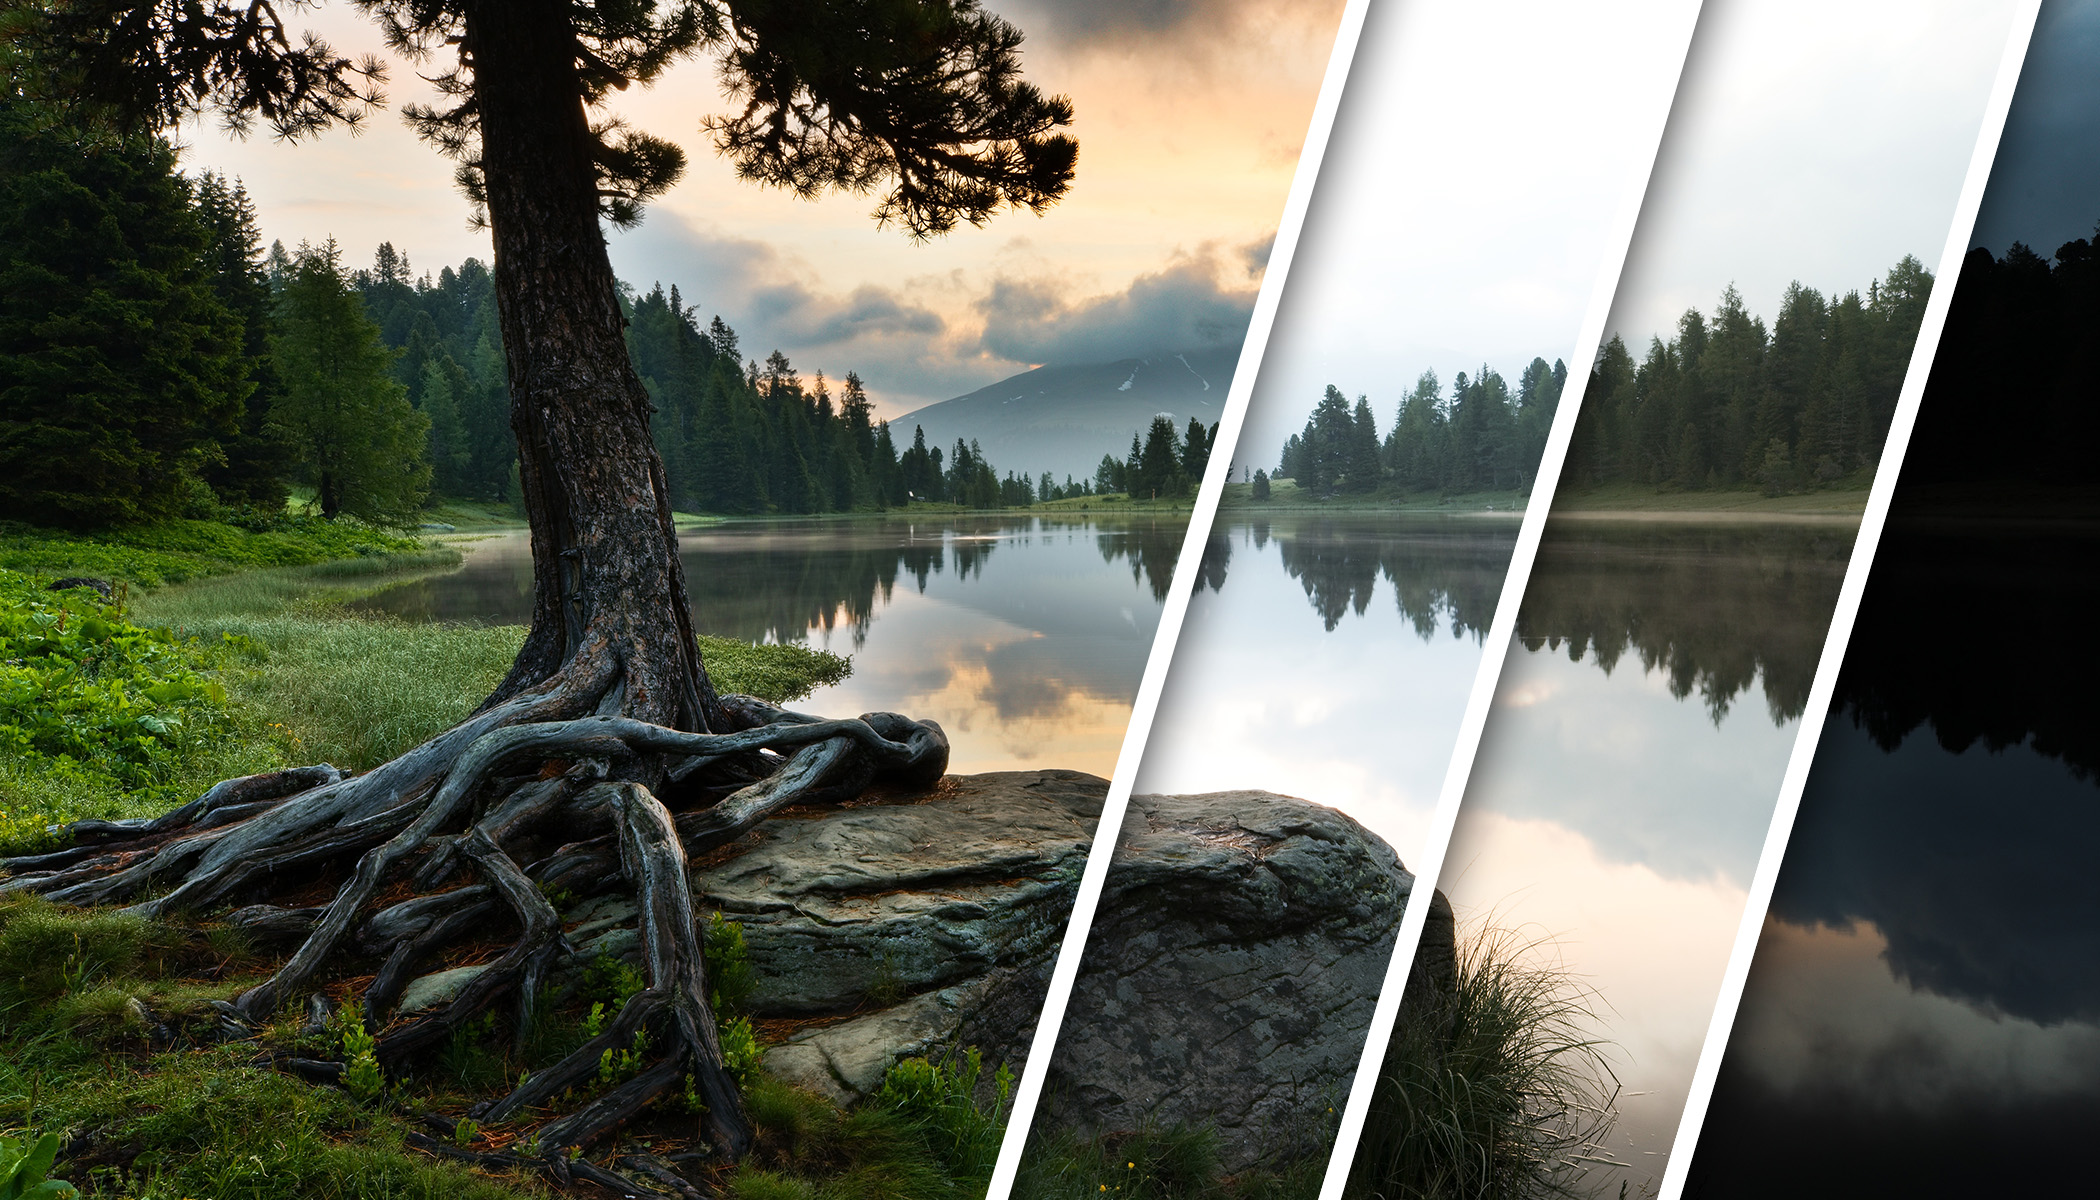
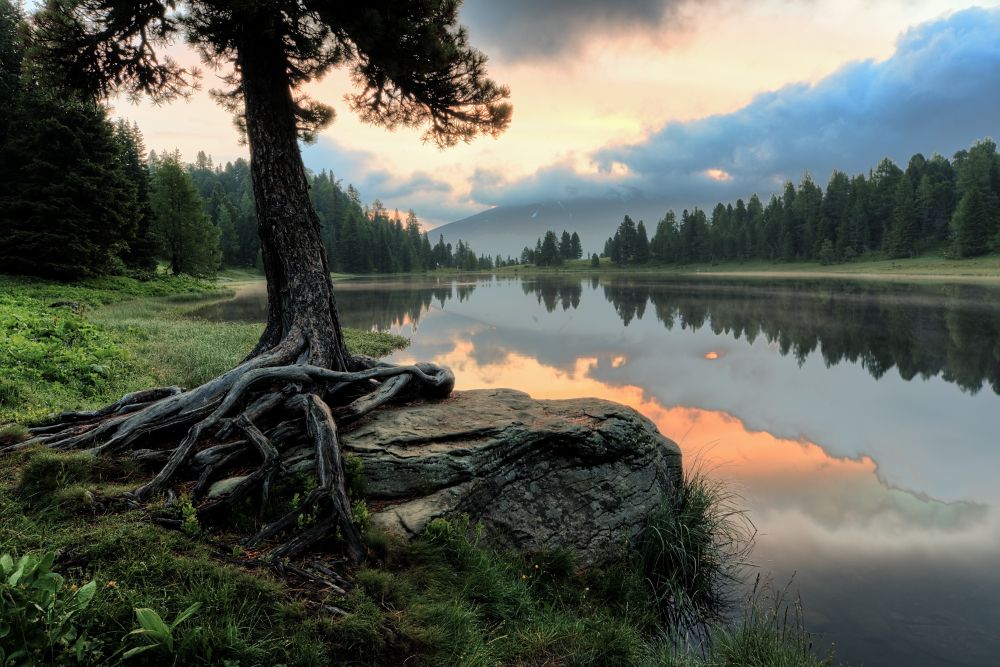
The best candidates for HDR processing are usually landscapes or cityscapes, especially at sunrise or sunset.

How to capture the right images for HDR
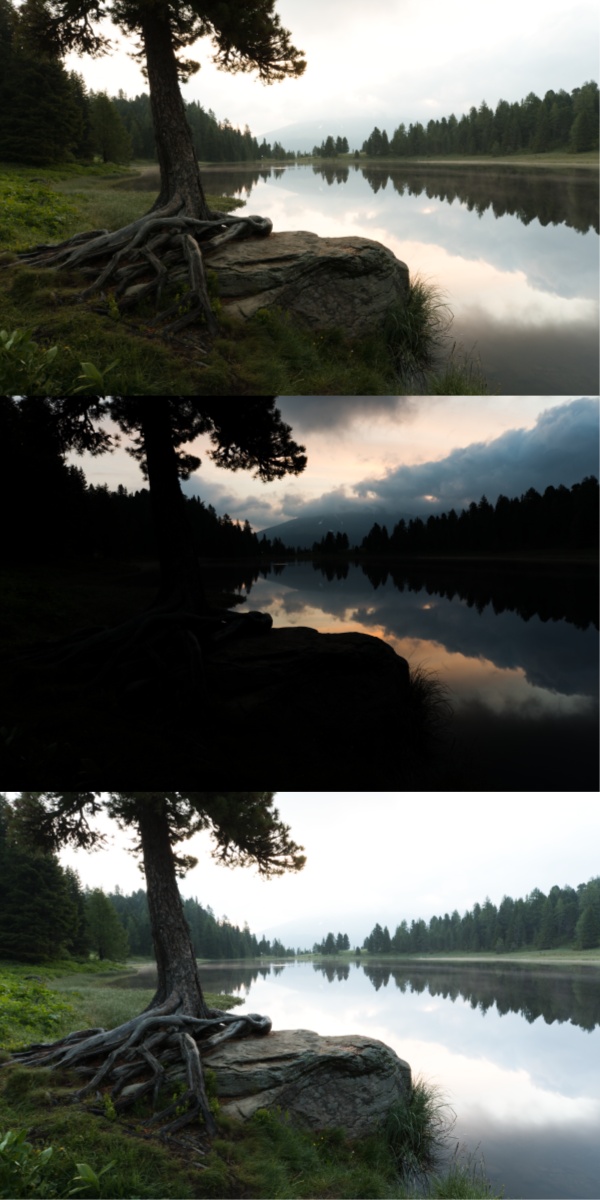
Good source photos are the foundation of HDR. That means identical positioning and settings, apart from shutter speed. Ideally, use a tripod, a delayed shutter release, and your camera’s automatic bracketing mode to capture three shots at different exposures. Everything is generally available in your camera’s settings, but each camera is slightly different, so refer to the manual for details.
HDR merging is possible even without a tripod, your risk of inaccuracies or visual issues is increased.
Two ways to create HDR in Zoner Studio
In Zoner Studio, there are two main methods for merging multiple images:
- HDR via Exposure Bracketing
- HDR via Tone Mapping
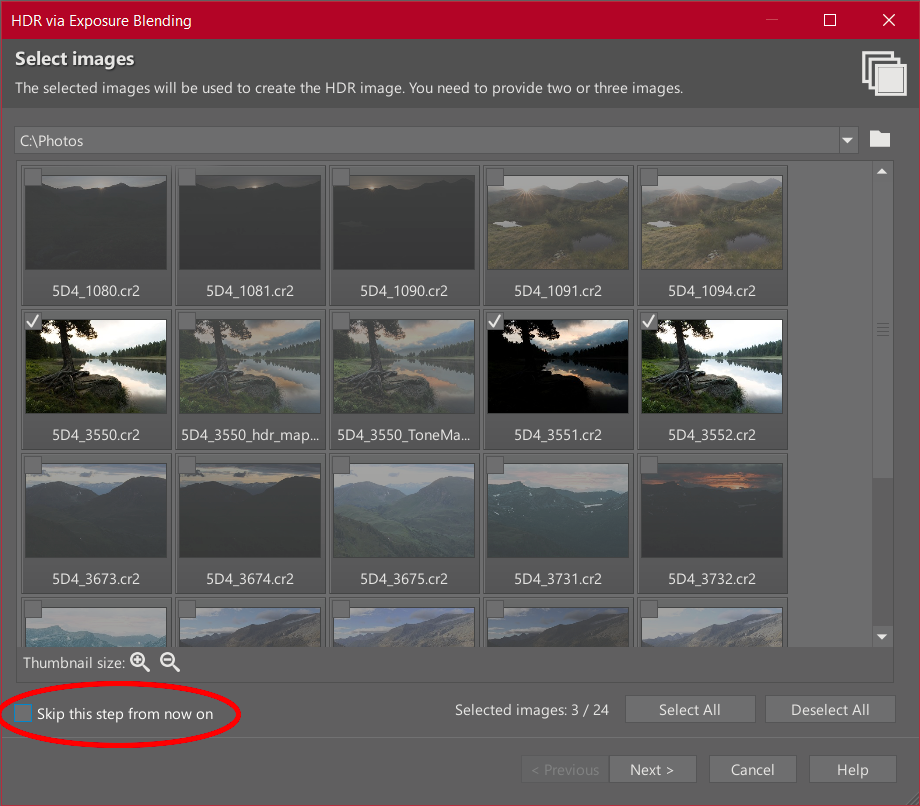
Both can be found in the Manager module under the Create menu. However, it’s faster to first select the photos you want in the Manager (using Ctrl or Shift + click). The Batch Operations section then appears on the right, where both HDR options are available.
You then see a photo selection dialog. This extra step can be disabled by checking Skip this step from now on in the lower-left corner.
The first step in both methods is image alignment. Zoner Studio tries to align everything automatically, but sometimes it doesn’t succeed. If it fails, you can’t continue to the next step. If you used a tripod, you can uncheck the Align pictures box so Zoner Studio merges the images exactly as they are.
The second option is to manually adjust the alignment points, but this is tedious and only worth it in critical situations.
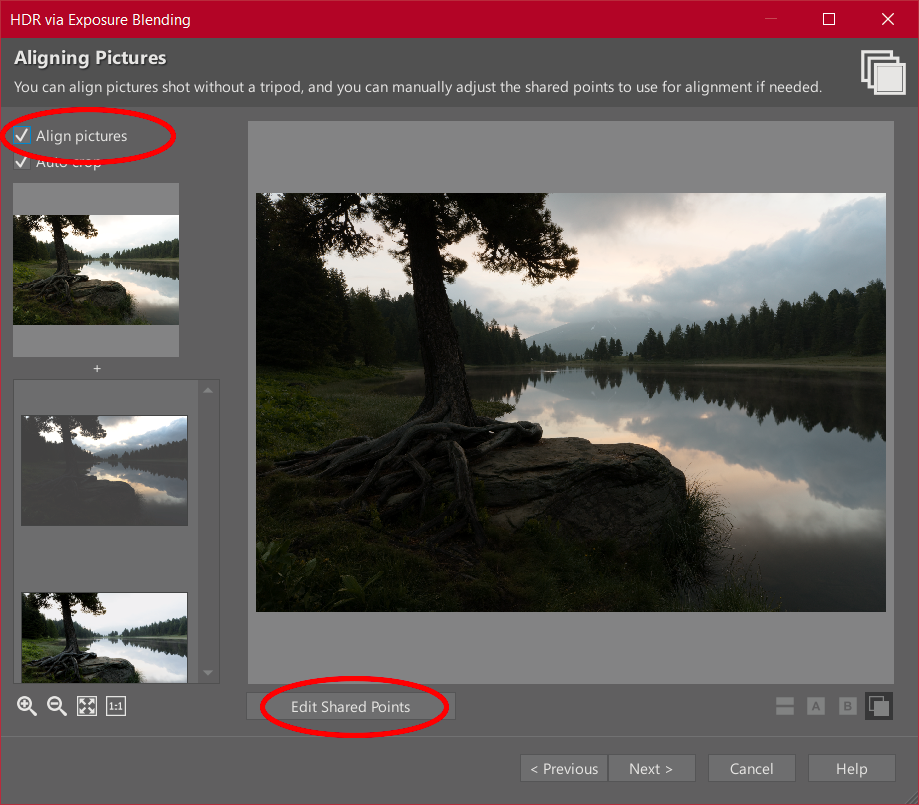
HDR via Exposure Blending
This method works with 2-3 source images. The concept is simple and mimics manual editing: Zoner Studio starts from the middle exposure, then automatically creates masks. Dark areas are replaced with lighter exposures (i.e., the dark ground becomes lighter), while bright areas are replaced with darker exposures (i.e., the sky becomes darker).
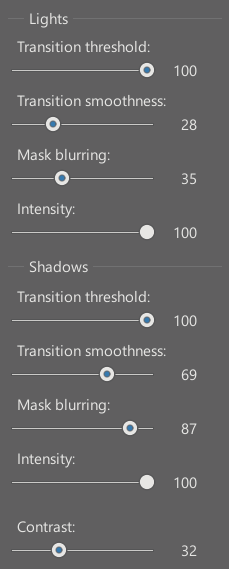
The controls for creating masks can be changed according to your taste and specific scene.
They are divided into three groups: Two identical sets of sliders for lights and shadows, plus an additional slider for overall contrast.
To see how the mask is being created, set Transition smoothness to 0 and Mask Blur to 1—the lowest values.
The two main sliders are Intensity and Transition threshold. Intensity sets how strongly the lighter or darker photo is applied, similar to adjusting layer Opacity in the Editor module. But nothing happens until you raise the Transition threshold, which determines at what brightness levels the middle exposure is replaced by a darker or brighter one.
These two sliders create sharp mask edges on their own, so it’s best to increase Transition smoothness, which softens the transition between exposures.
Finally, Mask blurring adds an overall blur to the mask, making the transitions more subtle.

HDR via Tone Mapping
Unlike the previous method, Tone Mapping is more flexible. You can use more than three source images, or even just one. Zoner Studio merges them into a single image with very high dynamic range, then applies your chosen settings to make it viewable.
There are two methods— Brightness and Contrast. Both have several interconnected sliders. Their effects overlap, but you can see their general use below.
Intensity roughly means how strongly the effect will affect large areas of the photo. For example, it can brighten a dark mountain without flattening the slope on the other side. However, the details on the mountain still keep their highlights and shadows.
Compression focuses on smaller areas, such as the large features of the mountain itself.
Light affects even smaller details, like boulders or grass.
Saturation does exactly what its name indicates. With HDR processing, it’s easy to overdo saturation. You can tone it down, but zero turns it black and white.
Gamma adjusts brightness using a curve. Shadows become brighter while keeping the brightest clouds bright.
Black point is similar to the normal Black point slider in the Develop module. The higher it is, the more it darkens shadows.
White point clips bright tones, turning them into pure white while brightening the rest of the photo.
Shadows intensity brightens dark areas, similar to exposure blending in the previous section.
Lights intensity darkens the bright areas in a similar way.
What to do next
After fine-tuning, you have three options for your HDR result:
- Open in Editor
- Open in Develop
- Save
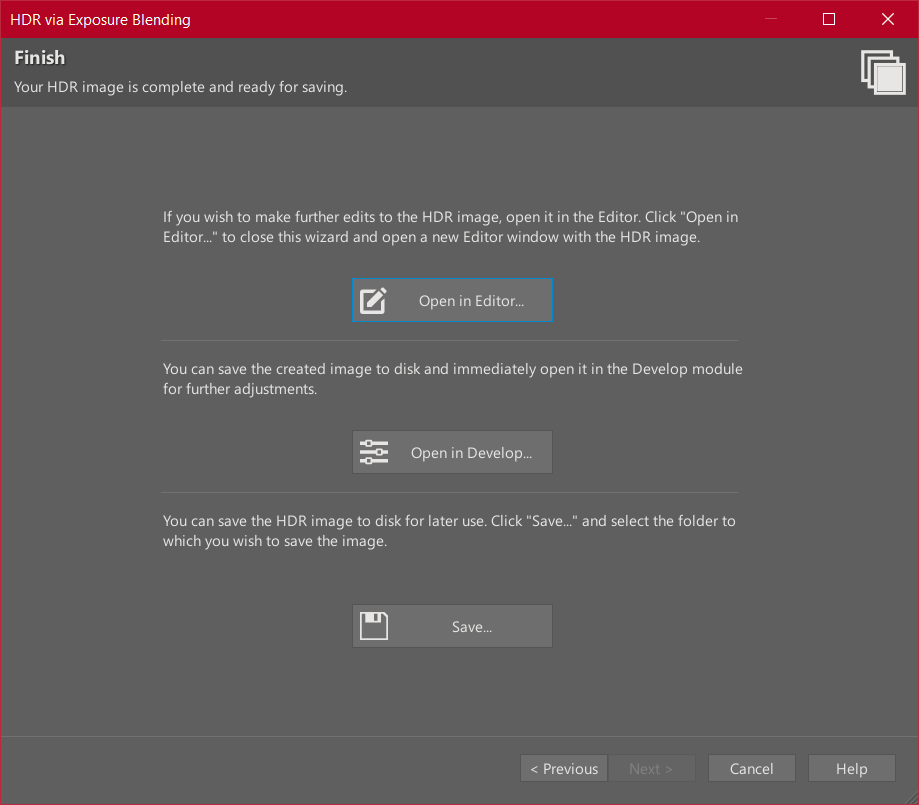
Open in Editor opens the HDR image for further editing but does NOT save it. This option is best if you want to continue editing, or are unsure about the result. After reviewing and experimenting with further adjustments, you don’t have to delete the file. Just close the Editor and the merged image disappears.
Open in Develop saves the image and opens it in the Develop module.
Save simply saves the image and returns you to the Manager module.
Different results
Two different methods for merging images are suitable for different scenes. If you have clearly defined areas with different brightness levels in your shot, like a bright sky and dark foreground, it makes sense to use exposure blending so the result looks more natural. However, for complex situations, you will want to use tone mapping, and fine-tuning the result after.
In any case, you always have plenty of sliders available to get the result that suits your taste and style.
FAQs
Can I create HDR images using one image? Yes, you can work with a single image using Tone Mapping in Zoner Studio, but you will get the best results from a series of multiple exposures.
Do I always need a tripod for HDR? It’s not necessary, but recommended. Zoner Studio can align the images. However, a tripod minimizes errors and gives the cleanest results.
When should I use exposure blending and when should I use tone mapping? Exposure blending is best for simpler scenes where the highlights and shadows are clearly divided, like sky and ground. Tone mapping works better for more complex scenes with subtle transitions.
Can I continue to edit an HDR photo? Yes, you can open the finished product in the Editor or Develop and fine-tune the colors, contrast, and sharpness, just like with a regular photo.
There are no comments yet.