Creative Photography: Experiment with Light Indoors
If you want to truly understand how light works in photography, turn off the lights. Darkness forces you to take control of the shot, and let go of it at the same time. Exposure isn’t something to fear. It’s a game with three players: shutter speed, aperture, and ISO. Once you understand how they work together, you can start creating magic right in your living room with candlelight or a flashlight in the bathroom.
In this article, you’ll learn:
- How the exposure triangle works and how to use it in low light and indoors
- Why switching to manual mode lets you take control of the light
- How to handle low light, movement, and digital noise
- How to use a tripod, self-time, and histogram for sharp, well-balanced images
- Why shooting in RAW gives you more flexibility when editing
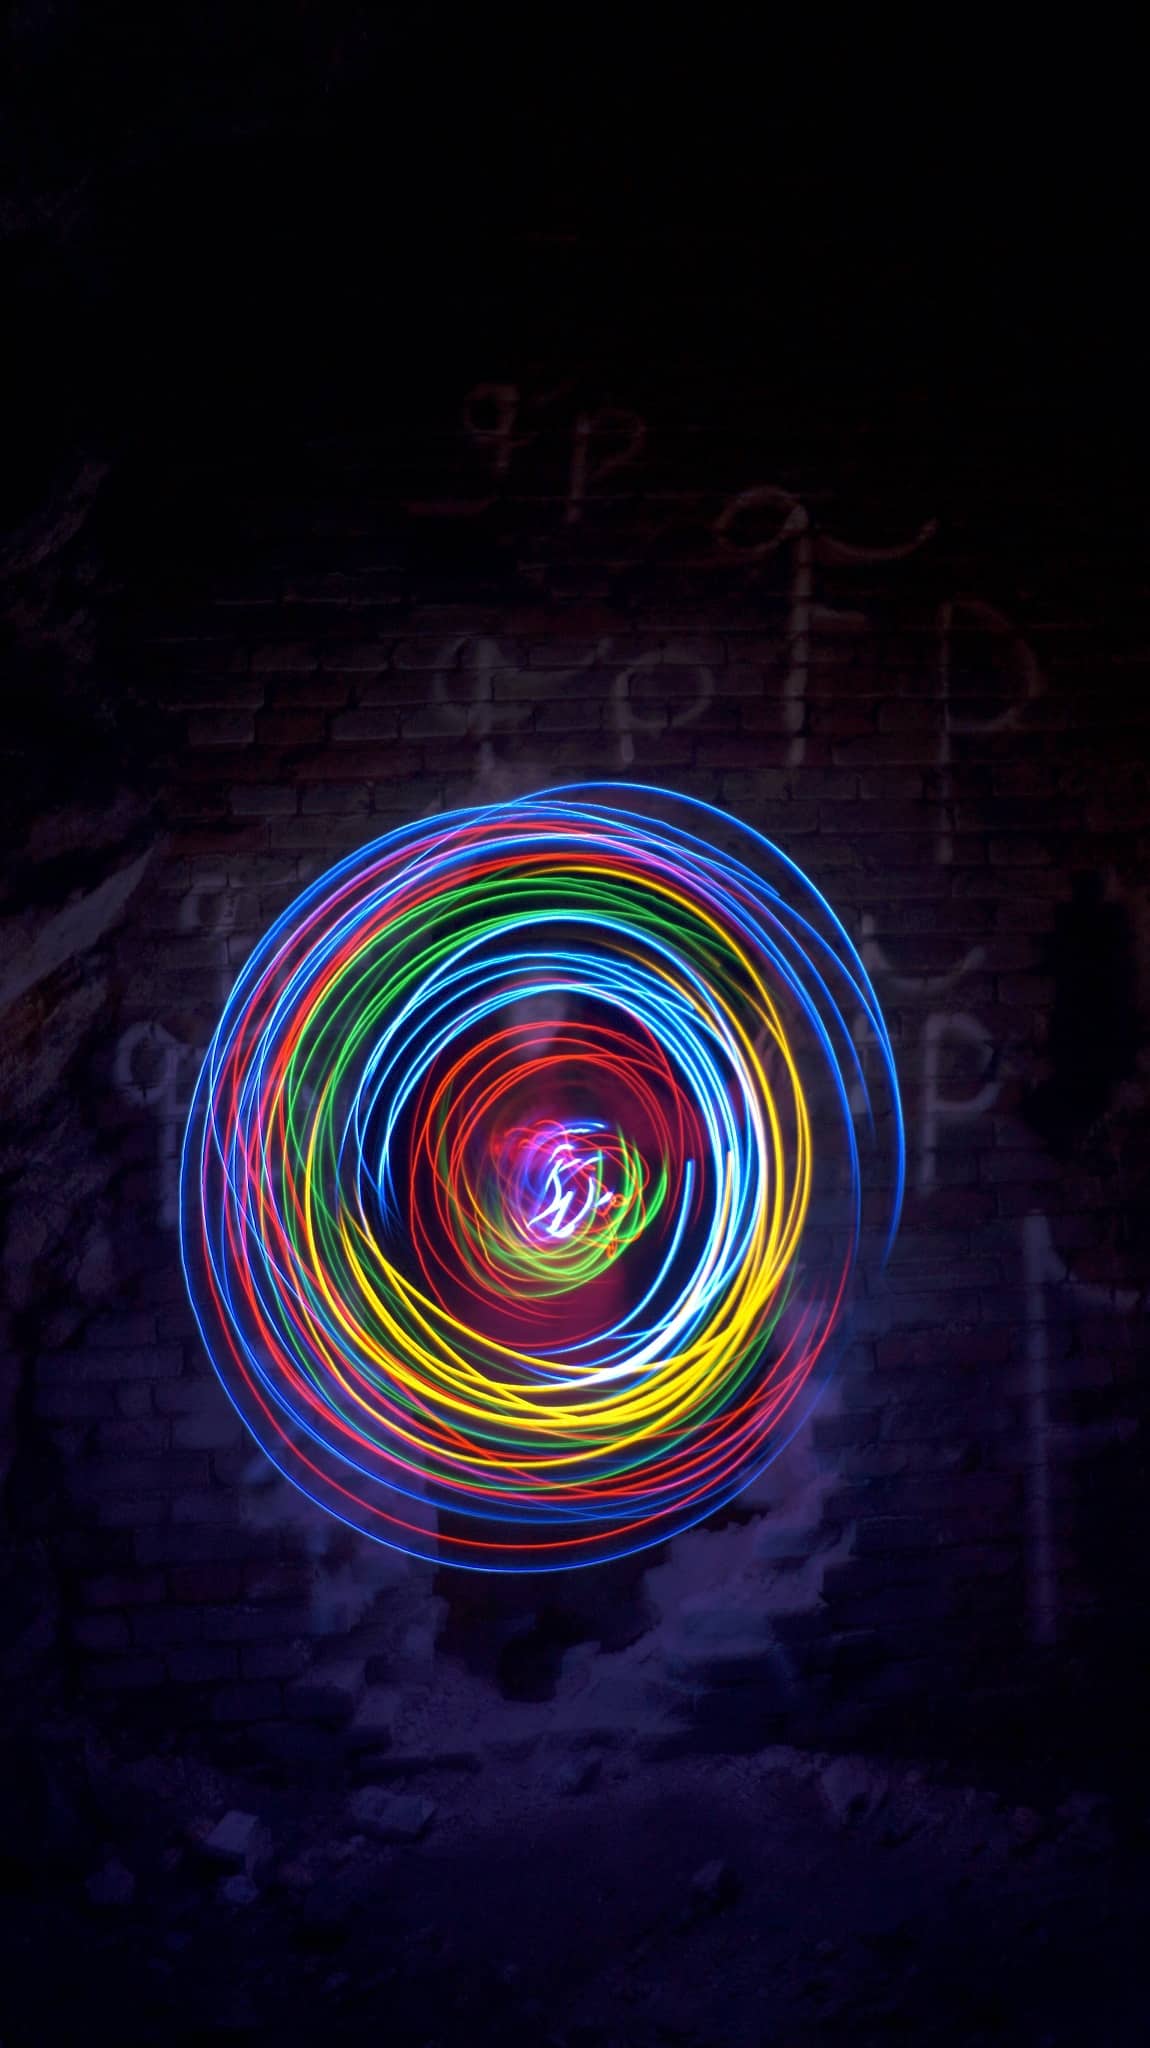
- How to try light painting, still lifes with Christmas lights, or shadow theater at home
A bit of theory first: understanding exposure pays off whenever light is scarce. Whether you’re shooting a theater performance, a Christmas party with kids running around, or a picnic lit by lanterns, automatic mode often lets you down.
This is where manual mode, or at least shutter or aperture priority, comes in. It can give you more creative freedom, if you know what you’re doing.

Get to know the exposure triangle
The exposure triangle determines how much light reaches your sensor and shapes how the photo looks. Think of it as a balance scale—if you raise one side, you need to lower another. What does this mean?
- Shutter speed (exposure time) determines how long light hits the sensor. The camera records any movement that happens in front of the lens during that time.
- Aperture (f-number) refers to the size of the opening through which light enters. It affects how much light the camera receives.
- ISO is a digital sensitivity booster. The higher the ISO, the better the camera can “see” in the dark.” But the tradeoff is more digital noise.
It’s not about perfect calculations. It’s about deciding what to sacrifice and what to emphasize. Motion blur can become an artistic element, like when you want to capture the movement of a dancer. It depends on your intent.


Photographing cultural events, like this dance improvisation, comes with plenty of challenges. There’s a lot of movement and low light, but the spotlights help guide both the attention of the audience and the photographer. A shutter speed of 1/60s is pushing the limit, and the image isn’t perfectly sharp. I couldn’t lower the f-number, so I had to raise the ISO at the cost of increased noise. f/2.8, 1/60s, ISO 800, 50mm
Practical tips for shooting in the dark
When shooting in low light, stability is key. Ideally, you should use a tripod, but you can also use a stack of books, an overturned cup, or a bag of beans as a makeshift base. Once your scene is set, activate the self-timer. Even the slightest camera shake when pressing the shutter button can blur your photo.


And what about noise? It’s a common issue in low-light interiors. Instead of cranking up the ISO to the extreme, try adding light to the scene. Even an ordinary lamp can make a big difference.

A useful tool for checking exposure is the histogram. It shows whether you’re losing detail in shadows or blown-out highlights. Shooting in RAW format gives you more freedom. In post-production, you can recover more detail, fine-tune white balance, or pull back overexposed areas. This flexibility is invaluable when shooting in the dark.
Still life with lights
Shooting in the dark doesn’t always mean capturing total darkness. Sometimes, just a few carefully placed light sources are enough. What works well? Christmas lights for a bokeh effect or a magical atmosphere, candles for warm light, and small lamps or flashlights for spotlighting details.

Try a simple still life—a book, glasses, a cup of tea—and light it from just one side. Watch how shadows shape the objects and how the mood of the scene changes as you adjust the distance or angle of the light source.

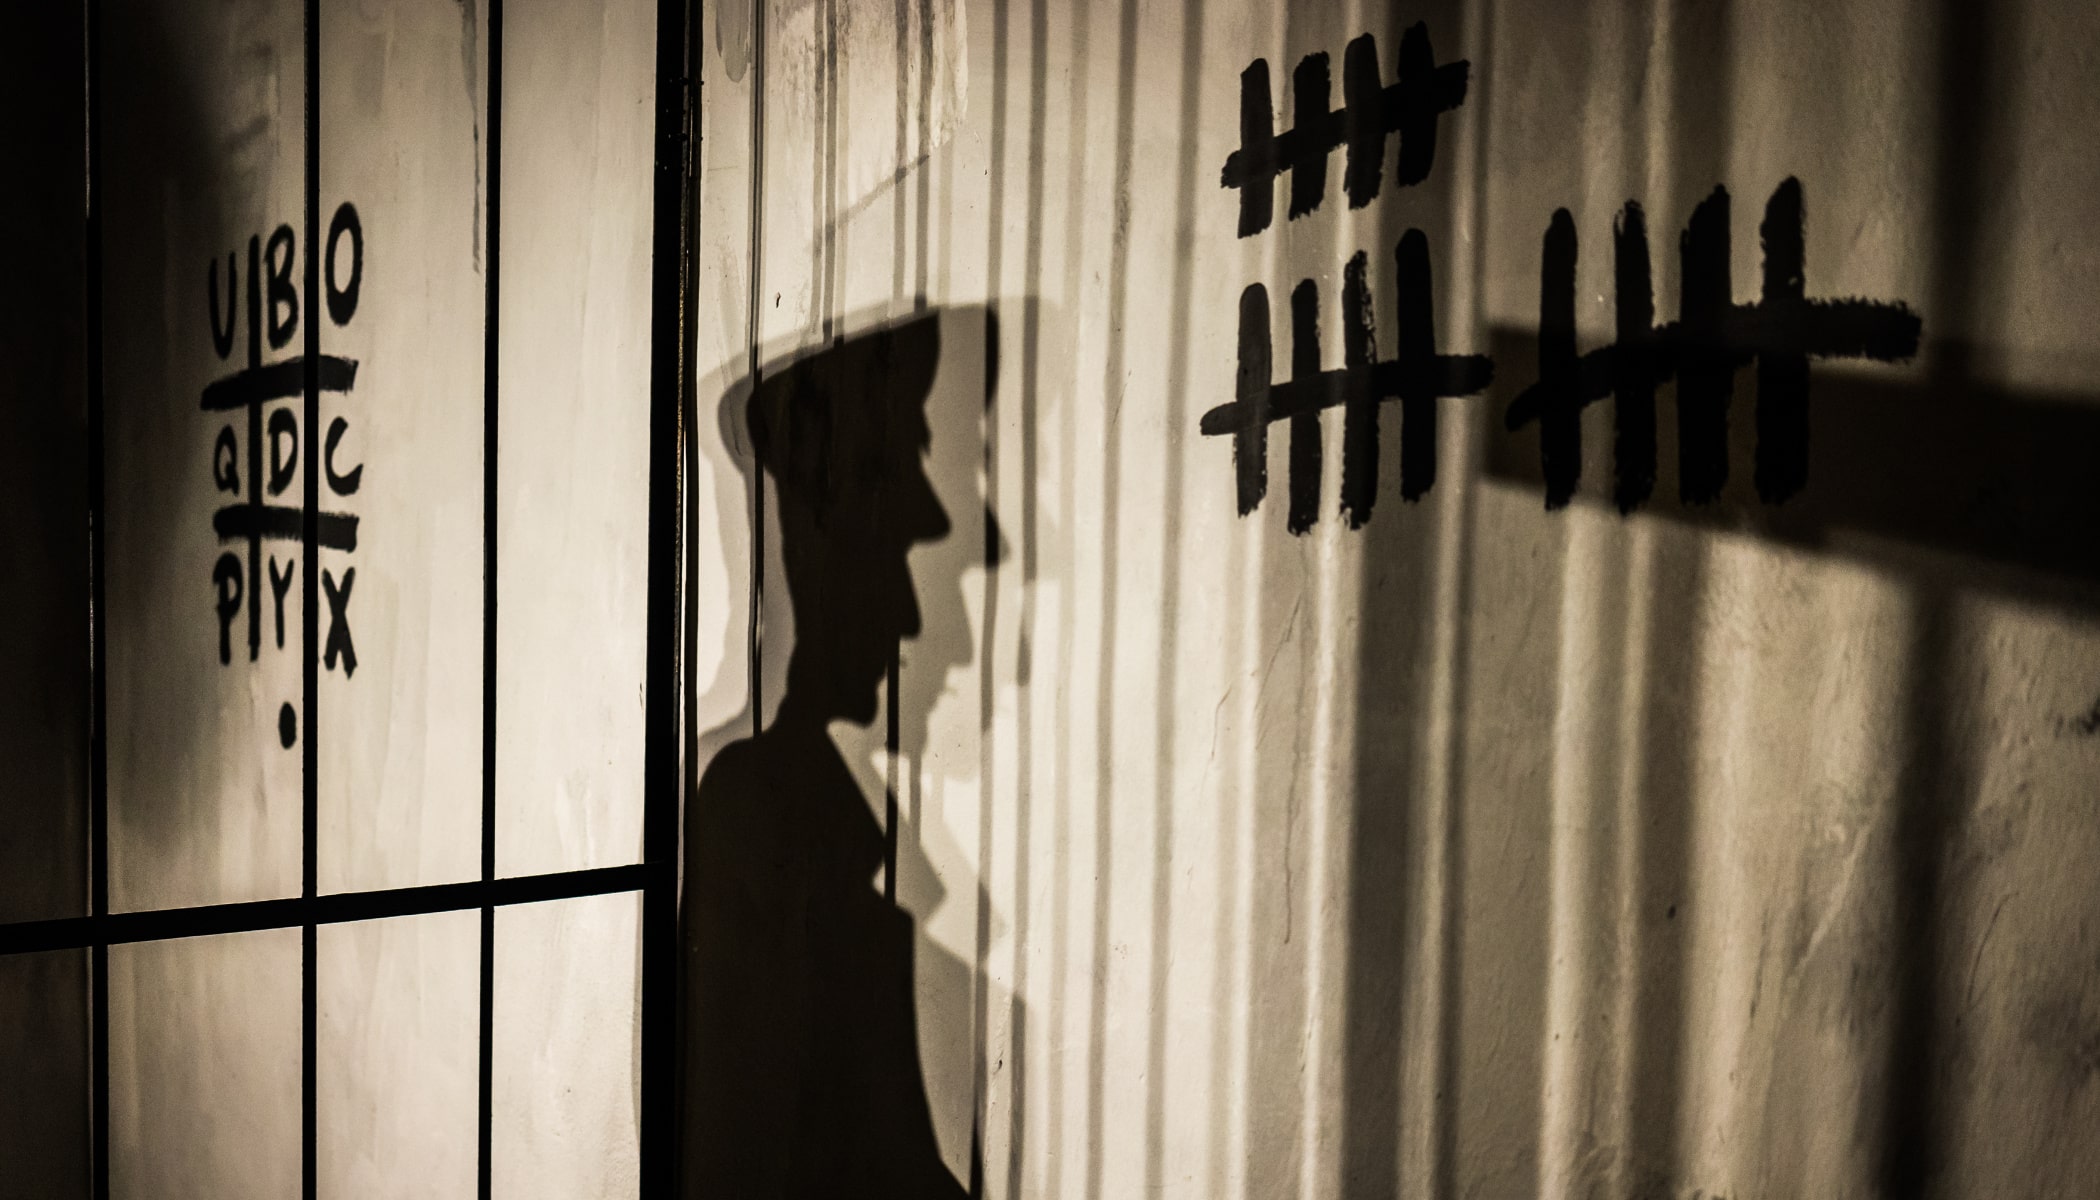
Shadow theater
If you want to get playful, try making your own shadow theater. All you need is a piece of white paper or white sheet, a strong lamp, and a few figures made using your own hands. Place the lamp so that it shines from behind, and position the props between the light and the “screen.” You can photograph the silhouette of a bug that looks straight out of a horror movie, animal shapes made with your hands, or dramatic shadows of everyday objects. Always shoot from the front, towards the screen, and see how the composition changes as you move the light or the props.


Photography in darkness isn’t about trying to make everything visible. It’s about deciding what you want to show and how. Darkness can be unforgiving, but it also gives you incredible creative freedom.
FAQs
What camera settings should I use when shooting indoors? Use long shutter speeds and the lowest possible ISO that still gives you proper exposure. If you’re capturing movement, pick the shortest shutter speed you can while maintaining correct exposure.
My handheld shots are blurry. What can I do? Use a stable base, such as a book, cup, or bag of beans. Use the self-timer to minimize camera shake when pressing the shutter button.
How can I reduce noise when using high ISO? Add light to the scene, even a candle or table lamp can help. If that’s not enough, you can reduce noise during editing in Zoner Studio.
What is the histogram and why should I check it? The histogram shows whether your image has overly dark or blown-out areas. It’s a great tool for spotting exposure issues that might not be obvious on your camera’s display.
How can I practice working with light? Try simple experiments—light painting with a flashlight, still lifes with Christmas lights, or shadow theater with a lamp and paper. Each experiment you do teaches you more than a hundred tutorials ever could.
There are no comments yet.