Drone Photography: What You Need To Know
Drone photography is becoming increasingly popular. You can get unique shots from a bird’s eye view without needing to rent a private helicopter or plane. When choosing your drone, you might not only be influenced by quality and price, but did you know that you might need user registration and a pilot’s license?
You can only fly certain types of drones in certain situations without limitations. But a photographer would do anything for amazing, breathtaking shots. You can find a list of categories, requirements, and rules for flying drones in this article.

There are many drones on the market at different price points. The price is determined by the quality of the built-in camera and the aerial characteristics of the drone. You can buy a “toy” drone for a few dollars that takes pictures like a cheap phone. You can also buy a large drone that can carry a heavy mirrorless camera.
Before purchasing your drone
Before purchasing your drone and taking flight, be sure to study the laws that govern drone flight. Keep in mind that they vary country by country and, in some places you can’t even turn it on without a license or special permit.

Drones are subject to universal rules from January 1, 2024, simplifying legislation for the entire European Union.
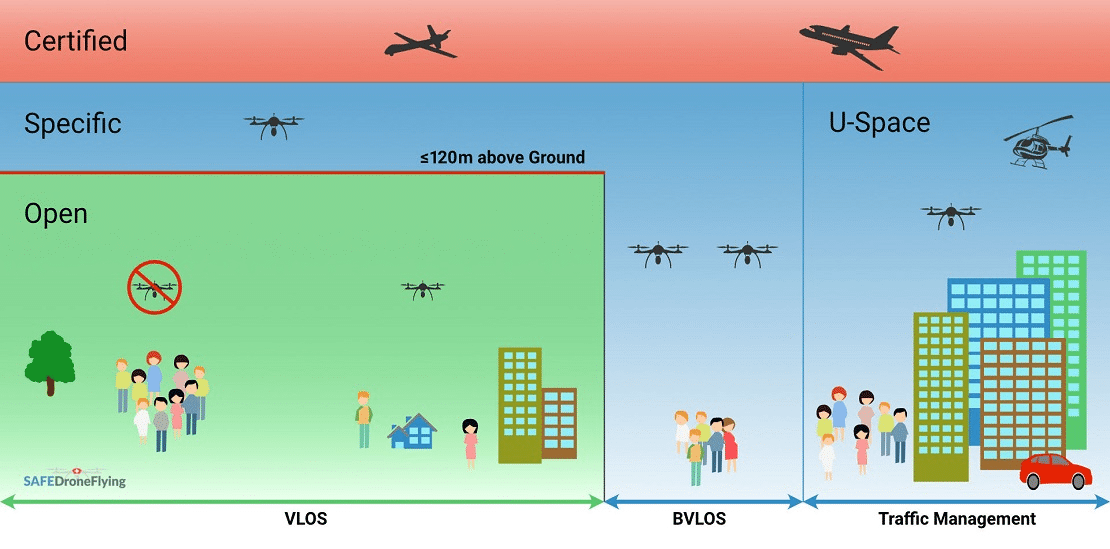
There are three new categories:
- Open—Practically all drones commonly found in stores or Eshops
- Specific—Professional drones. This category requires significantly higher demands for operation than the Open group.
- Certified—The Certified category is not used much yet but is planned for the future for drones intended for freight or passenger transport.
This article focuses on the Open category of drones, which includes all commercially available drones.

Unlabeled drones
This category includes homemade drones and drones put into service before January 1, 2024. Based on weight, they are divided into two sub-categories:
1. Lighter than 250g—OPEN A1
For these drones, operator registration is required, especially if the drone has a camera or other sensor. A pilot’s license is not mandatory for this category. Also, the pilot must avoid flying over crowds of people, i.e. uninvolved people. Uninvolved people are those who are not involved in, and not aware of, the operation of the drone. This qualification also applies to animals, so keep that in mind too.
2. Heavier than 250g—OPEN A3
For the OPEN A3 category, you always need an operator’s registration and a valid pilot’s license. You are also required to have a minimum distance of 150m from uninvolved people, residential, industrial, commercial, or recreational buildings or premises.

Drones with class labels
All drones purchased in the European Union before January 1, 2024 should have a manufacturer-issued class label. Drones in this category are further divided into sub-categories.
1. C0—OPEN A1
As with unlabeled drones, operator registration is only required if the drone has a camera or other sensor. The pilot is not required to have a pilot’s license (but should study the drone’s user manual). For this sub-category, flying over uninvolved people is only permitted with the consent of the concerned parties.
2. C1—OPEN A1
Operator registration and a pilot’s license is always required for the OPEN A1/A3 category. The pilot should also minimize flying over uninvolved people.
3. C2—OPEN A2
Operator registration is always required. The pilot should hold a license for the basic OPEN A1/A3 category, and an extension for the OPEN A2 category. For flying over crowds of people and uninvolved people, the 1:1 rule applies. The 1:1 rule means the maximum height equals the distance. The minimum distance is 30m, or 5m with low-speed mode on.
4. C2, C3, C4 – OPEN A3
Operator registration is always required. The pilot must hold a license for the OPEN A1/A3 category. The distance from uninvolved people or residential, industrial, commercial, or recreational buildings and premises must be at least 150m.

Choosing your drone
Most drone distributors produce drones with built-in cameras. Their image quality improves with each new model and is usually sufficient for normal photography. There’s no fooling science though. The quality still falls short of the level and quality of professional cameras. That’s why it’s better to use drones with built-in cameras for shooting video.

If you want truly high-quality photographs, invest in a more expensive drone that you can attach your camera to.
Also consider battery life. Most models have flight times between 15 and 30 minutes per charge, less in winter. However, some manufacturers offer packs that contain up to three batteries. They are known as the Fly More Combo editions. Purchasing these combo packs is more advantageous than spending money on separate batteries.
How to register your drone and get your license
Most drones must be registered with the Civil Aviation Authority (CAA). This is also where you can take the online pilot test if required for your chosen drone. This registration and license is valid for EU countries.
In general, a person over the age of 18 can become a drone operator, with the minimum age being 16 years. The test is in the form of a multiple-choice test with 40 questions. It requires a 75% pass rate, i.e. at least 30 questions answered correctly. After successfully passing the test, you are issued an electronic license. If you fail, you can retake the test as many times as you want.

Where you can fly your drone
The basic rule for flying a drone in all basic categories is that you only fly it as far as you can see it without any aids (excluding prescription glasses or contact lenses).
Flying over people? Usually flying a drone over people is prohibited. The exception is for privately made drones weighing up to 250 grams and for commercially purchased drones with a Class 0 or 1 designation (required from January 1, 2024). These drones fly in sub-category A1. However, you must keep any flying over people to a minimum.
In addition, you must be careful not to disturb no-fly zones around airports, military bases, power stations, monuments, or national parks.
You can use the DronView or AisView mapping tool apps to identify and avoid colliding with other objects in the airspace. The first app specializes in the operation of pilotless systems and provides realistic options or operating conditions for specific areas. For example, it provides information on what flight level you can operate in, or whether it is even possible to take off with a drone in that area.
Set everything up before launch
Before your drone takes flight, get familiar with its controls. The included controller doesn’t just control the direction of flight and camera tilt. Sometimes, you can use it to start recording videos, take photos, or adjust exposure.
With cheaper models from certain brands, these functions are usually only available via the mobile app. But when flying in freezing weather, you’ll appreciate the hardware buttons on the controller more.

Also, calibrate the drone and set up the camera before launch. If you wait until it’s in the air to set it up, you’ll be robbing yourself of battery life for nothing. It’s a good idea to calibrate your drone before each flight. This avoids issues when maneuvering your drone.
Taking pictures with your drone
If you decide to use the drone’s built-in camera, make sure it supports RAW format. If it does, be sure to take advantage of it. It will give you more editing options in Zoner Studio than shooting in JPEG.
When taking pictures with a drone, the same basic rules apply as shooting on the ground. Think about the right composition and lighting. This is the only way you can get truly high-quality images.

If you don’t want to spend more time walking than taking pictures, use the internet to find a subject of interest. For example, satellite images of the Earth’s surface are useful when planning your trips. They can help you find places of interest in your neighborhood and help you plan ahead for where to go and what pictures you can take.
Also consider using filters when shooting. Filters can help eliminate glare, among other things. A polarizing filter is a good choice for pictures when the sky is in the frame.

Safety first
Whatever you choose to photograph with your done, don’t forget one crucial thing—Safety first! Keep safety in mind when operating your drone and don’t put yourself or anyone else at risk in search of that perfect shot.
There are no comments yet.