Master Your First DSLR! The 5 Things That Matter Most
You’ve just acquired your first DSLR, and you’re ready to head out on your first photo expedition. In order to get the most out of it, you need to learn its controls. Take a look at what you should keep in mind when you’re shooting with a DSLR.
Some beginners make a fundamental mistake when working with a DSLR—they get scared by all its features and switch into automatic mode. But then they’ve lost lots of ways to be creative. And a lot of the camera’s potential as well.
The truth is that although being creative and thinking about your pictures demands more effort and study, it also helps you take better pictures. And this for one simple reason: you yourself tell the camera what you want from it.
In automatic mode, the camera does everything for you without asking your opinion. Because of that, it can’t always capture everything the way you imagine. Manual modes, on the other hand, are in your hands. So let’s look at the most important modes and functions that you should get to know when taking pictures with a DSLR.
The Exposure Triangle
Before you get to know the individual modes, you have to master the basic principles that affect your photos. These are ISO, aperture, and exposure time, in other words exposure.
Aperture
The higher the camera’s f-stop, the less light falls on the sensor. A high f-stop gives you a sharper photo, but also a darker one.

Nikon D3300, AF-S NIKKOR 35 mm 1:1. 8 G, 1/320 s, f/2, ISO 200
ISO
Set your ISO higher the darker your shot environment is. Raising it gives you brighter pictures. And vice versa. But watch out! The higher your ISO, the more visible the digital noise in your pictures will be. So as soon as you can, check and see what’s the highest value on your camera that still gives a usable picture.
Exposure Time
This is the time or period during which light falls onto the sensor, enabling the photo to be created. It’s also called the shutter speed.
DSLRs’ Photographic Modes
You generally set the individual modes using a wheel at the top of the camera. Skip right past the automatic modes and concentrate on the manual ones. For Canon and Nikon DSLRs, you’ll find them under these letters:
- M,
- A (Av for Canon),
- S (Tv for Nikon),
- P.

Manual Mode (M)
In manual mode, you have full control over your camera. You set up the whole shot yourself—ISO, time, and aperture.

Nikon D3300, AF-S NIKKOR 35 mm 1:1. 8 G, 1/1250 s, f/4, ISO 100
Aperture Priority (A/Av)
This mode is semi-automatic. The camera itself sets the shutter’s speed based on the ISO and aperture you have. The lower the f-stop, the bigger the aperture and thus the more light flows in, and vice-versa.
You can also use the aperture to control depth of field. The lower the f-stop you set, the blurrier your subject’s surroundings will be. Use this above all to make your subject “pop out” against their background. This is mainly useful for portraits. In nature photography, meanwhile, you want a higher f-stop.

Nikon D3300, AF-S NIKKOR 35 mm 1:1. 8 G, 1/320 s, f/1.8, ISO 400

Nikon D3300, AF-S NIKKOR 35 mm 1:1. 8 G, 1/40 s, f/5, ISO 400
Shutter Priority (S/Tv)
A semi-automatic mode that makes it easier to capture moving objects sharply. So it pays off when you’re photographing animals, people, etc.
In those situations, just turn on this mode and set the ISO and shutter speed you want, and the camera will calculate the aperture automatically. So when you’re using this mode to freeze motion, set a fast shutter speed.

Nikon D3300, AF-S NIKKOR 35 mm 1:1. 8 G, 1/320 s, f/2, ISO 200
A longer time, on the other hand, will blur moving objects. This method is popular for photographing water.
In general the longer you keep the shutter open, the more light flows into it.

Nikon D3300, AF-S NIKKOR 35 mm 1:1. 8 G, 1/1 s, f/25, ISO 100
Program Mode (P)
This mode sets both the aperture and the shutter speed. So you only control the ISO. But at the same time it lets you go ahead and adjust the aperture and speed if you’re not satisfied with the settings.
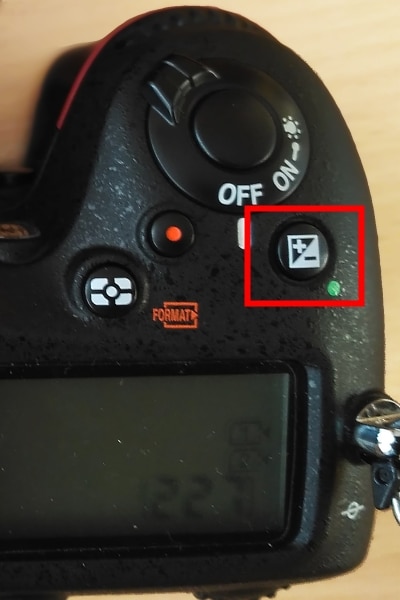
Exposure Correction in DSLRs
You’ll find exposure correction useful when you’re working with the two semi-automatic modes. On a DSLR you’ll generally find it on the +/- button, and it lets you increase or decrease the picture’s exposure time. So if you want a brighter picture, increase the exposure. If you want a darker picture, decrease it.
Manual vs. Automatic Focusing
Digital cameras let you choose between manual and automatic focusing. The switch for switching between them is on the lens.
When you shoot with automatic focusing (marked as AF-A or AI Focus), you can end up with your camera auto-focused on the wrong subject. To avoid that, use a different mode.

The most important focusing modes include:
- AF-S (Nikon), or One Shot (Canon)
- and AF-C (Nikon), or AI SERVO (Canon).
You’ll use the first of them when photographing stationary objects. E.g. when photographing nature or architecture. But it’s also a good fit for architecture.
Just press in on the trigger, and the camera will focus on a particular point, which it will keep sharp until you press the trigger in fully.

Nikon D3300, AF-S NIKKOR 35 mm 1:1. 8 G, 1/60 s, f/5, ISO 100
But if you want to photograph moving objects, use AF-C mode. When you press in the trigger, it focuses on a given object. The focus then follows that object until you press the trigger all the way in.

Nikon D3300, AF-S NIKKOR 35 mm 1:1. 8 G, 1/4000 s, f/1.8, ISO 400
In some situations, however, you may not appreciate semi-automatic focusing. This applies e.g. for macro photography. So in these cases, switch the lens to fully manual focus, and then you’ll have focus fully under control.
But this also brings an increased risk of a mistake—since the quality of your focus now depends purely on your judgment. Because of this, lenses often have a scale of focusing distances printed on the ring. Read this scale; it will help you out.
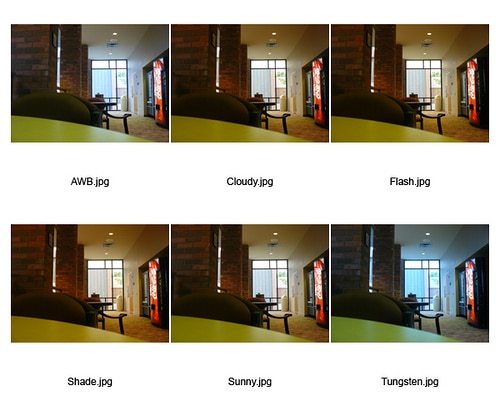
White Balancing Options for DSLRs
Every light source has a different color, and so cameras try to react to that color and automatically set white balance so as to give your photos realistic colors. But sometimes the automatic mode can’t guess everything correctly. That’s why DSLRs also offer several white balance modes.
Just choose the most appropriate one based on the situation you’re currently in. You generally have the following modes available:
- Daylight – useful e.g. for outdoor spaces with natural daylight.
- Cloudy– ideal when you’re under the clouds. Gives your pictures a warmer, more pleasant tint.
- Shadow – if you’re photographing in shadow, use this mode. Here once again you’re giving the picture a warmer tone.
- Tungsten – use it in bulb-lit rooms. It tames the excessive yellows in such rooms.
- Fluorescent – use this, meanwhile, in fluorescent-lit rooms. Once again, it gives you milder tones.
- Flash – A flash adds a blue tint to your photos. This setting will bring them back towards warmer tones.
- Manual color temperature – advanced DSLRs let you set color temperature manually in degrees Kelvin. For outdoor photography on a sunny day, temperatures around 5200 Kelvin are good, while if it’s cloudy, you’ll want to head towards 6500 K.
Naturally you can also adjust white balance in Zoner Studio. If you want the best results, it pays to shoot to RAW.
You may feel like you have a lot of information here in front of you—too much to ever learn. Not at all. It’s all just a matter of training. So take pictures, experiment, and learn. In a few months you’ll have these principles down pat. And what’s more, this will transform you over time from a shutterbug into a photographer who thinks over each photo.
There are no comments yet.