Non-destructive Edits Save You Time and Disk Space
The article is over 5 years old. The information in it may be outdated.
We are working on its update. In the meantime, you can read some more recent articles.
Non-destructive edits are edits that don’t destroy your original picture file. They keep you from having to take care of two separate versions of a picture—one edited, the other not. In short, they make editing work with large collections faster and easier to manage overall.
First let’s take a few words to describe ordinary, destructive edits. Those are edits thatdirectly change a picture file, destroying its original version. And meanwhile, when a photo is edited and saved multiple times, the small quality losses that happen with each re-saving all pile up, which can be bad for a picture’s final quality.
That’s why Zoner Photo Studio includes non-destructive edits, which have no negative effect on your originals. You can edit a photo however you like, and it will only be saved at the moment when you create a new, separate file with your picture (by exporting it).
The Advantages of Non-destructive Edits
- There’s no loss of quality.
- You don’t have to make copies to preserve your originals.
- You can undo your edits at any time.
- You don’t lose your edits in progress even if your PC suddenly loses power.
Where to Go for Non-destructive Edits
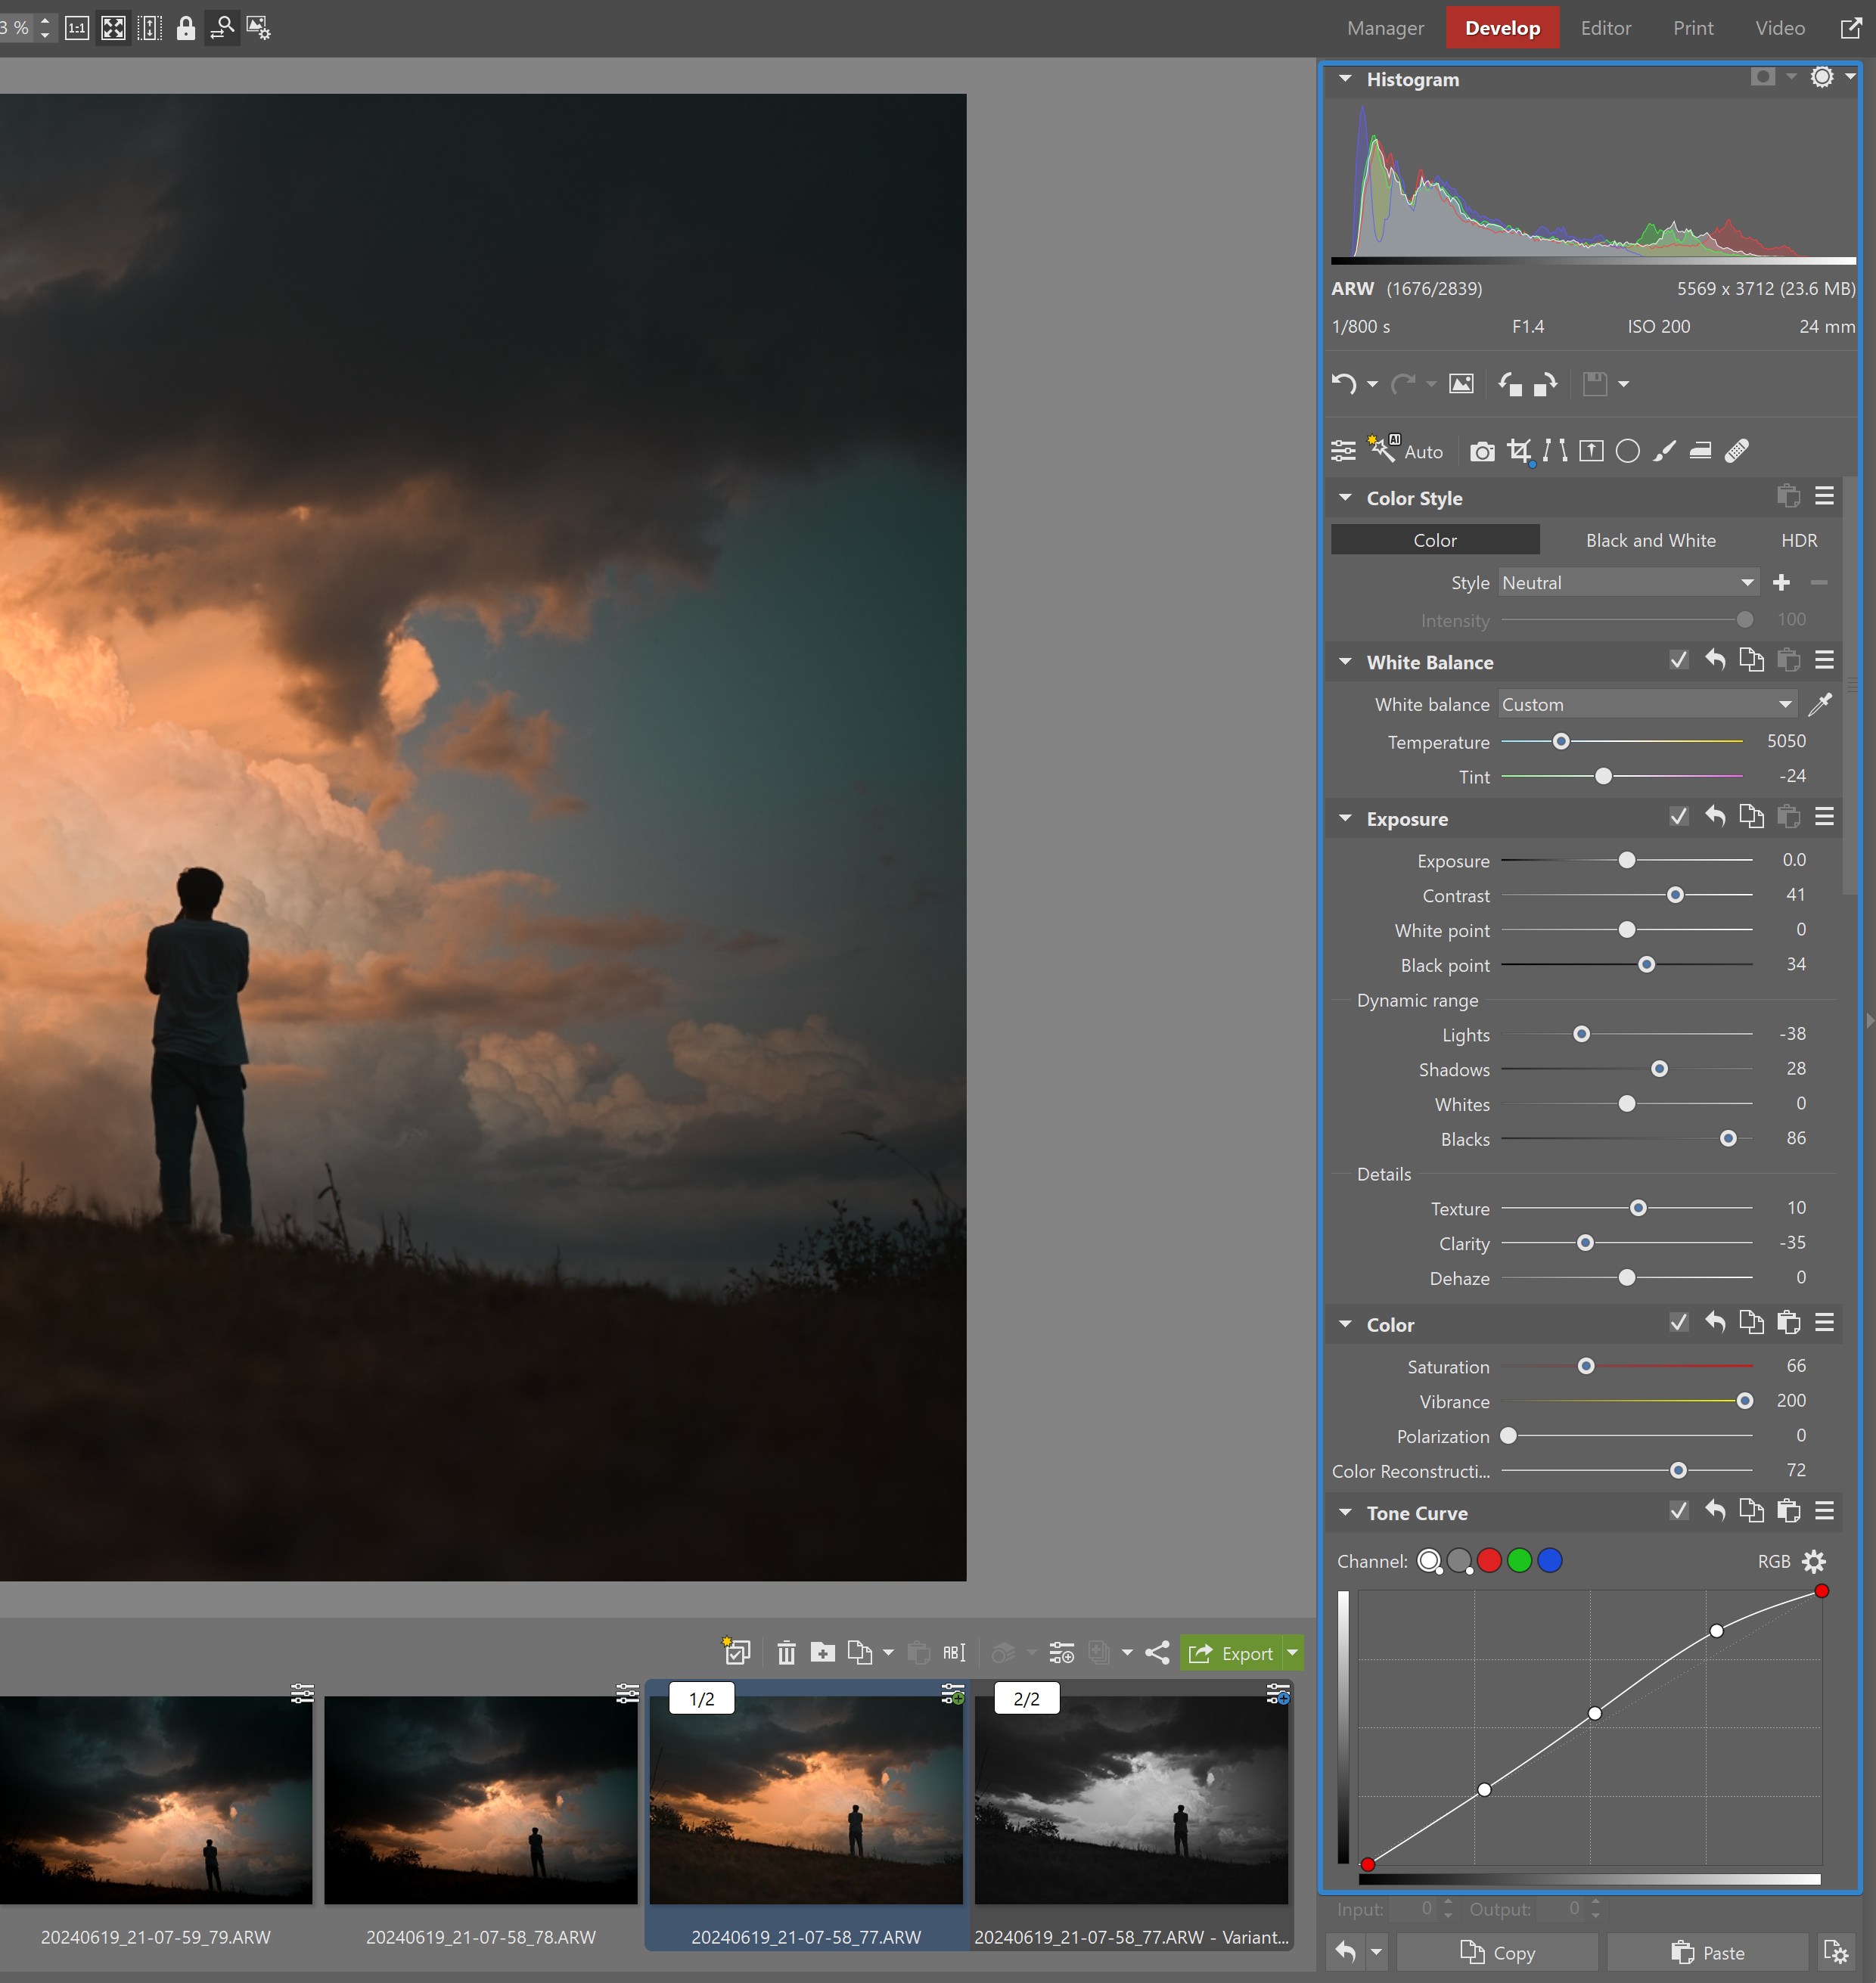
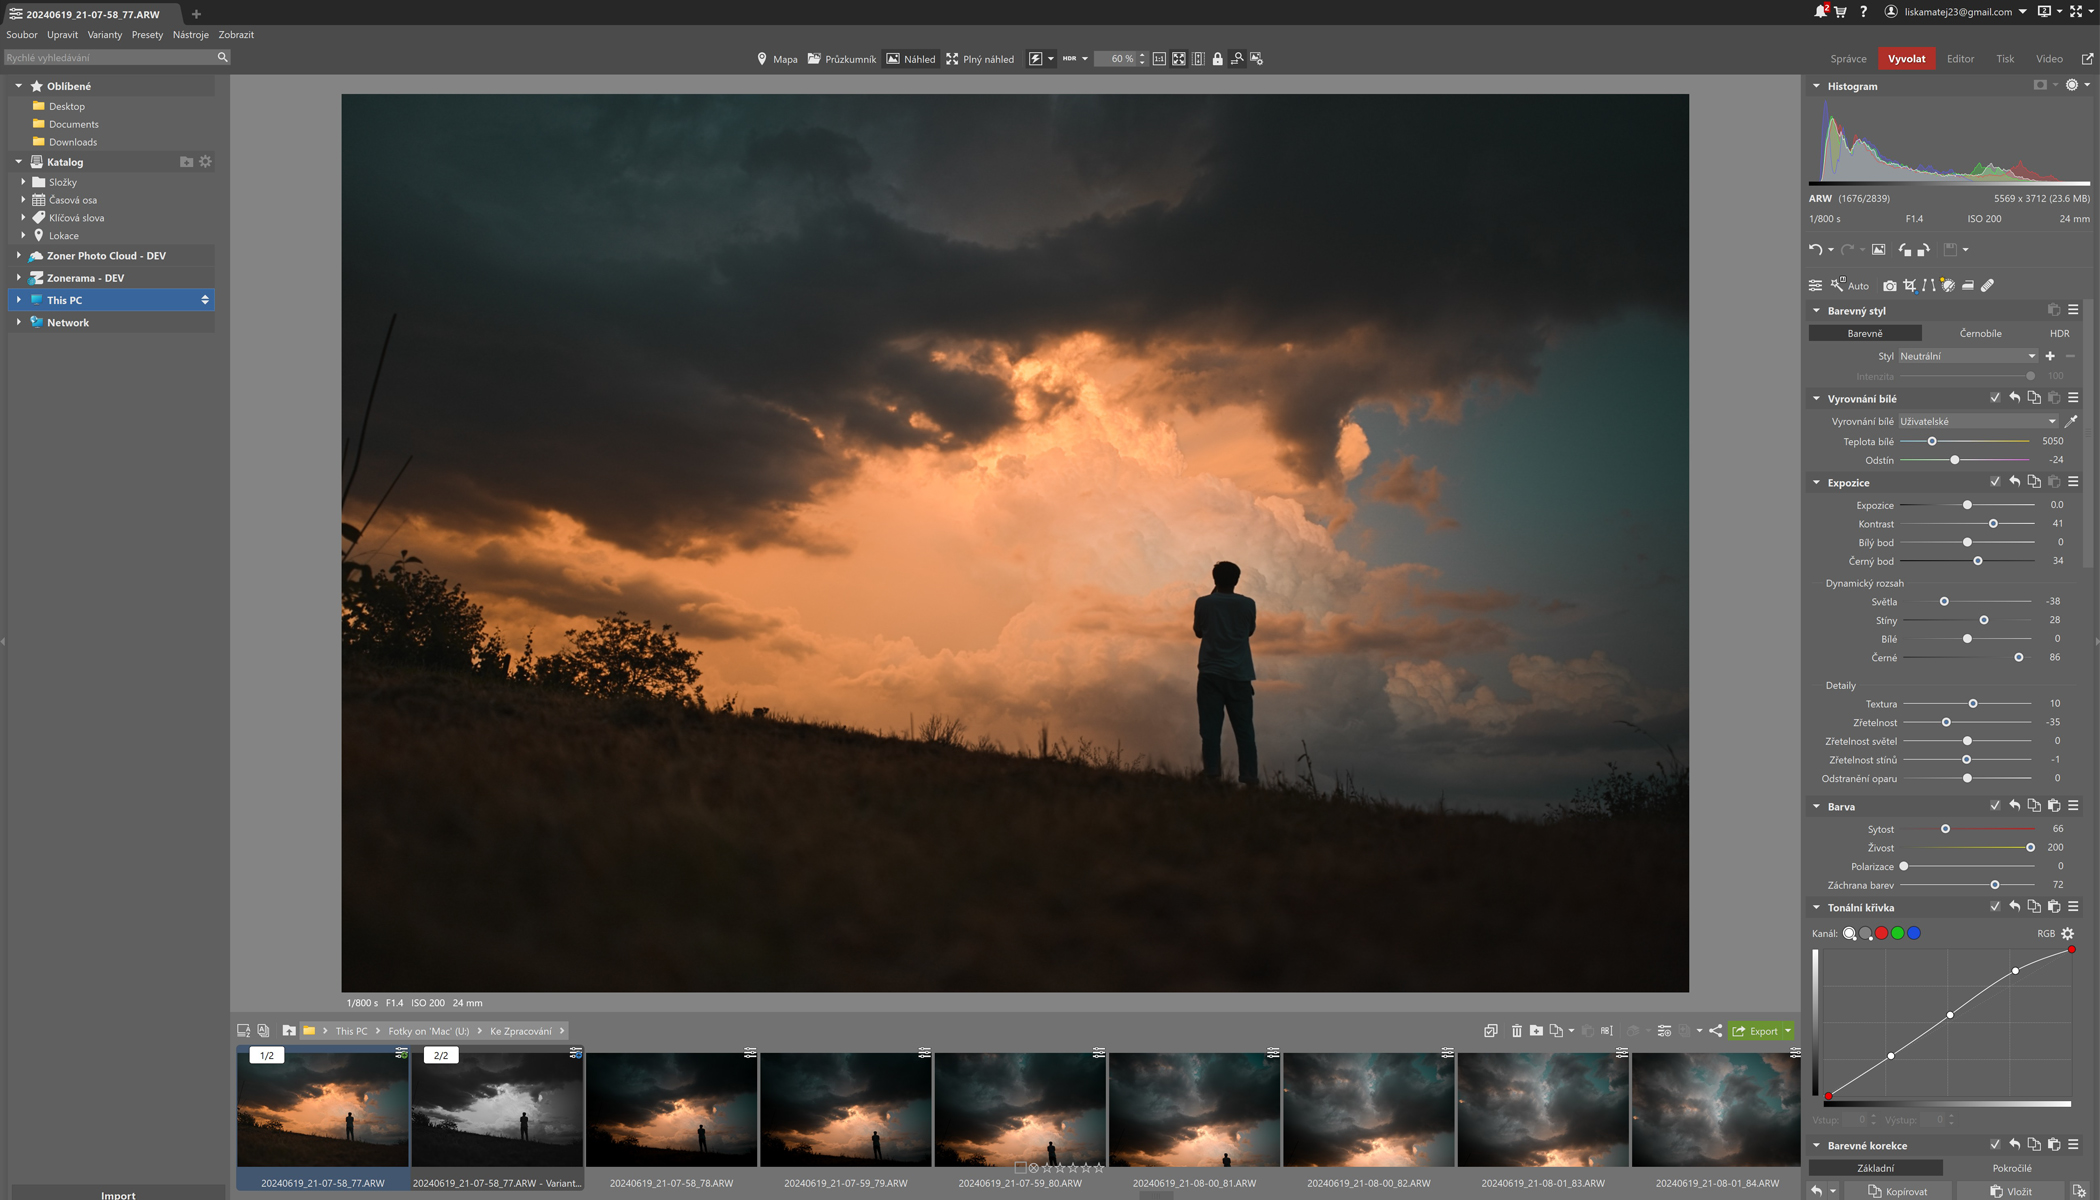
Use the Develop module in ZPS for non-destructive editing. In this module, you’ll find all the major editing functions gathered together in the right panel. You change exposure, colors, etc. in the usual way, by dragging the sliders or by clicking them and using the mouse wheel. To quickly restore the default value for a slider, double-click its name.
How Non-destructive Edits Work
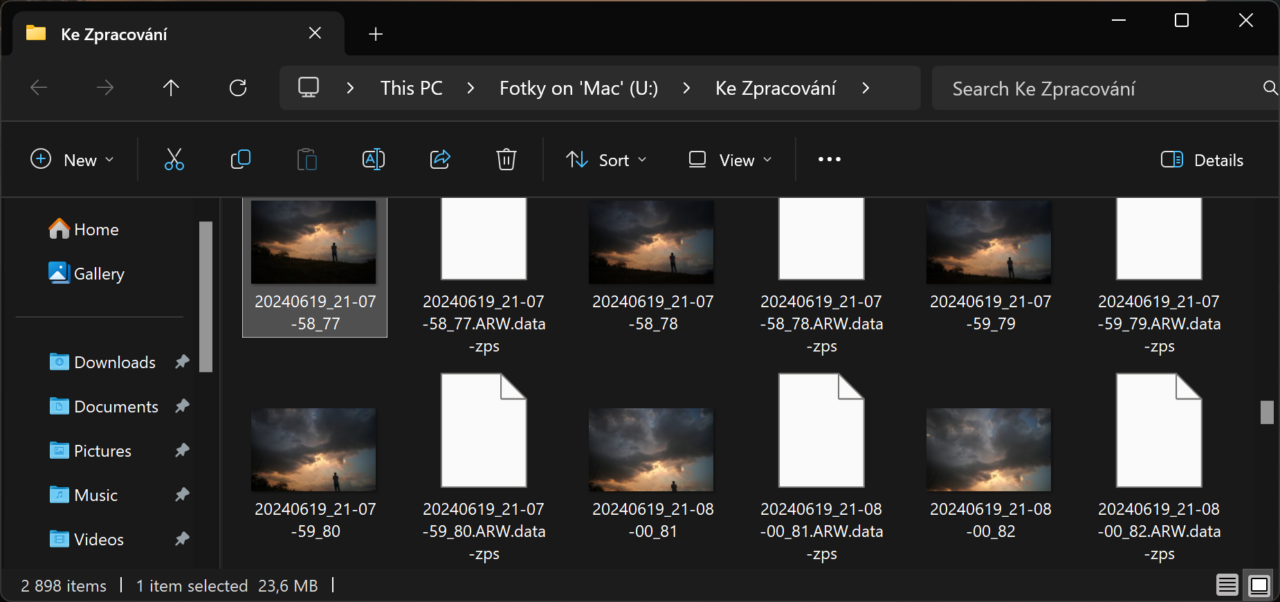
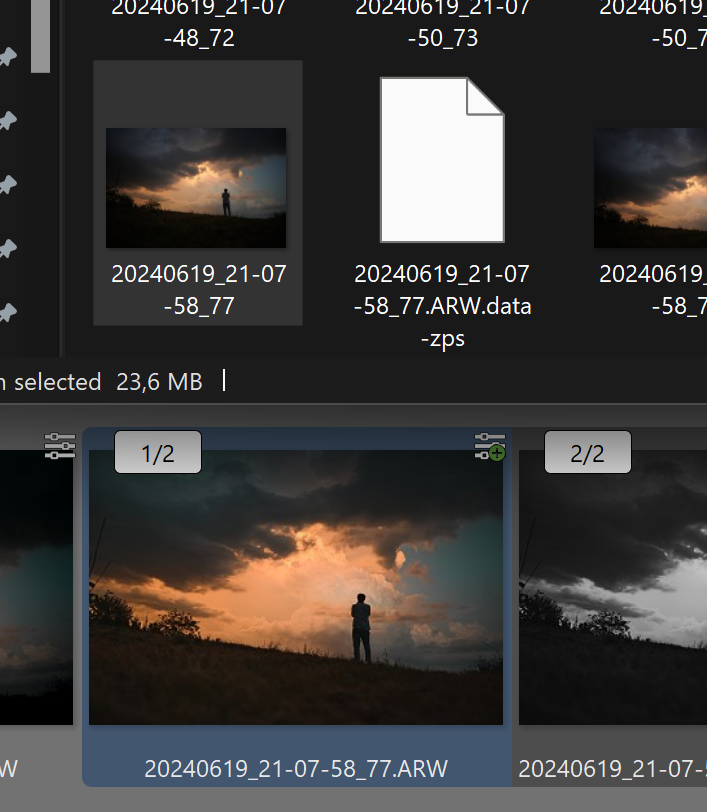
Instead of overwriting your original, ZPS stores your edits in a new informational text file a few kilobytes in size with the same filename as the original, and with the extension .data-zps. This file holds information on all of your edits.
These files created by ZPS are tiny compared to the space it would take to save each photo as separate edited and unedited versions.
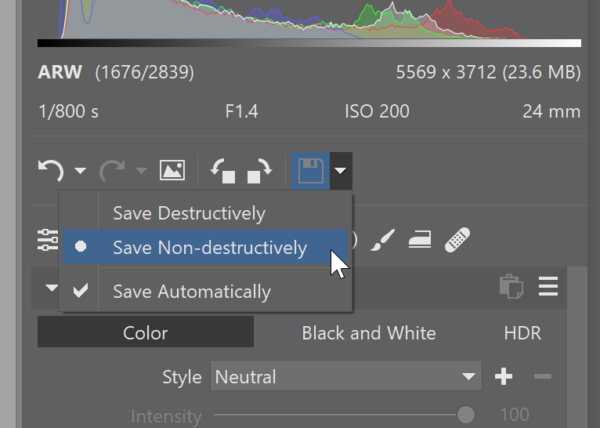
ZPS stores an editing history automatically. That way, you don’t have to save interim versions. And if, for example, your laptop battery runs out when you’re not looking, you won’t lose any work. After returning to a picture in the Develop module, you see all of the sliders right back where you left them, and you can get right back to adjusting them.
The Data File
The data file isn’t an edited picture file, but it does contain a list of your edits. When you change a picture in Develop, leave, and come back to that picture, your changes are still visible, because they were stored in this file. And this is in fact a fairly typical workflow for in-progress photos.
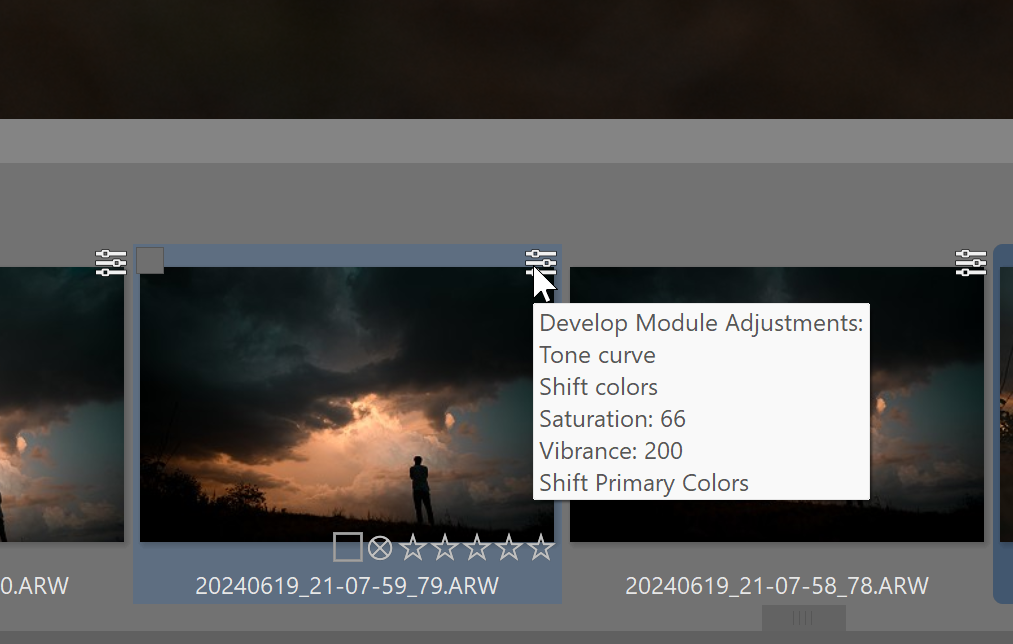
Meanwhile, you can easily tell which of your photos have non-destructive edits: just watch for the “three sliders” icon on their thumbnails. Hover over this icon to see what changes you’ve made to a picture in Develop. That’s an easy way to quickly tell an in-progress picture from one that you’re done with.
Your Changes Are Only Visible in ZPS
It’s important to keep in mind that these are changes that can only be seen in ZPS, and that alongside the original file there’s a data file with the changes, without which you won’t be able to display your non-destructive edits. So if for example you copy photos without their data files or open them on another computer where you don’t have those files available, your non-destructive edits will not be displayed. And if you open a picture in other software, such as the Windows picture viewer, your changes will be invisible there as well.
The same applies when you want to print your pictures or publish them somewhere. In those cases you need to finish up your “in-progress” photos, by exporting them.
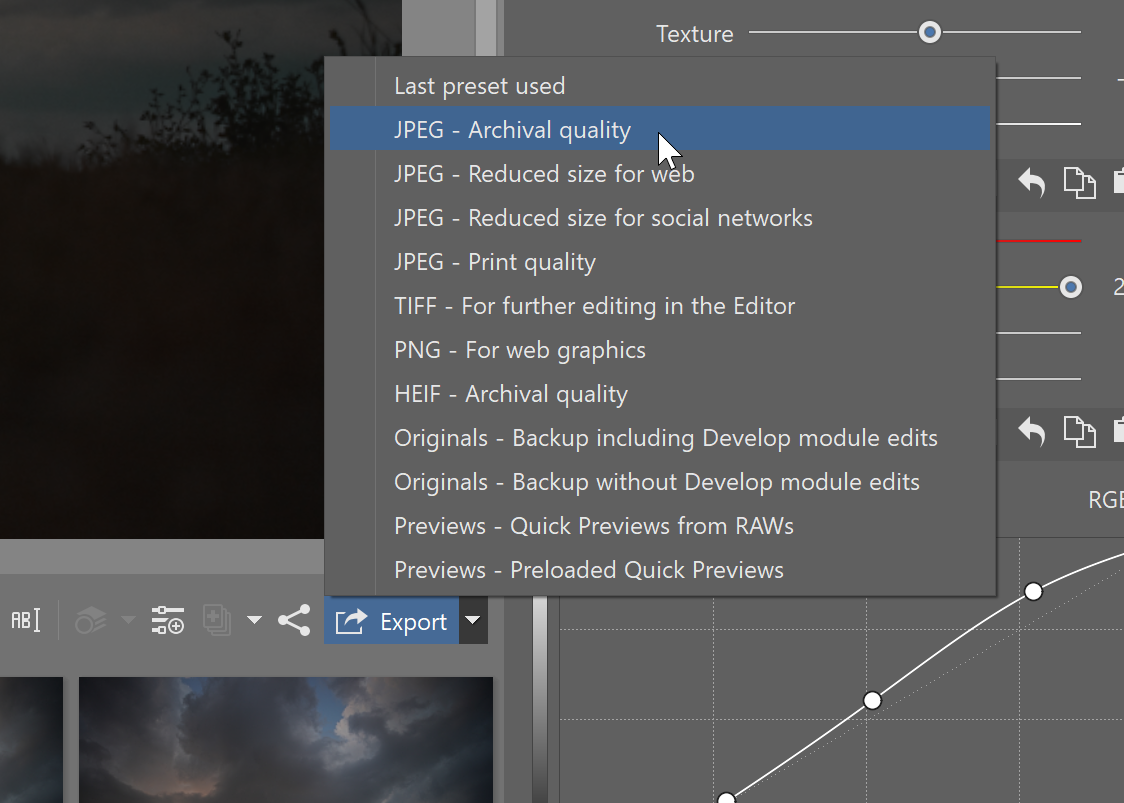
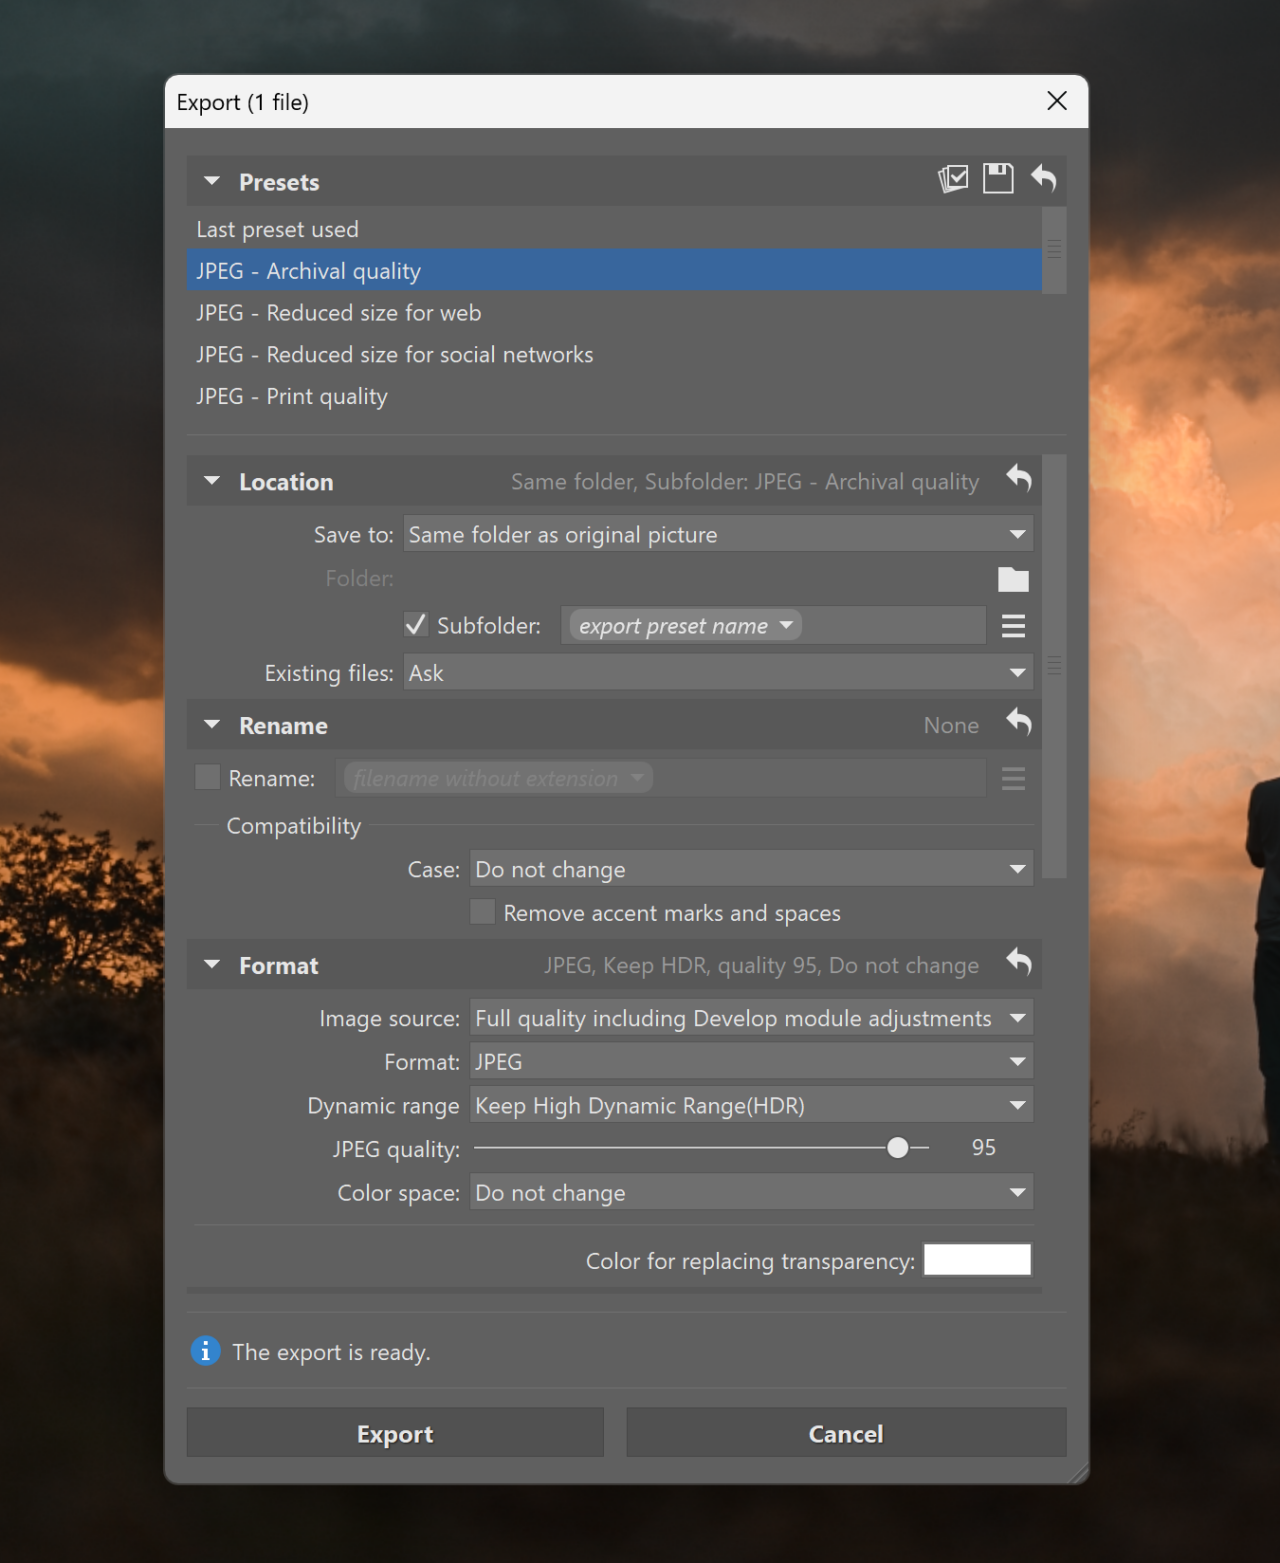
When a photo is ready, click the little triangle by the green Export button and choose how you’ll be using that photo. If you have disk space to spare, use JPEG – High quality for archival. If you only want to use the photo somewhere on the Web at preview quality, then choose the corresponding option.
After making your pick, you just need to choose where you want to save the exported photo file and choose its quality and other parameters.
You can export photos at any time, and you can do it not only from the Develop module, but also from the Manager. There you can even export a batch of photos at once. For example, a set of photos that you just found using the Quick Search box.
Invented for RAW Format, Perfect for Every Format
If you’ve been using ZPS for a while, you might know about another way of returning to pictures’ original versions—our Backups of Originals feature. That feature is useful, of course. Its main difference from non-destructive edits is that non-destructive edits also store every step you’ve taken along the way, enabling you to roll your steps back. Another major advantage of non-destructive edits is that you don’t have to worry about whether you’re editing RAW or JPEG, because Develop can handle them both and treats them both the same.
TerryB
I’ve been a ZPS user for several years now, and I must admit it took a little while becoming accustomed to the single develop module that covers both jpeg and RAW files. I’d become so used to creating full copies of my “developed” images, be they jpeg or jpeg derived from RAW, that not so readily knowing whether I was working on a jpeg or RAW file was a little unnerving.
I’ve become used to it now, although I still keep ZPS 17 as I find it better in viewer mode for scrolling back and forth between consecutive images.
What I’m not so clear on regarding ZPS 18 is the editing list itself. For example, if I make, say, 5 adjustments to a file, for simplicity let’s call them 1 to 5, is it possible to go back to the image and make a change to only adjustment #3, for example? Whatever adjustment #3 was, if I subsequently re-work it, does my later adjustment override or add to, the earlier one?
Zoner
Hello Terry,
To remove a change in our Develop section, you have to roll back all the changes that came after it – so by removing adjustment #3 in your example, you would automatically also be removing the two later changes.
If you subsequently rework adjustment #3 – let’s say it was the Exposure slider, and you later move Exposure again – your later adjustment overrides the earlier one (in other words, it’s relative to the picture’s starting exposure, not the exposure from adjustment #3), and both slider-moves are shown in the history.
If you’re familiar with the Undo function in for example Microsoft Word or our Editor, it’s very similar, except that this history sticks around as long as you want, unlike the Undo list.
TerryB
Thanks.
Loyal Customer
I think this article is very misleading, to put it mildly. I’m just trying to be civil and not call it flat out deception.
If you are editing a jpg file, and then you saved it, for example, including, say, resizing, a huge file from a FF camera, to something like 800×600 for web viewing, there is no way on earth you can restore that file to the original size and resolution after a save. As soon it is saved, the destruction already took place, no matter what text/info file you store with it.
As for the info file stored with it, it’s useless. It has no effect on the fact that editing and then saving a jpg file is destructive. Any image editor allows me to do as many Undeletes as I want. I could specify up to hundreds of undeletes in the settings. I understand these steps may not be stored in an info file by ALL editors, but some editors do store such info automatically.
The bottom line is that jpg editing and saving is destructive, and any statement to the contrary is misleading and constitutes false advertising.
Most likely my comments will not be published.
PACO
I am user (satisfied) from ZPS 5 or 6 …
But at what number the 64-bit plugins can be used?
ZPS 27 or ZPS 98?
Zoner
We have no plans to add support for 64-bit Adobe plugins at this time.
TerryB
As I understand it, ZPS 18 is now able to treat a jpeg equally as though it were a RAW file. Non-destructive editing of RAW files has been around for some time, but as one can’t do anything with the RAW file, to print for example, it will have to be converted and saved as a jpeg, or TIFF file, first and from which a print can be made.
We’ve long understood that any non-destructive adjustments to a RAW file have been stored in a side file, as explained here by Zoner, and this “set” of instructions is what is used to display a RAW image that looks like a normal picture, but seen as we adjusted it. Each time the RAW file is opened this set of instructions ensures we always see our edited file. As odd as it may seem, we can now work in the same way with jpegs. But before I commented here, I worked on some images that I first copied and proved to myself it does work.
Remember this only works in ZPS 18, and whilst your derogatory comments will apply to saving jpegs in conventional software, it does NOT apply to ZPS 18.
Open a jpeg and make any adjustments felt necessary, then whilst still in the develop module, click on the export arrow and this will take you to a dialog box where jpeg quality can be set and, if you want to, the image can be resized by dialling in the number of pixels on the long side of the image. Hit save and the image will be saved in a new folder “Export”, which in my case I keep within the main folder. You will see that the resized image is indeed smaller but, importantly, go back to the original jpeg and you will see it as per all your adjustments and without any reduction in file size. If you wish to get back to the pre-adjusted image so you may work on the original again in the develop module, simply click the little crooked arrow at the top and it will automatically revert you to the original image. By clicking a right facing crooked arrow you will be taken back to your adjusted image.
It is sad that you felt the need to comment in the way you did when it would seem you haven’t tried ZPS 18. Otherwise, you would have known better. By the way, other than a consumer, I have absolutely no connection with the company. This is an unsolicited comment.
Cool_Man
I stand by my comment.
If you save the jpg file to another folder (or to another file name), the original jpg is not affected.
There is nothing new here.
The author doesn’t go that rout, and did not save a new, edited file. The article talks about not creating new files and consuming hard disk capacity!
We have used “Save as” for years, or decades now, so we don’t write over the original file and affect its quality.
The difference here (in 18) is that a text file containing the editing steps is being saved.
Your assumption about me not having tried ZPS 18 is wrong.
I’m not new to this business. I have been using computer imaging since the mid 1980s, long before Adobe got involved in imaging, and I’m sure I know a little thing about it.
In most cases, saving a jpg file is not going to terribly affect it (if it is not being resized, and / or its resolution reduced), but edit and save it a dozen times (usually unlikely), and the degradation would be very clear.
My comment was not derogatory, or meant to be derogatory, but it was a strong objection to the claim.
Zoner
Hello Cool Man, you are right when you note that editing and then saving a jpg file is destructive.
The thing about Zoner Photo Studio 18 is that you can work in two different sections with two different approaches.
If you edit your photos in the Editor section, it’s exactly as you write. You take a JPEG file > you edit it and save the edits > the edits are written in the file and the file is damaged – this is destructive.
Then there is our Develop section. It works with pictures like this: You take a JPEG file (or RAW, or PNG, etc.) > you make the edits you want > the edits are written to a text file named (picture’s-filename).data-zps. The original picture is still untouched. To use the edited picture, you have to click Export. When you do this, ZPS basically takes the original and the data-zps file and merges them into a new picture file (= a picture that contains your edits). The original is even now still untouched, but since the Develop module reads both the data-zps file and the original picture in at once, you can still see the edits you made to the original. And you can still edit the original later.
We hope that these edits are more understandable like this.
We will be very happy to answer any of your questions at support@zoner.com if you try out Zoner Photo Studio 18.
Cool_Man
Thanks to all for taking the time to comment or reply.
Cool_Man
Thanks for the reply. I have been using non-destructive editing for years (using a competitive product which is one of the oldest image editors).
I also use other products, such as Phase One’s Capture One 9, Canon’s Digital Photo Professional, Photomatix (by far has proved to be the best at aligning multiple exposure images correctly), Silkypix, Picture Control, RawTherapee, Nikon’s Capture NX-D, Picturenaut, Corel’s Paintshop Pro, Corel’s AfterShot 2, Zoner Photo Studio, and a few others. Some of these products can do non-destructive editing.
Zoner is good product, and I have put it to good use actually over the past few years. It has its own unique features. I have nothing against the product itself at all.
Glad we are in agreement, and that we now have better understanding.
Zoner
Thank you for your comments, it’s always good for us to know if we say something in the understandable way or not.
TerryB
My apologies for assuming you weren’t using ZPS 18, but from your initial post and the comments you were making about destructive editing of jpegs in 18 is giving a very misleading impression of 18’s non-destructive editing capabilities that I did think you were trolling.
That on which we do agree is that doing a straight “save” with a jpeg image will involve some degree of image degradation, the first save can be quite minor and may go unnoticed, but if subsequent edits to this saved image are saved again, the destruction is cumulative. And of course, this overwrites the original permanently.
Saving an edited file as “save as” does at least leave the original file unchanged, but the point you do not press home is that details of the file edits are still lost and will not be displayed if the saved as image is subsequently called up for re-editing, Now there may well be other software where this is possible with jpeg files, I simply don’t know. ZPS 18 does not overwrite the original jpeg file, so when this is subsequently called up for re-editing the original edits are still displayed. And your referencing having access to any number of undeletes, is itself misleading. In all the editing software that I’ve used over the years, undeletes are only available during the process of editing. Once you perform a save as, how do you access the undelete function when you call up your edited jpeg? As far as I’m aware, you can’t.
What is true is that the exported file ZPS 18 creates from an edited jpeg file can’t be reconstituted to the original is correct. But this is not the point – the original jpeg is still available to be recalled, along with the last editing settings, to be re-worked on. And surely, is not this all that Zoner is actually saying?
sydney harrod
It seems to me that the article is over-selling the new feature. It merely protects you against clicking Save instead of clicking Save As. A more welcome upgrade would be to separate those two a bit further apart.
Maybe it’s worth mentioning that in the rare cases where intermediate edits are worth retaining they can be identified by brief code inserted before the filename extension.
TerryB
It is offering more than a protection from clicking on save instead of save as, although this alone is useful.
When I edit in ZPS17 and do a “Save As” the original file, as one would expect, is not over-ridden”. However, if I subsequently re-visit the original image all the sliders have bee reset to their nominal settings and do not display the settings to which they were set in creating the saved as image,
Now, when I edit in ZPS18 and export the developed image to do a save as final image, if I should subsequently revisit the original image to make any minor adjustments, Zoner will display it with all the sliders returned to the settings to which they were set when previously working on the image.
Zoner
Thank you for your comment Sydney. The most important thing is to be clear what section we are talking about. This article is about non-destructive edits in Develop section of ZPS 18. There is nos Save and Save as, only Export. On the other hand you can use Save and Save As buttons in Editor section and we beleive it works exactly the same as in any other app.
Phil
Hi, I have a question about files with non-destructive edits applied. I have a set of 220 files and I have applied edits to maybe 20 of them. Is it possible to filter or sort by files that have been adjusted in Zoner Develop module so I know which ones need to be exported? I have set it so that I can see the overlay icon that shows that a file has had edits applied but can’t find a way to group, filter, order or select by this property.
Thanks for any help!
Phil
Eva Krusoftova
Hi Phil, Thanks for Your question. Our support from ZPS X will contact you and try to resolve your issue.
Eva from ZPS X