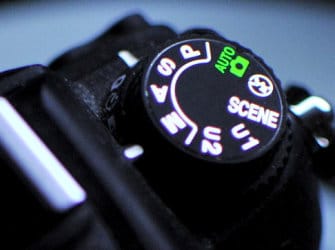
PASM Modes: Get Your Camera under Control
Among beginning photographers’ most frequently asked questions is: “How should I turn that little wheel?” In today’s article, we’ll answer exactly that question. You’ll learn how each mode works, when to use the P, A, S, and M modes, and what goals each mode serves best. And even if you already know your camera modes, then you can recommend this article to your friends to answer any questions they have about them… a sneaky way to get more time behind the shutter!
Every DSLR has PASM modes, and they’re also found on mirrorless cameras and the more advanced compacts (especially the most advanced ones). The PAS modes are semi-automatic, so they each calculate at least some of the time and shutter settings automatically. In P mode, both are chosen automatically. P mode is still semi-automatic, though, because your camera lets you adjust the remaining settings yourself. Once you learn to work with PASM modes, you’ll have your camera under control like never before.
P – Program
This is a semi-automatic mode that is very similar to full-automatic mode—it’s the “programmed automatic” mode. You can set the sensitivity—the ISO—yourself. You can also set a focus point, and toggle the use of a flash and of RAW format.
The full (green) automatic mode uses the camera’s judgment for practically everything, and it doesn’t always get things right. P mode, in contrast, is great for beginning photographers who want to learn more about photography, but don’t yet fully understand the time/ISO/aperture triangle.

S (Tv) – Shutter Priority
Another semi-automatic mode. This is the least used mode in practice. The S mode (or Tv on Canon cameras) lets you set everything except the F-stop. S mode is especially useful when you want to use the shutter speed to emphasize motion (for example when using the technique called panning) or to make it freeze. In this mode, the camera calculates the F-stop automatically.
Time priority is also often used in combination with an external flash. But in everyday photography, there are few situations where you need tight control over exposure time. That’s why S (Tv) is rarely used.
A – Aperture Priority
One of the most-used photography modes. Aperture priority. Depth of focus is what photographers need to influence the most, and aperture is one of four factors that directly affect it. (The others are focal length, sensor size, and distance from the photographed object.)
By changing the aperture value (F), you also signifcantly influence the exposure time. And additionally you can conveniently influence the photograph’s brightness—by overexposing it (this brightens it) or overexposing it (this darkens it). Aperture priority mode is useful in every genre, from portraiture to landscape to reportage to sports.
M – Manual
In this mode every automatic system that could influence exposure has been turned off. These systems’ judgments are left only to serve as advisors. To see their advice, look in the viewfinder. Manual mode is mostly used by experienced photographers, but it’s also vital for scenes whose light conditions make the camera’s judgment go haywire.
The classic examples here are when taking pictures with a studio flash or with multiple flashes, or when the scene is lighted using a large number of lights of different intensities or colors.
Adrian
There are 2 overexposings and no underexposings in aperture priority script
Kevin
There is nothing in this article that isn’t in your camera manual.
Petaluma John
RTFM? You have to be kidding. :)