What is Chromatic Aberration and How to Remove it
Chromatic aberration is a common lens issue that can ruin an otherwise great photo. Learn how to easily recognize it and effectively remove it using tools in Zoner Studio. See how you can improve the quality of your photos without having to buy an expensive lens.
In this article, we cover:
- What chromatic aberration is and what causes it
- The two main types of chromatic aberration (LCA and TCA)
- How to recognize chromatic aberration in your photos
- How to remove it step-by-step in Zoner Studio
- How to add chromatic aberration creatively for an interesting visual effect
Camera equipment manufacturers must carefully balance various design compromises. It’s not that they don’t know how to make lenses with minimal optical defects. It’s that such lenses are complex, heavy, and expensive to produce. These high-end lenses do exist, but with cheaper glass and simpler construction, some flaws remain. They’re often corrected later using editing software. Sometimes directly in the camera and other times in Zoner Studio.
What causes chromatic aberration
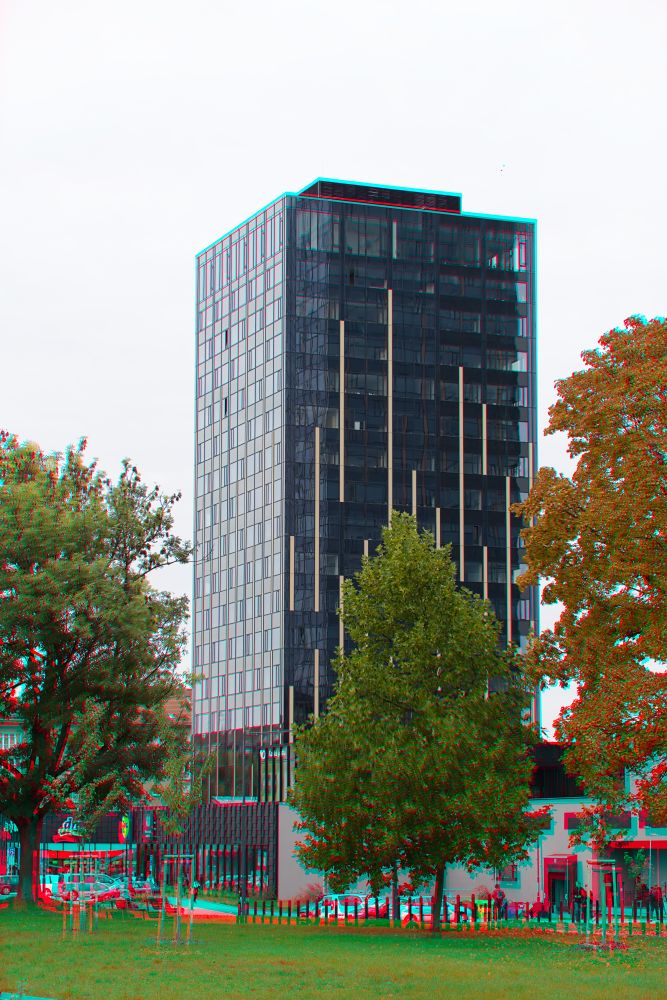
Chromatic aberration is when each wavelength of light (each color) refracts at a slightly different angle as it passes through the lens. Instead of a single white point being recorded as one pixel on the sensor, the light spreads out across adjacent pixels. Some colors end up on one side, and others on the opposite. If this behavior isn’t corrected by other lens elements, it becomes visible in the resulting image.

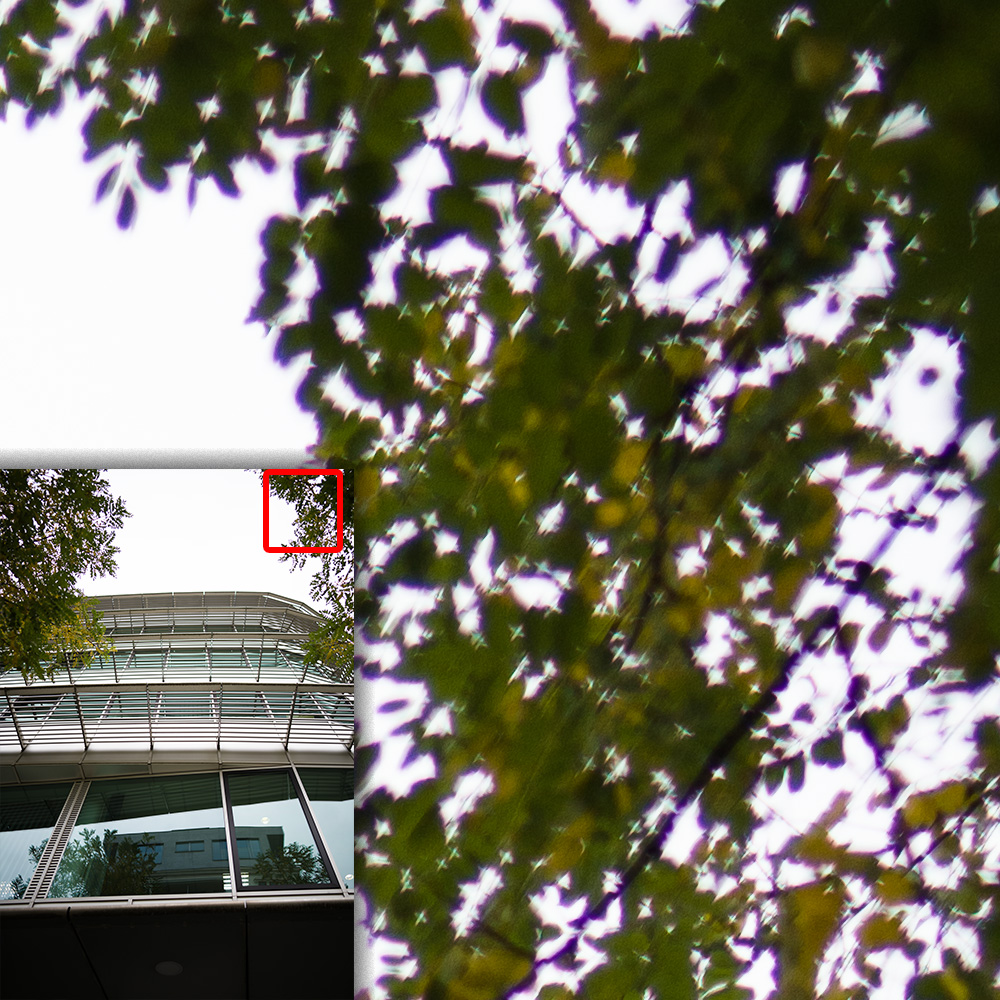
You don’t even notice it most of the time, because in most photos, the problem isn’t significant and only appears as a slight softness. But it becomes visible along sharp edges, especially where very bright and dark areas meet, such as a black silhouette against a bright sky.

Using a higher f-number can reduce chromatic aberration. However, that’s not always practical. This is why it’s useful to know how to correct it in post-production.
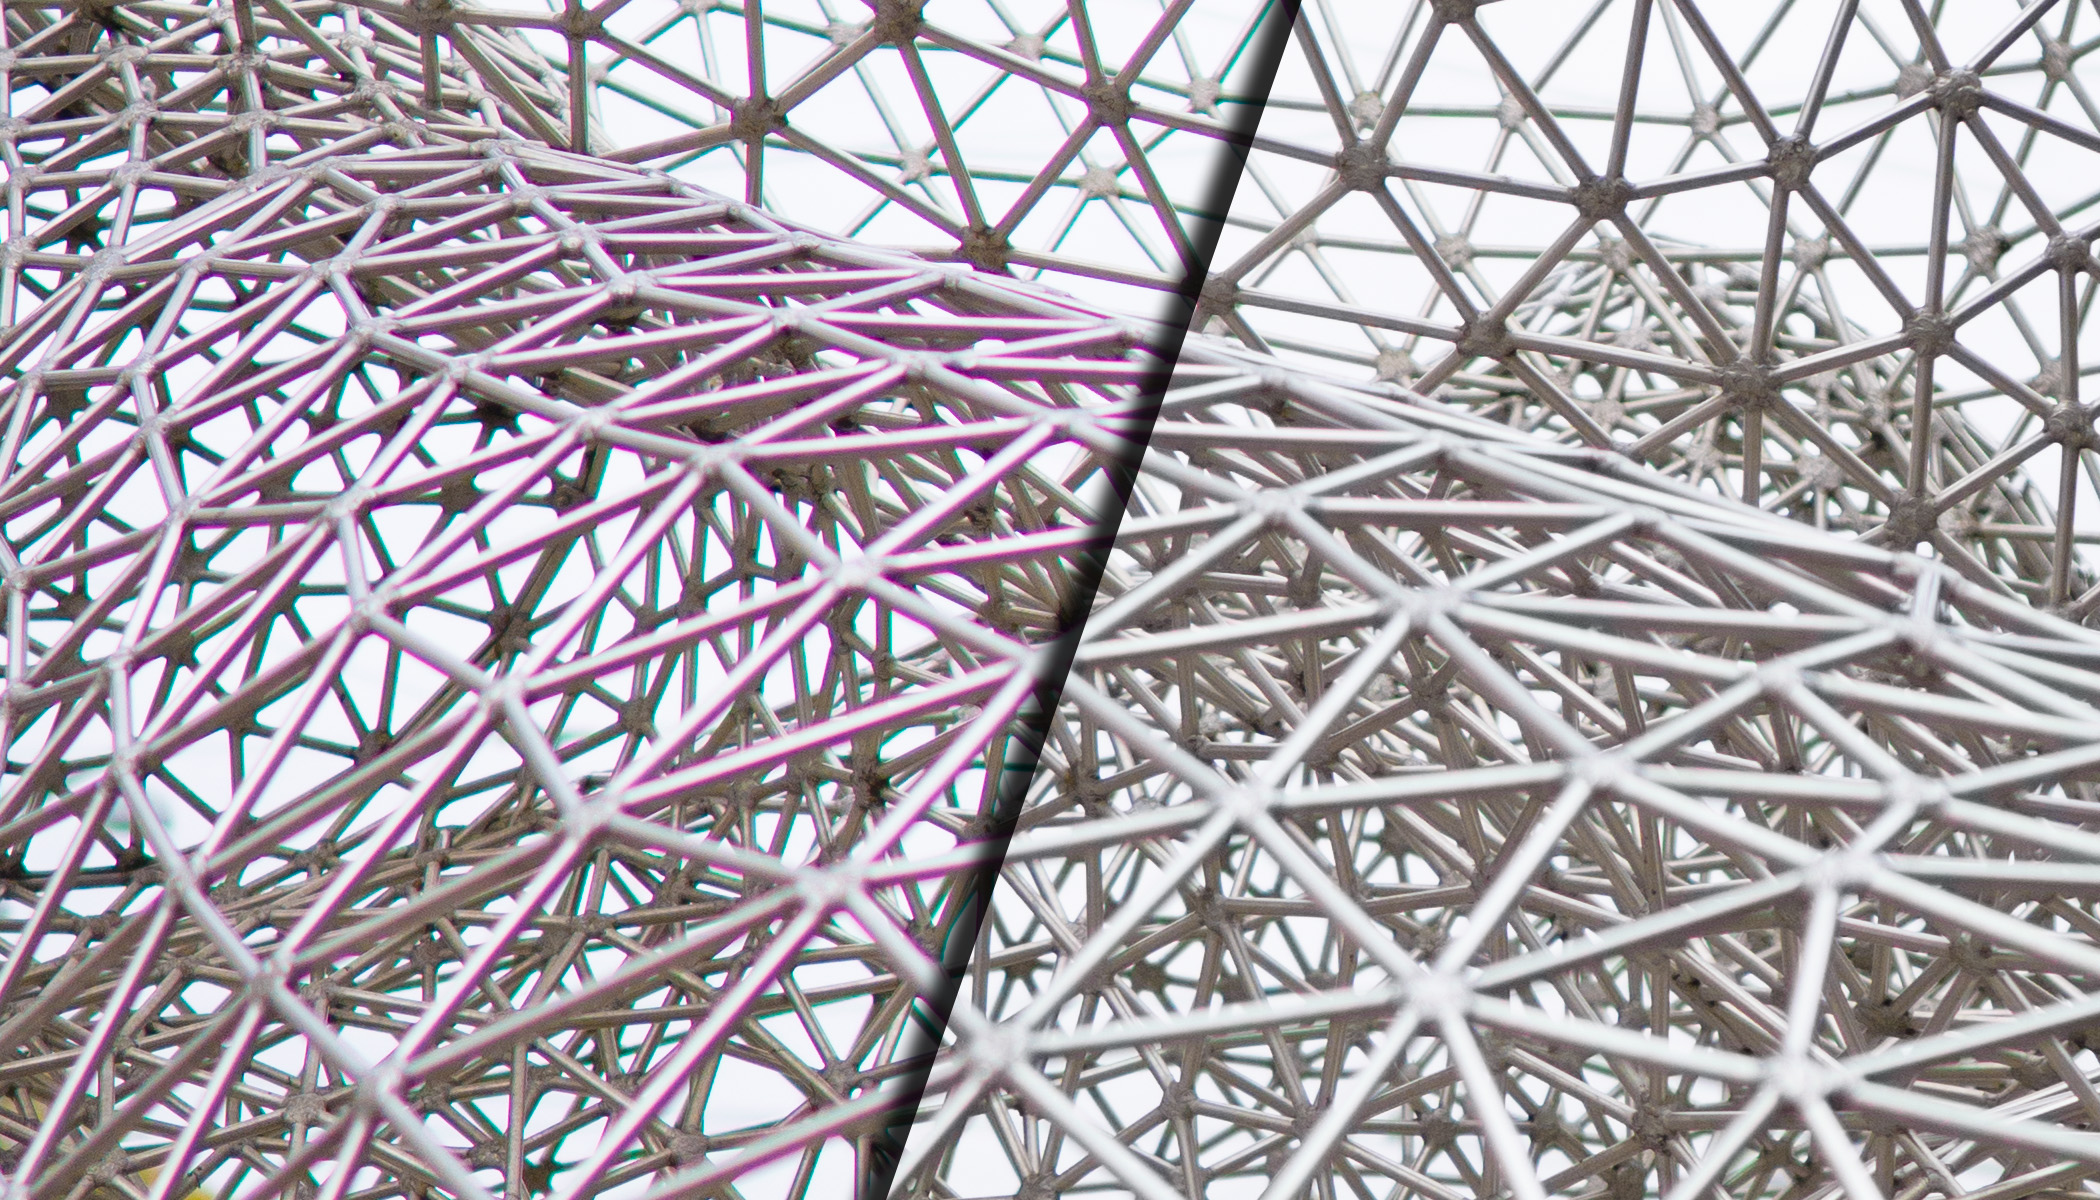
Two types of chromatic aberration
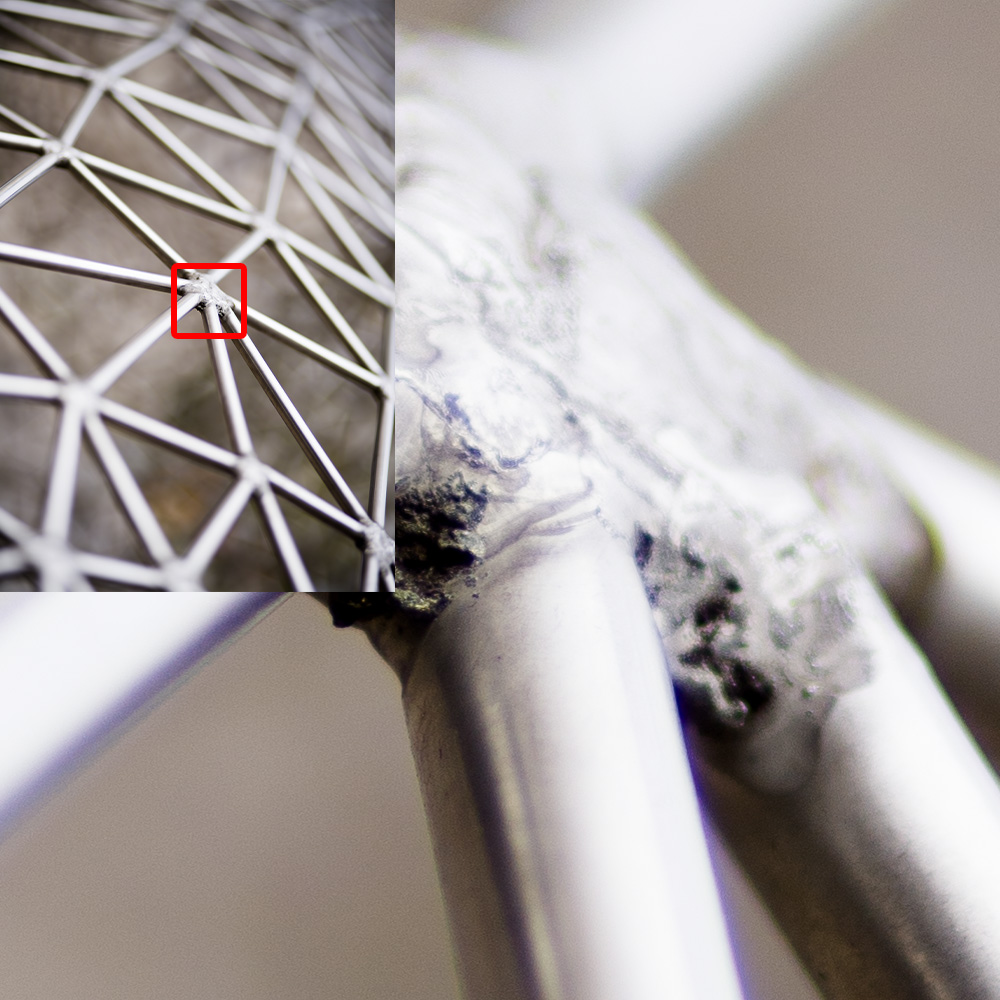
There are two distinct types of chromatic aberration. The first is longitudinal, or axial chromatic aberration, also known as LCA. Its effect increases gradually toward the edges of the image and doesn’t appear in the center. It’s more visible in the corners, farther from the center of the image.
LCA depends mainly on the lens model and not the scene, so it’s easier to correct. Sometimes selecting the correct lens profile is enough.
The second type is transverse, or lateral chromatic aberration also known as TCA. It’s usually well-corrected at the focus point, but worsens both in front of, and behind, the plane of focus.
Since TCA depends on the scene depth and composition, it’s harder to correct, but there is a reliable way to do it.
How to correct chromatic aberration in Zoner Studio
Zoner Studio offers several easy options for removing, or at least greatly reducing, chromatic aberration. You can try each one and see which gives the best result.
You can find the necessary settings in the Develop module under the Camera and Lens (M) icon in the right panel. It’s best to apply these corrections to photos in RAW format. This is because the adjustments are higher quality than with JPEGs, where some corrections may not even be available.

Selecting the correct lens profile
In some cases, the lens profile is embedded directly in the image file, so basic optical defects are automatically corrected. If not, you can select your lens from the list of supported lenses. Make sure to select your camera first. Then, under Chromatic Aberration, choose Based on Profile.
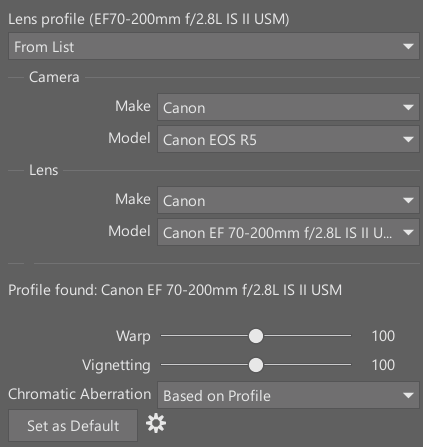
This method helps with minor aberrations. If your lens isn’t listed, try selecting Based on Image Analysis instead. Zoner Studio then attempts to reduce the chromatic aberration automatically.
Removing remaining color fringes
In many cases, aberration extends beyond a few pixels or appears throughout the scene and can’t be fixed with profile correction alone. In that case, there is a more general solution which works for both RAW and JPEG files.
After lens profiles, there’s another section called Defringe.
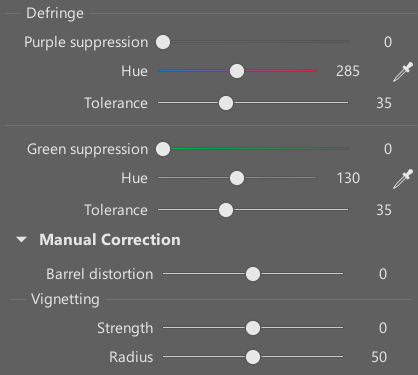
The key sliders are Purple suppression and Green suppression. The wider the fringe, the farther you need to move the slider to the right.
Medium Defringe settings removed most of the purple color cast.
If the color of your fringe differs from the usual purple or green, use the Hue slider to fine-tune the color. You can also click the eyedropper icon to the right of the slider. Click the colored edge in the photo to sample the exact hue. If that still doesn’t help, increase Tolerance to include nearby color tones.
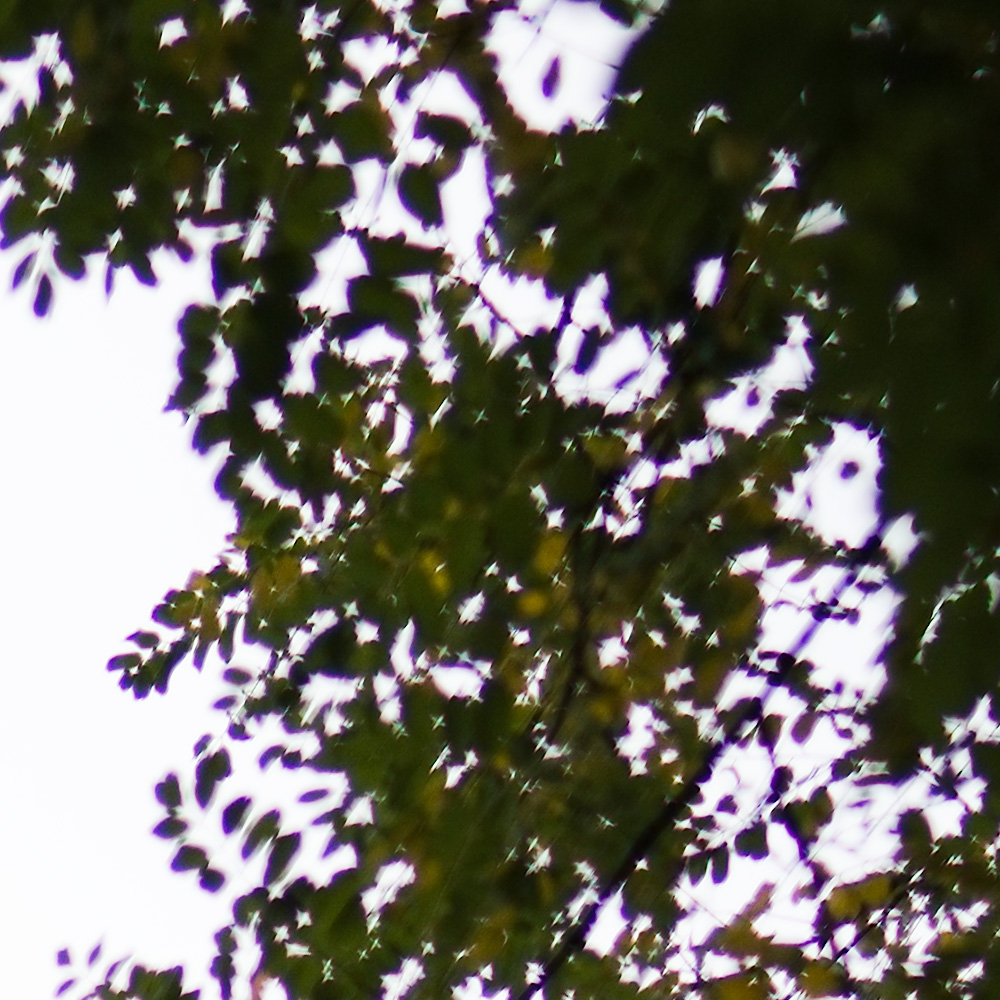
Be careful, though. The higher the Suppression and Tolerance, the more you can unintentionally affect other areas. In less saturated photos, this usually isn’t an issue. But when your image includes similar purple or green tones, you risk losing them. In extreme cases, the entire image can shift in color. You can usually notice that immediately. But be cautious with subtle details like purple lipstick, which can be affected without you noticing.

Extreme correction (all sliders pushed to the right) sucked the colors we wanted to preserve out of the image.
Manual correction
The final option for fine-tuning color shifts at the edges is below Defringe, under Manual Correction -> Chromatic Aberration.

These sliders shift individual color channels relative to one another so you can realign them and eliminate simpler LCA artifacts. However, this method requires precision, and geometric distortions in the lenses can sometimes prevent a perfect fix.
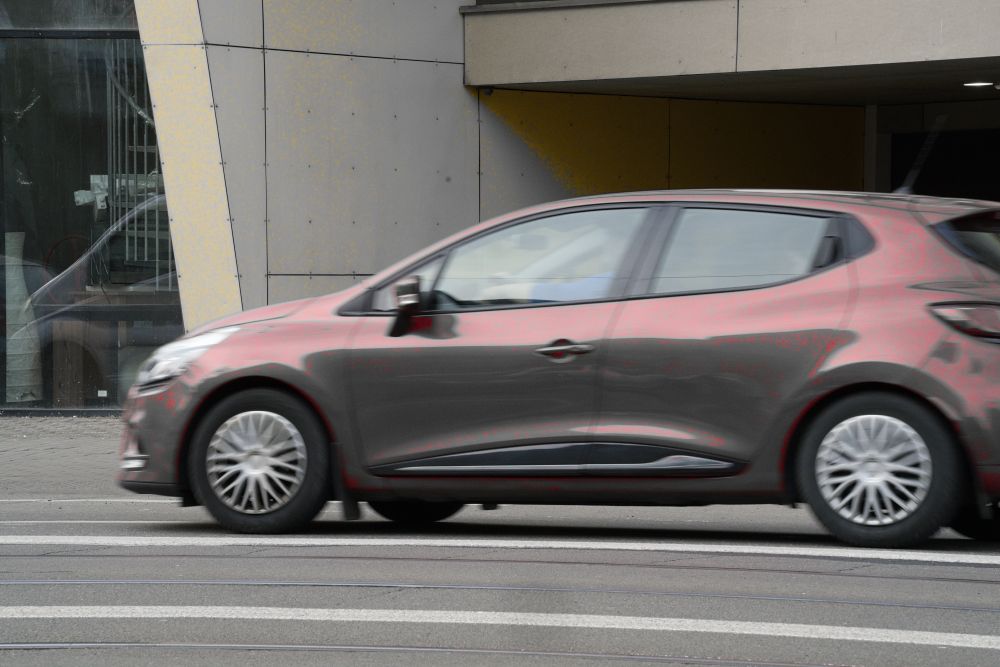
Adding chromatic aberration
Zoner Studio also lets you go in the opposite direction and add colorful lens defects in the Develop module. Disable the Camera and Lens (M) icon and go to Effects -> Add Chromatic Aberration.
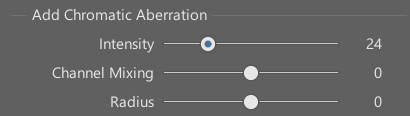
Adjust the Intensity slider to control how visible the effect is, the Channel Mixing slider to change its color, and Radius to set how far from the image center the effect appears.
Correction for better photos
Adding chromatic aberration can be fun and make ordinary photos more attractive. But in most cases, removing it leads to better photos. Even if viewers don’t consciously notice purple or green fringes, an image without them looks cleaner and more professional. Of course, you can always invest in a high-end lens, but even without one, Zoner Studio can help you get photos free of distracting colored edges.
FAQs
What is chromatic aberration? Chromatic aberration is an optical lens defect caused by the different refraction of light wavelengths, resulting in colored edges in the corners of your images.
How can I recognize chromatic aberration in a photo? You see purple or green fringes appear along sharp edges where bright and dark areas meet.
Why does chromatic aberration often appear in the corners? Because longitudinal chromatic aberration (LCA) increases from the center of the image toward the edges and corners.
How do I remove chromatic aberration? You can use software tools, such as those in Zoner Studio, to reduce or completely remove chromatic aberration. Step-by-step instructions are provided above.
How can I add chromatic aberration for creative effects? Go to the Develop module of Zoner Studio, and go to Effects->Add Chromatic Aberration to apply the effect creatively.
There are no comments yet.