Capturing the World in a Water Drop
Have you ever admired a beautiful macro photo of dewdrops on a flower that reflected the world around it, and thought that it must be a hard photo to take? It’s not; pictures like these simply need a little preparation and a few basic accessories.
But first you have to answer the question of where you’re going to photograph: indoors with a flash, or outdoors, where daylight will be enough? I personally prefer working at home and lighting with a flash.
That’s because I can’t control the amount of daylight. Also, it can be windy, and so there’s the risk that the photo won’t turn out because my subjects are in motion.
Besides lighting, you’ll also need several other aids:
- a flower holder,
- a syringe with water for the larger drops,
- a spray bottle for the smaller drops,
- some nice flowers, of course, but also perhaps some spiral tendrils (e.g. cucumber tendrils), a blade of grass, or leaves.


How to Work With Backgrounds and Foregrounds
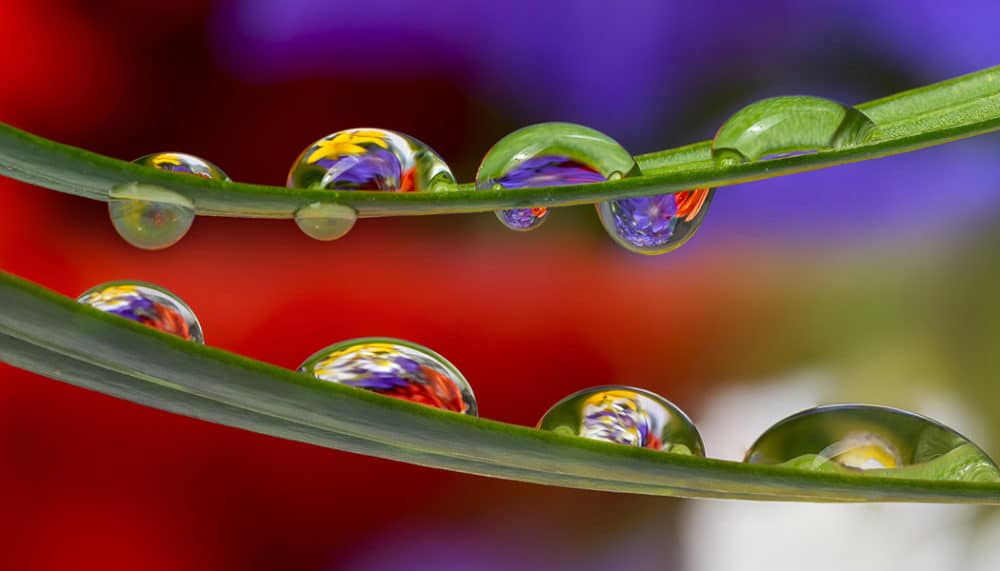
The most important thing here is to learn to work with both the foreground and the background of the photo. The foreground contains the subject, e.g. a blade of grass with water drops. The background is flowers, which will be reflected in the drops. Together they need to form a harmonic whole in their colors and shapes.
When choosing your plants, think through their colors and shapes. Various spirals can look very nice. Before taking your pictures, you should also check whether the drops will hold in place. Certain plants have a waxy layer that sheds water.
Also check the background flower’s distance. It should be distant enough to be completely blurred and create a blurry, colorful background.

Nikon D800, Tamron 180/3.5, 1/250 s, f/18, ISO 100, focal length 180 mm, lighted with an external flash

Nikon D800, Tamron 180/3.5, 1/100 s, f/18, ISO 100, focal length 180 mm
What Gear to Use
A DSLR and a macro lens are a good choice for this kind of photo. But you can also use extender tubes, or a compact in macro mode, if it enables you to come up maximally close. But in that case you’re shading your subject with the lens, so it’s not an ideal solution.
No matter what you’re using, the goal is to maximize zoom. The drop and the image inside it should be as large as possible within the photo.
Besides your macro lens, you’ll also need a tripod. Because you’ll be working with f-stops of f/18 and up, you’ll often need to use long exposure times—too long to shoot by hand. If you have a remote trigger, then it’s good to use that. If you don’t, then replace it by setting a two-second self-timer. But the remote option is more convenient in every way.

Nikon D800, Tamron 180/3.5, 1/160 s, f/18, ISO 200, focal length 180 mm
How to Set up Your Camera
It’s hard to get enough depth of field in macro photography, so set an f-stop of at least f/18. You need to minimize ISO, meanwhile, to keep from ruining your final image with excessive noise. But you can stretch out the exposure to get enough light; just use a tripod and trigger.
Your choices for camera modes are aperture priority and manual mode. I personally prefer manual mode, because I add light to the scene with an external flash.

Nikon D800, Tamron 180/3.5, 1/250 s, f/18, ISO 100, focal length 180 mm, supplementary lighting from an external flash
Using a Flash
A flash is not a necessity for this type of photo, but if you can use one, it has many advantages. One of the largest is that you can choose where to light your plant from. I personally go for side lighting to get a stronger feeling of depth; then my drops have a more visible shape.
Flashes also let you set the light intensity, so you don’t have to only rely on the available daylight, of which there is never enough. Also, a flash lets you take the photo indoors. Arrange everything on your table and light it with your flash. That way you’re not as tied to the weather and the outdoor light.

Nikon D800, Tamron 180/3.5, 1/200 s, f/18, ISO 100, focal length 180 mm
Several Practical Tips
Prepare everything for your photo in advance—both your accessories and your plants. When selecting the flowers, examine everything carefully, and choose only perfect specimens. For macro photography you have to keep in mind that every imperfection, for example every spot on a leaf, will be very visible and will harm the impression from the final photo.
The only way to produce large, precisely placed drops is with a syringe. A spray bottle, meanwhile, lets you evenly cover the flower with many tiny dewdrops.
If you want a zoom above 1:1, use a combination of extender tubes and a macro lens.
Don’t Forget to Edit
Ideally you’ll want to shoot to the RAW format, because it holds up excellently during computer editing. In Zoner Studio you can then make supplementary adjustments to the exposure and the subject’s sharpness, and tone down noise.
You can also improve the final picture by merging images with varying depths of field, which is a very useful technique for this kind of photo. Even if you’re using an f-stop of f/18 or f/22, you may not be able to fit your whole subject into the area in focus. But by joining multiple images that were focused to multiple depths, you can remove this handicap. And you can create magical images easily.
There are no comments yet.