How to Photograph the Motion of the Stars
The seeming motion of the stars is due to the Earth’s rotation around its own axis. The stars form concentric rings around the point that the Earth’s axis intersects in the sky—for the Northern Hemisphere, this is roughly around the North Star. The method for creating impressive pictures that capture this stellar motion is simple.
You can use practically any digital camera for taking static pictures that capture the motion of the stars in the night sky. You set up a tripod, keep it in one place, and take a large number of short separate exposures. Then you join these exposures into a single picture so that you can use specialized software to select, for each pixel, the brightest value that appeared among all of the individual exposures.
Thus when a star is bright enough, it is always the brightest point in the individual exposures, and it is expressed in the final picture showing the part of the circle that the star has time to draw. Both the picture-taking and the assembly can be automated, of course—and here we will describe how to do it.
Joining the Brightest Ones
Naturally, you could blend the individual photos in Zoner Studio, but only with enough patience—in our guide, we will be working with dozens or hundreds of source photos, which is a little extreme for ordinary photography. Specialized software will only make this process faster.

Canon EOS 400D, EF-S Canon 18-55 mm F3.5-5.6, F3.5, ISO 800, focal length 18 mm.
The Right Equipment
You can take the pictures with basic, commonly available equipment:
- any digital camera that enables manual focusing and the use of an automatic trigger.
- A wide-angle lens. When you are photographing star trails, you typically take wide-angle photos similar to landscape photography, in order to capture as many stars as possible. High-quality or fast optics or precise focusing are all fairly unimportant. Certain unwanted effects such as aberration can actually help by giving the picture more colors.
- An ordinary tripod.
- An automatic trigger. You can replace this with laptop control (Canon and Nikon offer a tool for this, or you can use something like BackyardEOS).
- Batteries that will let you keep running for at least two hours, but the optimal choice is either a battery grip or just going for a power socket instead.
- Heating for your optics (optional)—if the temperature drops below the dew point, your lens will fog up. The best defense is some mild heating, which you can easily set up at home.
- If you are shooting out somewhere in nature, be sure to take warm clothing and a sleeping bag with you.
Preparing Before the Shoot
You can record the stars’ motion anywhere and at any time; here are a few tips for choosing a place, time, and composition before you head out:
- You will capture more stars when the sky is dark and free of light pollution. For a good light pollution map, see Blue Marble Navigator. The sky is typically less polluted after midnight (certain lights are turned off) and there tend to be fewer airplanes flying. Try to also face away from light-pollution sources (i.e. to have the city at your back) when taking your pictures.
- If the Moon is in the sky, then the sky will be overexposed and only the brightest stars will be visible. You can check the phase of the Moon and where it will rise using Stellarium.
- It is unwise to take your pictures when ragged clouds will be passing through the main part of the composition. The clouds will be very bright in the picture, and so they will overshadow most of the stars during the step where you apply pixels’ maximum values. Cloudiness far away on the horizon, however, can look impressive.
- Source pictures also arise “on their own” if you are photographing a meteor storm—try combining the source exposures based on our guide.
Photographing Meteor Showers
Photographing meteorites is similar to photographing stars. Use your lens’s wide end, choose a 20–30 second exposure and an ISO of 800–1600, and check that you have the sky dark enough on an individual picture that it will not outshine any meteorite that arrives (since they fly for only a fraction of a second). Shoot repeatedly for as long as you can (you will be going back later to find the meteors; it would not work to wait to press the trigger until you see one). If a fairly bright meteor flies across the scene, check whether it is visible in the picture and how much so, and adjust your exposure if needed (if the sky is too bright or the meteor is rendered too weakly). For meteors, occasional passing clouds are not a problem; on the contrary, they make the composition more interesting. A waxing Moon, on the other hand, will be very distracting, but only shortening your exposure can really help with this. Try including a horizon in your scene—ideally the eastern horizon. Typically most meteors will be flying after midnight when your position is turned towards the Earth’s direction of motion. Every shower has what’s called a maximum, but they can be very visible even several days/weeks away from that particular date.
Composition
Your picture’s composition should work with these factors:
- The positioning for the center of rotation (for the Northern Hemisphere this is roughly the North Star). The closer stars are to the North Star, the smaller the circle they describe in the picture. The center of the rings naturally attracts your viewers’ eyes, and so it is good to take it into account when composing the picture, e.g. to make use of the golden crop and the positions of the picture’s other dominant features. Even if the center is not depicted in the picture at all, the human mind will easily fill its position in from the motion of the stars—and the result should remain harmonious.
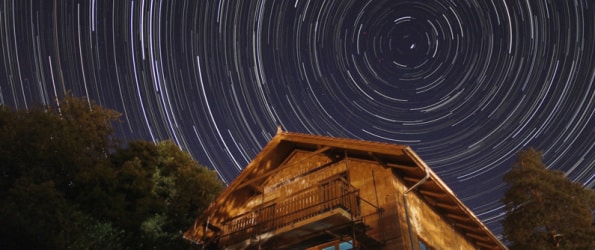
- It is useful to have a static object in the foreground. The motion of the stars stands out especially nice if you have an attractive landmark in the picture such as a church, a massif, or a shining city far away. If you have an external flash or a light, you can light the nearby part of the scene artificially (during one exposure is enough).
- The stars’ motion can be recorded as a reflection on a water surface (you will need a wind-free night) or another shiny surface (e.g. window glass). An interesting effect also arises when shooting through a partially permeable barrier such as tree branches.

Canon EOS 500D, Sigma 10-20mm F4 EX DC HSM, F4, ISO 1600, focal length 10 mm.
And Something More…
Where I live (in Europe at around 49°), over the course of the year you see the whole Northern Hemisphere and a smaller part of the Southern Hemisphere. If you take a picture here while facing south, you capture not only the seeming motion around the North Pole but also a small part of the motion around the South Pole. This transition is interesting in the picture in itself. The camera optics (e.g. fish eye) can also add a certain distortion to the stars’ motion. Around the winter solstice in my location, you can capture truly long exposures (over 14 hours of dark skies), during which the stars draw paths reaching past 180°. Of course, for 14 hours of nonstop shooting, you need to be plugged into a power socket and have a large memory card or a laptop.
Astro Camera Configuration Step by Step
- Switch to your camera’s manual mode. Its automatic modes would degrade the source shots (their settings would vary).
- Set the exposure length and ISO depending on your optics and the surrounding light pollution so that any static landmark in the scene (e.g. a church) is not overexposed, the stars shine brightly, and the sky is relatively dark. Typical exposure lengths are from 30 to 60 seconds, and ISOs range from 200 to 1600.
- Turn off your camera’s noise compensation (Long Exposure Noise Reduction) completely. Leaving it on would significantly interrupt the stars’ motion. To quickly tell if it is turned on, set the exposure length to 10 seconds and take at least one picture. If it takes at least as long to show the picture as it took to photograph it, then this function is turned on.
- After determining the right exposure length and ISO, take at least 11 “dark frames” (dark shots) with these settings. Take these by shooting with the lens cover shut so that no light falls on the sensor. You will use them later for correcting certain defects (hot pixels and uneven sensor sensitivity). It is better to take them in advance, since at the end of the shoot, you may not have enough battery power or card space left.
- Raising the f-stop slightly can help you to create attractive light rays around any bright lights (not stars) in your composition, and increases the depth of field as well. However, it will also decrease the number of stars you can depict.
- No added filters are typically used for the source shots. Yet there is one possible exception: a CLS filter for suppressing light pollution, e.g. in the form of a clip on the body of a Canon camera (note that it is only compatible with the EF line of lenses).
- Unlike when photographing other astronomical objects, you do not need to shoot to RAW; top-quality JPEGs are enough. Since a wide shot angle is typical, minor quality differences are insignificant, and you will be able to store far more pictures on the card and wait less between exposures, and your batteries will last appreciably longer.

Canon EOS 500D, Sigma 10-20mm F4 EX DC HSM, F4, ISO 800, focal length 10 mm.
Right: A composite of 37 exposures at 20-second intervals. The glow in the distance is the French city of Grenoble. Assembling this picture was laborious, because part of the snow under the camera melted during the exposures, shifting the scene. (I had not taken a tripod with me, and the camera was only laid on a plastic bag.)
Canon EOS 400D, EF-S Canon 18-55 mm F3.5-5.6, F3.5, ISO 1600.
Focus Before You Photograph
With enough light, you can use auto-focus. Otherwise, use manual focus. However, after focusing, always turn off automatic focus and secure the focusing ring using an adhesive gum or a cellophane tape such as Scotch Tape.
Typically you will want to focus on a distant landmark with fine details (e.g. a church) that is in your composition, rather than focusing on the stars. Mild unsharpness in the stars is not a problem; it is more a solution: it makes the stars’ paths more visible (an unsharp star occupies more pixels) and adds color based on their surface temperatures.
How to Take the Source Pictures
Make one last check to ensure that the photos are exposed and composed correctly and that the tripod is firmly anchored.
Your overall number of exposures depends on how long you and your battery hold out, the weather, and the length of the night. The motion of the stars begins to be clearly visible after just a few pictures, but aesthetic and distinct motion only begins after about 2 to 3 hours. In three hours a star will make 1/8 of a full revolution, and usually, the battery will also run out in this time. With exposures 3/4 of a second long, you will take about 360 pictures, occupying several gigabytes, more or less, depending on the camera resolution.
The stars move even when your camera is not recording them. So try to keep the pauses between exposures as short as possible (no longer than two seconds), or otherwise, their motion in the composite picture will be discontinuous.
You will take your next step on a computer, working with your source pictures.

Canon EOS 500D, Sigma 10-20mm F4 EX DC HSM, F4, ISO 200, focal length 10 mm.
Processing the Photos
In theory, you can join the photos manually in Zoner Studio. If doing so, always blend the photos using the Mode called Lighten. However, for large numbers of pictures, it is more advantageous to use the special freeware tool named Startrails (version 2.0 was used here); it automates the whole process. Then Zoner Studio is used for editing the resulting composite picture only.
Startrails do not require any installation; you simply unzip it to wherever you would like. Within Startrails, take these steps:
- Use File | Open images to select all the pictures to be joined. A list of them appears in the window labeled Images: Files.
- If you have shot some dark frames as described above, open them using File | Open dark frames.
- Join the pictures using Build | Startrails. Try joining just three pictures, and check for visible interruptions between exposures. If any appear, use Lighten-Screen-Blend. Otherwise, use the faster and slightly sharper Lighten.
- Save the final picture using File | Save the image. This creates a TIFF file that can then be edited in Zoner Studio.
Incidentally, you can also turn the individual exposures into a video using Build | Video.

Post-editing
The picture and the rotation of the stars can then be joined in Zoner Studio to suit your taste and the given picture’s needs. For example, you can brighten dark areas using Curves, mildly saturate the stars to emphasize their ages and surface temperatures, and remove any unwanted artifacts such as wires using the clone stamp.
Fixing the Foreground
If there is a foreground feature and it is damaged for some reason (blurring, overexposure, etc.), you can select a good-looking shot of the landmark (e.g. taken with different settings than the rest of the pictures, but without moving the camera) and combine this damage-free photo with star-rotation picture produced by Startrails. For this, open the picture with rotation in the Zoner Studio Editor and paste the undamaged foreground feature into it as a new layer. Then align the two pictures (if they are not already aligned) and set the layer’s Mode to Linear Dodge. Then if no further edits are needed, click Apply to merge the pictures.
The picture is now ready. As a parting thought: keep in mind that photos with star rotation can also be taken on the road; you just need your camera, trigger, and an improvised tripod.
There are no comments yet.