Landscape Photography at Every Hour—Part I: Landscapes in the Morning, Evening, and Night
Landscapes can take on a variety of forms. They’ll change in your photos based on the weather, the time of day, and the gear you use. You should keep this in mind in your landscape photography, and adapt your compositions and your camera settings to match. So take a look at how to photograph landscapes as they appear in the morning, evening, and night.
I’ll emphasize in advance that I shot all of the pictures in this article to RAW and then edited them. I usually use my Holy Trinity of edits:
- increasing the contrast,
- increasing the clarity of the picture’s colors,
- darkening the sky.
For more information on these edits, see my article on typical landscape edits.
These edits will often change a picture significantly. Take a look at the example below:
Straight out of the camera, it’s nothing unusual for my landscapes to look boring no matter what the weather and environment. But my edits then restore the magic that the camera couldn’t capture.
Some General Tips for Photographing Landscapes
There are some tips that apply for landscape photography in general, while others are only useful in certain cases. In this section you’ll find the general ones. But keep in mind that the sections after this may recommend a different approach. I’ll always make a note of that when it happens.
I won’t cover the basics of composition in landscape photography here, as I’ve already devoted an entire article to them. Instead I’ll be focusing on technical and meteorological issues.
Your Gear for Landscape Photography
Your gear should fit the goals for which you’ll be wanting to use your photos. But generally you can get by with practically any lens and camera. Personally I like to carry an ultra-wide zoom lens that goes 16 to 35 mm (full-frame equivalent) and a telephoto lens along with that (70 to 300/400 mm, depending on the type), but you can use practically any focal length.
You’ll definitely also get some use out of a polarizing filter, and if you want to create special effects like blurred water or clouds, you’ll appreciate a neutral density (ND) filter as well.
Camera Settings for Landscape Photography
To get a quality result, keep the ISO as low as you can. Even though you might not see much noise in your photos even at higher ISOs, it can start to show up once you start editing.
But once again it’s important to keep in mind the way that you’ll be using a photo. If you’ll just be putting a picture on Facebook, people won’t be inspecting it too closely, and they won’t see it at high resolution. In that case, noise may not matter.
To keep everything in your pictures sharp, use a high f-stop. Stay up around f/8 through f/16 at full frame, which corresponds to f/4 through f/8 for a Micro Four Thirds sensor (crop factor 2x).
A low ISO and a high f-stop do mean, though, that you’ll be needing to capture a lot of extra light. In the daytime, you can manage this even when you’re shooting by hand, but around dusk and at night you’ll need long exposures. So you won’t get by without a tripod.
Long exposures can sometimes be a problem even with a tripod, for example if there’s a strong wind blowing. Then you’ll have to compromise on one of the parameters. Either you’ll need to raise the ISO, or make do with a lower f-stop.
If conditions allow it, try exposing to the right. That is, making the picture as bright as you can. Without overexposed spots, of course, and without having the picture blurred by the wind or your shaky hands. You can then darken the picture back to a normal exposure on your PC, and the final result will have reduced noise.
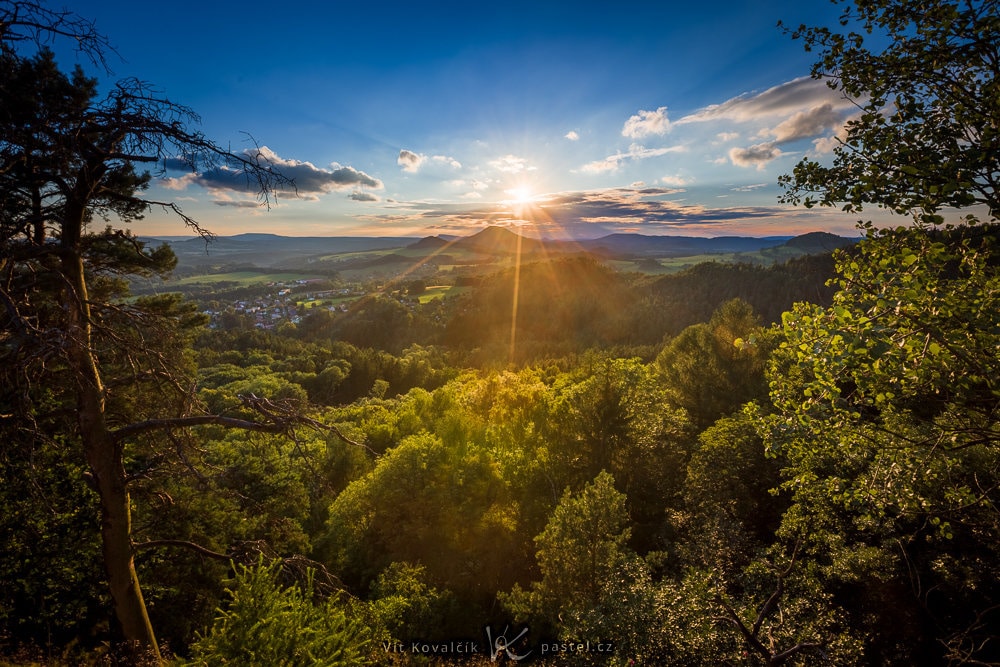
Take Advantage of the Golden Hour
Roughly the hour after sunrise and the hour before sunset—both called the Golden Hour—are two times of day that are renowned in photography. At these times, the light is soft and warm, and the peaks and the mountains cast long, impressive shadows.
That means that your shot direction will matter. You’ll take the most impressive pictures facing towards the sun or with the sun to one side. If the sun’s rays are coming from behind you, meanwhile, they’ll eliminate a large part of the shadows. That will produce an evenly lighted landscape, which can come across as boring.
But it also all depends on factors like the angle of the peaks and the overall character of the landscape in front of you. If the scenery is riveting on its own, it will probably look good under any kind of light.
Canon 5D Mark IV, Canon EF 70-200/2.8 IS II + 2x Extender, 1/6 s, f/16, ISO 100, focal length 360 mm
Keep in mind that when you’re shooting against the sun, it doesn’t have to be in the frame. But that too is an option, and it can give you some impressive pictures.
Creations like these generally require HDR or other tricks that help when shooting with the sun in the frame. When you’re shooting in this direction, it’s thus simpler to just leave the sun itself out of the picture and make a crop of the landscape alone. The shadows will be just as dramatic, and the outlining light on the leaves of the trees will still be there as well.
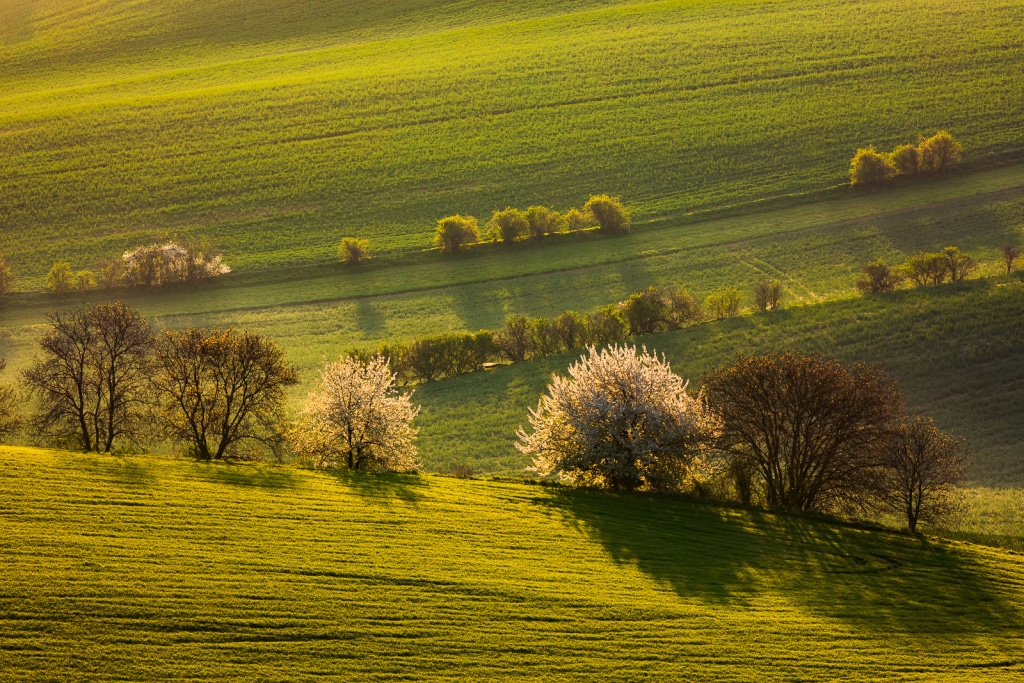
Canon 5D Mark IV, Canon EF 70-200/2.8 IS II + 2x Extender, 1/25 s, f/16, ISO 100, focal length 292 mm
When you’re photographing landscapes against the sun, any mist in the atmosphere will have its strongest effect, and it will reduce your photos’ contrast. Straight out of the camera, they’ll look a little blanched. The practically unavoidable solution here is to significantly add contrast in Zoner Photo Studio. But this kind of processing will significantly increase a picture’s noise, which is something you’ll want to fight however you can. So here especially you’ll be glad if you exposed to right during the shot.
When you’re shooting against the sun, there’s generally no shortage of light, so if you’re also shooting with a wide angle, you generally won’t need a tripod. For longer focal lengths, however, you probably will want to use one.
Now, unless you’re an early bird, I’m sure you’ll prefer the evening’s Golden Hour. But when you need to have the sun on the opposite side of the landscape from its evening position, you’ll have to get up and be there in the morning after all.
Also keep in mind that the disk of the sun moves quickly, and so you won’t have much time. Ideally you’ll want to scout the location in advance and then arrive at the right place with time to spare. You can determine the sun’s position at different times of day using a number of mobile apps—for example The Photographer’s Ephemeris.
For these dark times of the day, bring a flashlight or a headlamp in addition to your camera. For roughly three quarters of an hour before the sunset and after the sunrise, you can still see reasonably well and orient yourself in the landscape easily without a flashlight. But if a long night trek awaits you, these artificial light sources will come in handy. Especially if you’ll be walking through the forest.
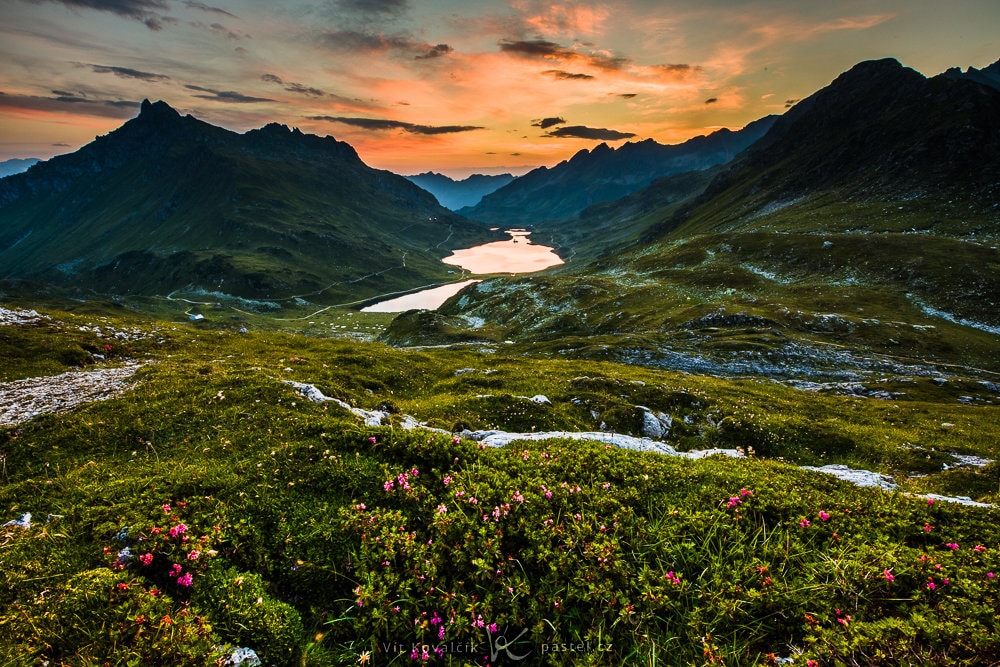
How to Photograph Landscapes Before the Sunrise and After the Sunset
When the sun is just over the horizon, you get a situation where the sky is still (or already) clearly lit up and light is partially also being cast onto the ground. In these situations it’s best to shoot directly towards the sunlight, where the sky is the most dramatic.
A tripod will be an absolute necessity here. And due to the enormous brightness differences between the sky and the rest of the landscape, here again it pays to assemble your final picture using HDR. Nevertheless with a little patience you can get photographs that have a different atmosphere and yet are just as impressive as photos with the sun in the scene.
Canon 5D Mark IV, Canon EF 16-35/2.8 III, f/11, focal length 16 mm, combination of multiple exposures (up to 1.6 seconds)
Canon 5D Mark IV, Canon EF 24-70/2.8 II, f/8, focal length 24 mm, combination of multiple exposures (up to 30 seconds)
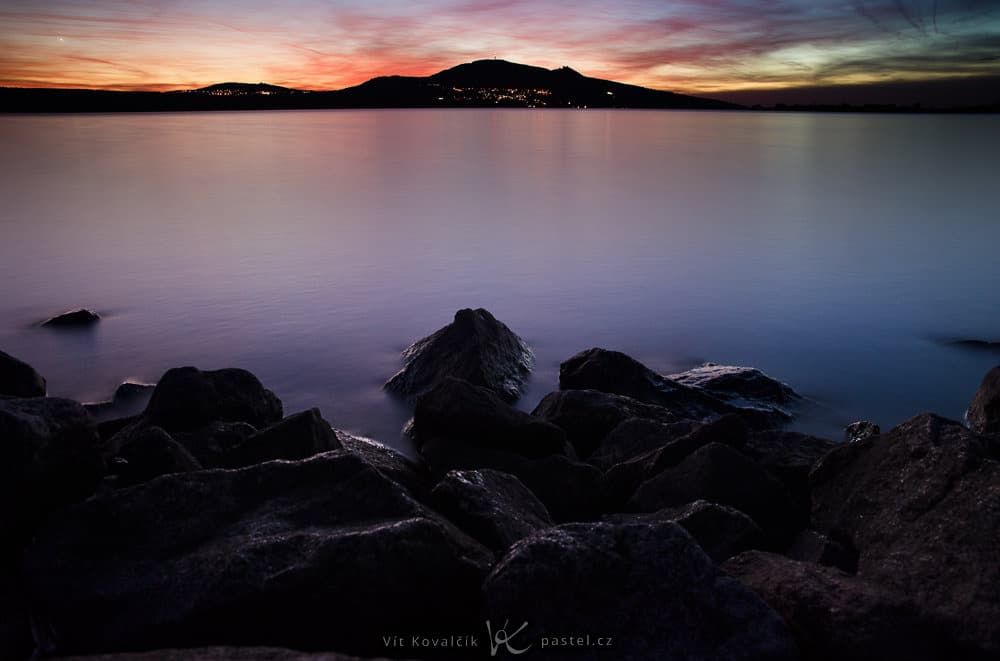
A time of day like this is called the blue hour. In the photos above, I captured (and emphasized) the part of the sky that was just above the horizon. Because of that, these pictures still contain orange sun rays. But when you’re shooting from higher up or in the opposite direction, blue tones will dominate instead.
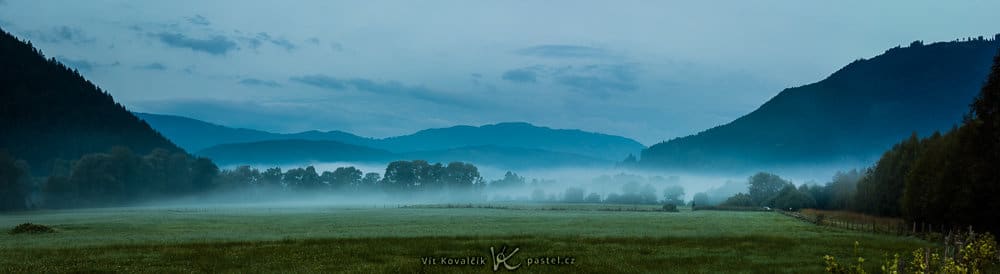
Canon 5D Mark IV, Canon EF 70-300/4-5.6 IS, f/11, 2 s, ISO 100, composite panorama
Photographing Landscapes at Night
Don’t forget that at night, the landscape isn’t visible, and so there’s no point in photographing large areas. Despite that, this section closely ties in to the one above. Once you’re already visiting a landscape to take pictures in the evening’s blue hour, you can work for a while with the starry sky there as well (or even at a different spot on your way home). Once again, don’t forget your tripod.
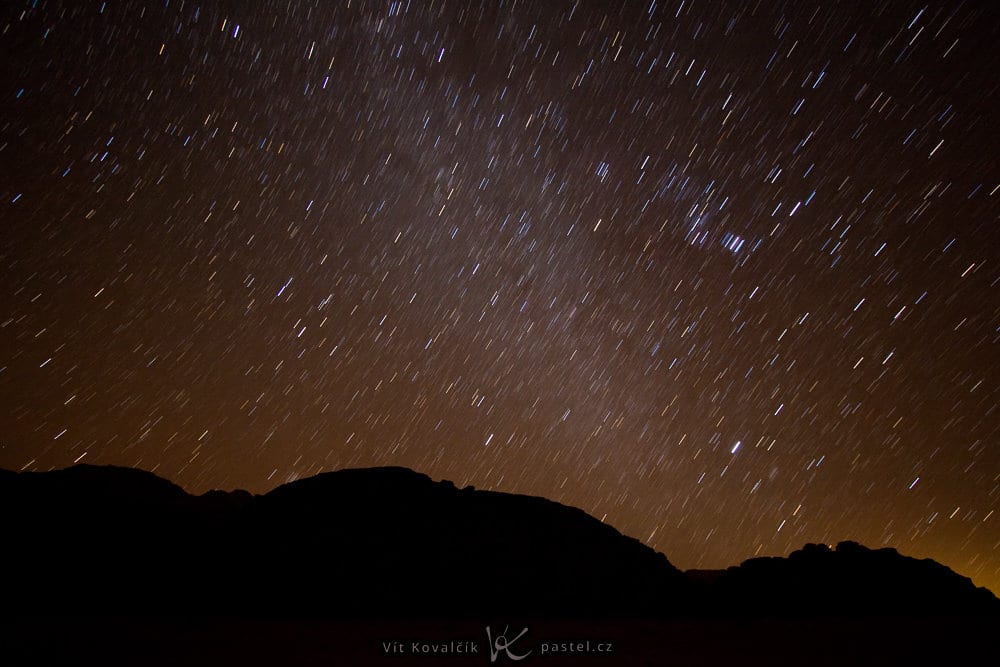
Canon 40D, Canon EF-S 10-22/3.5-4.5, f/3.5, 305 s, ISO 400, focal length10 mm
With a very long exposure (like the five-minute exposure here), the Earth’s rotation around its axis starts to become apparent, and you’ll start recording the stars’ trajectories. Here the landscape acts as an anchor that stays sharp.
But your surroundings don’t have to be dark. Besides using the glows of the cities, towns, and villages, you also have the option of illuminating your nearby surroundings on your own. The next illustration shows different versions of one shot that vary in how long I shone a flashlight on the nearby trees during my exposure. You can “paint” a foreground in this way to suit your tastes.
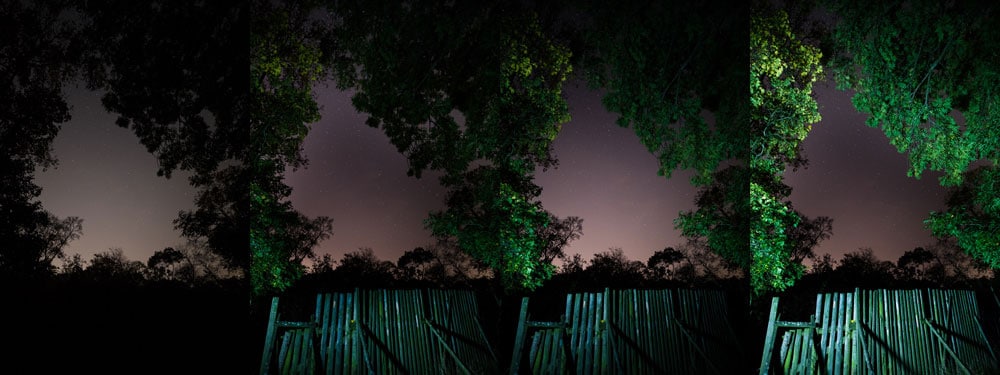
Canon 5D Mark IV, Canon EF 16-35/2.8 III, f/2.8, 15 s, ISO 1600, focal length 24 mm
If night photography is an interesting topic for you, then take a look at our other articles on photographing the stars.
Next Time the Daytime
This is part one of a series; this time around, you can see that I’ve covered the periods around sunrise and sunset and on into the night. In the next part, we’ll be looking at the different photographic conditions that prevail during the day.
There are no comments yet.