Show Off Kids in Action With Longer Exposures
Most people go for freeze-frame when they’re photographing children. But sometimes it’s nice to mix things up. And to work with blurring, which can make pictures feel more dynamic. The trick is simple—a longer exposure. This also lets you use even cloudy, low-light days to your advantage.
When photographing kids who won’t sit still, you’ll usually use a short exposure to freeze their motion so they won’t be blurred. For most situations a speed around 1/250 s is enough; for fast motion, faster speeds are needed, e.g. 1/500 or even 1/1000 s.
If there’s a lot of light in the scene, this is no problem. On bleak days with less light, raising the ISO will solve the trouble. But ratcheting up the ISO can lead to increased digital noise. Even though you can suppress it in Zoner Studio, major noise reduction can also reduce sharpness. So raising the ISO has its limits.
Blur Motion to Increase the Action
Freezing motion using a short exposure is a safe way to create perfectly sharp pictures, no matter whether a child is running, or jumping on a trampoline. However, on the level of feelings, that hint of motion in a photo can really be lacking sometimes.
A little cyclist captured at a speed of 1/1000 s will look like he’s just stopped his bike. So the photo will lack action. But if you leave the shutter open a little bit longer, only the fastest-moving parts of the picture are blurred (in this case the feet and the pedals). And your photo looks more convincing.
So when you’re photographing children, experiment with different exposure times. Especially around 1/125 s, where you can capture an object relatively sharply, but with mild motion blurring.

Canon EOS 6D, Canon EF 35 mm f/1.4L USM, 1/30 s, f/2.8, ISO 100, focal length 35 mm
How Long Can You Hold the Camera Steady?
If you decide for a hand-held shot instead of a tripod, you need to calculate how long you can hold the camera steady. It all depends on your current focal length and on your hands.
But the classic guideline is: you can hold your camera steady for 1 second divided by your focal length. So if you’re using a 35 mm focal length, a time of 1/30 s will still be fairly safe (this applies for full-frame DSLRs; for other camera types, you need to multiply the focal length by the crop factor).
If you’re using a longer focal length (e.g. 85 mm), you can only maintain a shorter exposure time (e.g. about 1/80 s). One exception where this doesn’t apply is panning.

Canon EOS 6D, Canon EF 100 mm f/2.8 Macro USM, 1/30 s, f/5, ISO 100, focal length 100 mm
Learn to Pan Like a Pro
Panning is an effective technique that’s used for emphasizing motion. With panning, the moving object is (at least partially) sharp, and the background is blurred, with “lines” that are this technique’s hallmarks. You can take these pictures from a tripod or monopod, but handheld shots are less restrictive.
The foundation is to continuously follow the subject, copying its motion with your camera. It’s important to keep following and copying its motion for a bit after the shutter snaps.
At first it’s best to stick to horizontal motion. Once you’ve practiced this technique, you can try out vertical motion too.
The recommended exposure length range is from 1/60 to 1/15 s. I find 1/25 s to be the most convenient. A shorter time may not blur the background enough, and with a longer time it can be hard to keep the subject sharp.
To achieve the needed exposure time, you’ll have to use the lowest available ISO (this is 100 on most cameras). So work with shutter priority or set the values manually. Then your camera will calculate the f-stop (shutter priority), or you can set it yourself with a view to the amount of light and the scene’s brightness (manual).
Tip: For best results, use servo (dynamic) focusing and continuous shooting.
Panning is quite the addictive technique, though its results are unpredictable—many pictures will end up in the trash. Yet the ones that don’t will look all the better.

Canon EOS 6D, Canon EF 35 mm f/1.4L USM, 1/50 s, f/8, ISO 100, focal length 35 mm
Use a Tripod and Weave Stories
There’s one big advantage to using a tripod—you’re not tied to the times you can shoot by hand. That lets you experiment more, emphasize atmosphere, and create stories. The disadvantage, meanwhile, is less mobility.
In kid photography, you’ll mainly appreciate a tripod for scenes where:
1) a child is in motion, e.g. on a ride,
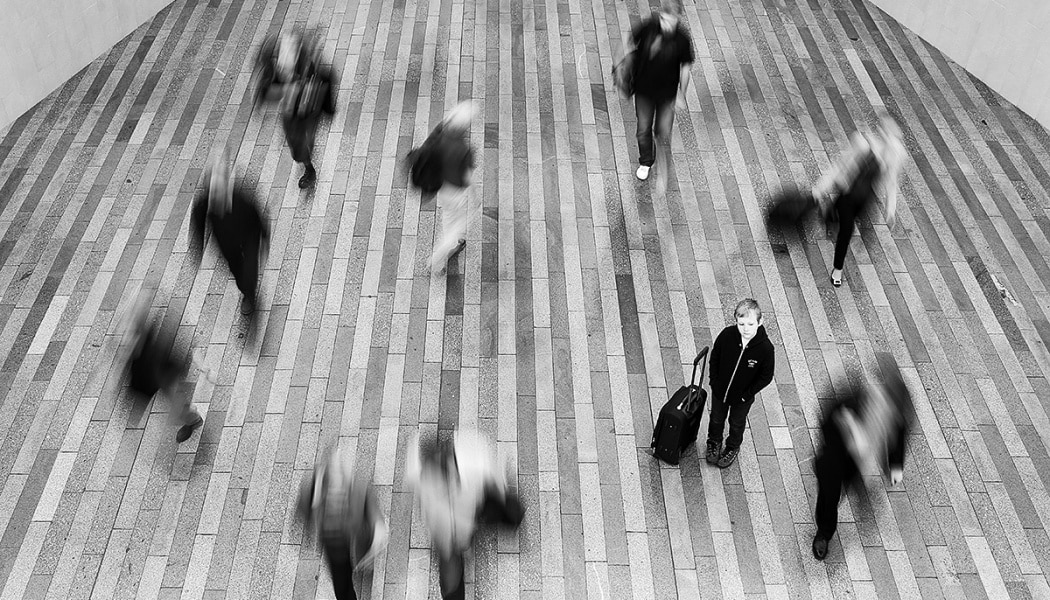
2) a child is standing (or sitting) while objects are in motion nearby.
The ideal environment for trying out the first option is a playground. Manually focus on the static part of a ride (like the center pole of a merry-go-round) and set the exposure you want. Remember that the longer it is, the blurrier both the ride and the child will be.
For the second option, find a way to get the child (generally school-aged, as this rarely works with younger children) to stand or sit in place for a while. With an exposure time of 1/2 to 1 second, you can then easily blur passersby. The pictures you’ll get will typically be full of emotion, and will be worth the trouble of using a tripod.
Tip: When you’re shooting from a tripod, use a remote trigger. That will prevent camera shake, which would ruin the picture.
To Get Longer Exposures, Use an ND Filter
Long exposures have their benefits for child photography, and they can often lead to magical pictures. But sometimes there’s too much light in the scene for you to use the exposure length you want. The solution is to mount an ND filter onto your lens. These filters absorb light, increasing exposure length by the number of EV listed for them. (Some are “variable ND” and can extend exposures by a range of amounts.)
From experience I can say that an ND8 is enough to lengthen an exposure by 3 EV. If even that isn’t sufficient, you can combine an ND filter with a polarizing filter. Or just wait for a cloudy day.
There are no comments yet.