We’ve noted before how your
computer hard drive is a ticking time bomb. The best way to protect yourself, and your photos, is to keep copies of your files on external hard drives and cloud services like
Zonerama so they’re secure when disaster strikes. Of course, like most things in life that are good for you, backing up your photos is something of a chore, something you may be tempted to skip in favor of…. well, anything else.
We’ve noted before how your computer hard drive is a ticking time bomb. The best way to protect yourself, and your photos, is to keep copies of your files on external hard drives and cloud services like Zonerama so they’re secure when disaster strikes. Of course, like most things in life that are good for you, backing up your photos is something of a chore, something you may be tempted to skip in favor of…. well, anything else.
Fortunately, Zoner Studio has a great little feature that can make your backups easy and automatic. It’s called Folder Synchronization. Once you master it (and it’s not hard), your photo back-ups will take care of themselves, freeing you do to…. well, anything else!
Step One: Choose Folders and a Back-up Target
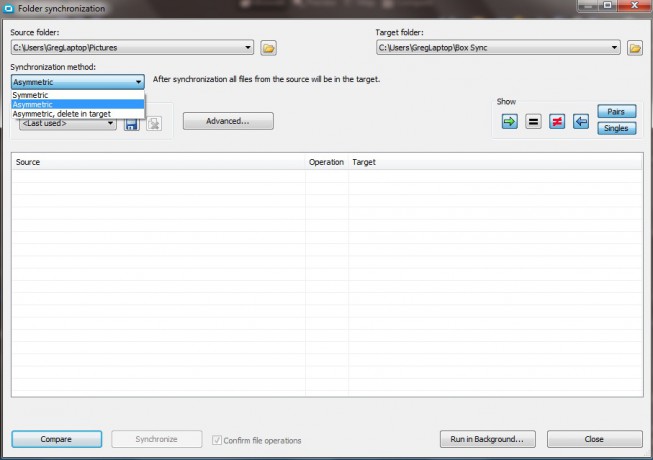
Folder Synchronization can be accessed in the Manager tab under the Organize drop-down menu. When you click on it, you’ll see a basic menu that lets you choose which folders you want to synchronize.
The easiest way to put your back-ups on autopilot would be to start at the highest possible Source Folder level, such as the “My Pictures” folder on your PC. Then you choose your Target Folder or the place you want to store back-up copies of your images. Ideally, this folder would be an external hard drive that’s attached to your PC or home network. If you use a service like Box or Dropbox that gives you access to your online drive through the Windows file system, you can choose folders in there as well.

Step Two: Choose Synchronization Method
You have three synchronization options: Symmetric (where the contents in both folders are identical); Asymmetric (where the source files are loaded into the target folder) and Asymmetric delete in target (where source files are loaded into the target folder and any other items are deleted).
Personally, I like the middle option, Asymmetric, since it ensures all my source files are backed up without erasing anything I might have accidentally moved into the target folder.
You also have the option to sync certain types of files and exclude others, like thumbnails, in addition to viewing the contents of both the source and target folders before you pull the trigger. If it’s your first time syncing, you should definitely run this comparison first, but afterwards, you won’t need to.

Step Three: Run as Background
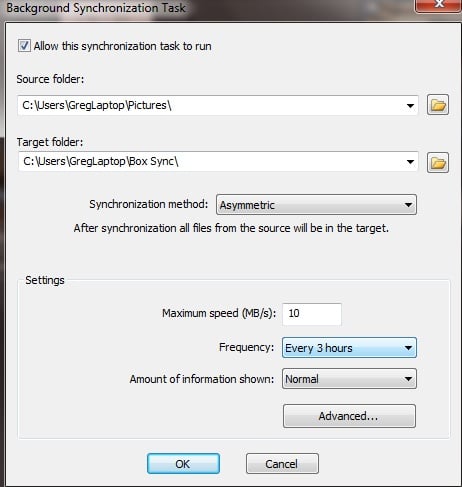
This final step is the key. If you click Run as Background you allow Zoner Studio to monitor and change your folders in the background while your computer is running, so that any changes or new images you upload to your source folder can be automatically saved into the synced target folder without you having to lift a finger.
You can configure Photo Studio to sync as regularly as every three hours or as long as on a monthly basis. Personally, I think a daily sync is ideal. You never know when disaster might strike.

![]()


There are no comments yet.