How a Cool Idea Became a Cool Picture
Inspiration for photos can come from anywhere—even from a video. In today’s article, we’ll be following the story of a photo inspired by a Pink Floyd video: the birth of its idea, the shoot preparation, the shoot itself, and the post-editing. If you like the picture’s final style, then try to recreate it! All you’ll need is a camera and a lens, plus Zoner Studio for the post-editing.
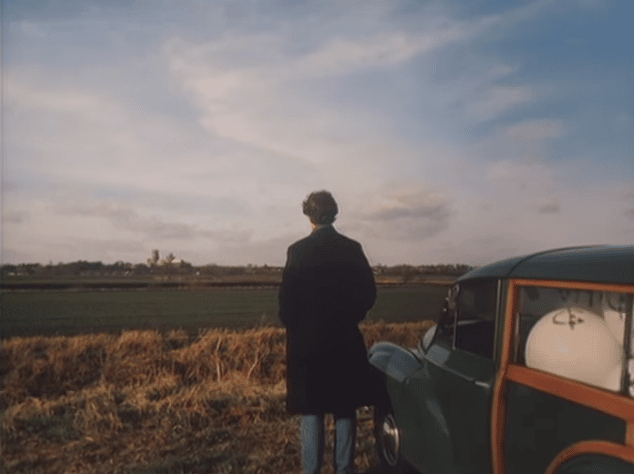
The foundation for our picture was a specific segment of the video for High Hopes by Pink Floyd—a segment where a man is gazing out onto a landscape. (This video has a wealth of great ideas and even greater execution.)
Find the Right Spot
Before you can take a photo like this, you’ll need to find the right spot—ideally a hill with interesting yet simple features—a hill with a good view of a picturesque landscape.
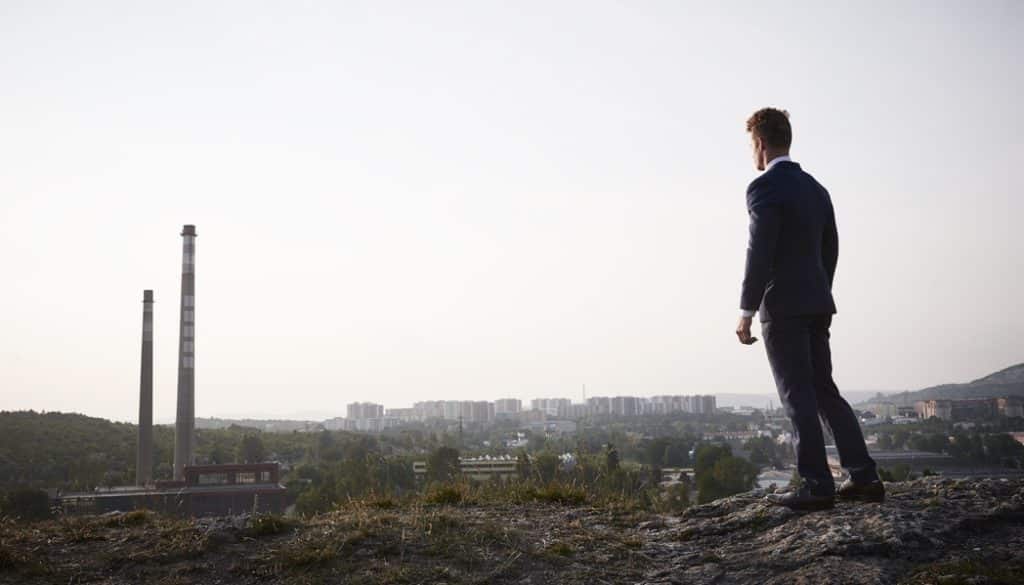
We gave ourselves one more condition on top of those: an important feature in the landscape—in our case a factory smokestack—had to be nearby, in a place where it would stand out. If the smokestack were far away, then the photo would feel unbalanced.
That’s why we decided to take the picture near a city. The view out onto a city nearby was fundamental for the photo, as was the contrast of nature, the factory, and the post-communist apartment buildings. Here’s a Google maps link to the shot location.
Finding the Right Model
Finding the right model and dressing him in the right clothes was as important as finding the right spot. (Incidentally, location and the model’s look are key elements in model-based photography overall.)
We chose a model with very masculine features and dressed him in a made-to-order suit that fit him perfectly.

Learning the Light, Watching the Weather
Before “going live,” we went out to examine the site. This let us judge its light and find the right composition. That way, when we returned to the site with the model, we knew what time of day and what angle would give us the best photos. Then all we had to do was watch the weather forecasts and choose the right day for the shoot.
D-Day
Like with any serious model shoot, we arrived in advance—a half hour early. That let us prepare everything carefully before taking pictures. We wanted a photo with rather large depth of field, and so we chose a high f-number and a fairly wide-angle lens. But not so wide as to distort the picture’s lines! We chose a universal 35 mm lens. We set the aperture to f/9. The exposure time was 1/160, and the ISO was 100.
For the posing, the most important aspects were the comfortable, relaxed pose and the way the model is leaning slightly inwards, so that the photo expresses the “magnetism” of the city. We shot to RAW for maximum photo quality.

Our Edits
Here we had our edits for the photo planned out before we even took the shot. We wanted a color image with slight desaturation and increased contrast. This sort of edit is relatively non-invasive and undemanding.
We made the following edits to the photo in Zoner Studio:
We developed it in the RAW Module, where we used the following settings:
- White Balance: Default
- Contrast: +8 (to increase the contrast)
- Lights: -15 (to reduce the amount of extremely light areas in the picture)
- Shadows: +15 (to brighten the dark areas)
- Clarity: -15 (to keep defects from shining through in complete clarity)
- Sharpness: With an eye to the typical outputs of our Nikon D800, we used these settings: 263; 0.8, and 1. We turned on the Brightness Method for sharpening.

We exported this photo to a 16-bit TIFF so we could make further edits without reducing its quality.
That was important since some tools we wanted were available in the Editor only. For example, we wanted a much more dramatic photo, so we decided to add light vignetting. We added this vignetting using the Curves function.

We used an elliptical mask (an elliptical selection). We set the selection’s Blur to the maximum, that is, to 1000 pixels, so that the selection would make the Curves effect fade in gradually. After creating the selection, we inverted it.

For the rest of our edits, we used the same approach as described in our article on “Hollywood” contrast. That greatly increased the picture’s impact.

Behind the Scenes
During the shoot we took several photos instead of just one, so that we’d have enough to choose from. Every one of the photos was thought out and planned out in advance just like this one.
In closing, here are some behind-the-scenes photos from the shoot.


There are no comments yet.