How to Photograph Shiny Products and Glass Products
In previous articles we looked at tips and recommendations for photographing products against white backgrounds and with a reflection in the background. The most difficult product photography of all is when you’re working with highly reflective objects or glass. So let’s take a look at how to make these look great.
Photographing transparent objects works a little differently than photographing ordinary matte or plastic objects. Glass in itself is actually usually invisible; we only see its shape through the refraction of light. In other words, we’re not so much lighting up the glass as redirecting light with glass. And if this spreads the light out too much, then the object will show every color in the room. The moral of the story is: try to keep light off of the surroundings, and if you can’t, then at least take your shots in a white-walled space.
Here we’ll use some drinking glasses as an example. The most straightforward solution is to return to using a black glass foundation, use a single light to illuminate the wall in the background, and use no other lights. That gives you a bright background and a dark-contoured product.


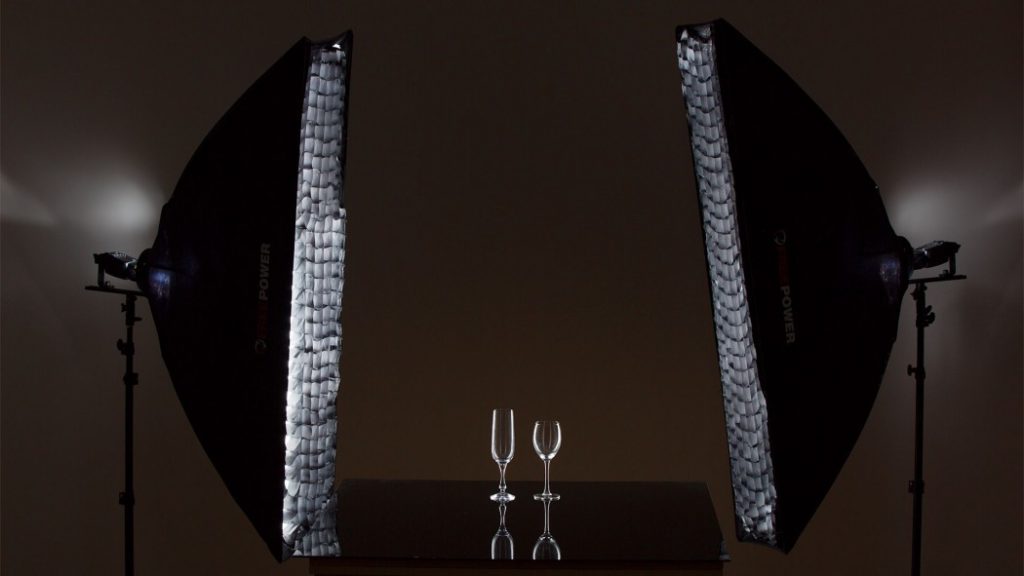
You can also use the opposite variant, with absolutely no light from the background, and two lights in the rear from the sides. In this case the lights are visible on the contours of the product. Here you have to be careful not to let the lights illuminate the wall. To avoid that you either use a honeycomb (but that can end up being visible in a reflection on the object) or turn the lights away from the wall. Just as in our previous product photography articles, the second approach anticipates that you are in a large-enough room and that the light does not bounce back from the rear wall into the background.


All of this can be combined with other lights in the background, which again can be colored, adding life to the scene.
We can for example use the photo table from our previous article to get a softly-contoured scene with gradual light transitions—we shine light onto the table through its translucent board, from behind (and optionally from below as well). Here it all depends on precise, careful positioning and fine-tuning for the lights. You can get several different styles this way. Instead of glass, there is an opal translucent sheet on the table, so this loses us the reflection.


You can side-light a photo table too, creating a dark background, but this will still light up the table’s opal-colored board beneath the object. Compare this situation with the one for black reflective glass, where we could illuminate the object however we wanted without affecting the base.


Reflective Objects
Even though work with highly reflective objects is in some ways similar to work with glass objects, here we will want to capture more than just the contours. The trouble is, reflective objects generally only become visible when they reflect something. Because we don’t want to leave that “something” to chance, we need to get the “largest,” most diffuse light we can, as close as we can to the object photographed.
It might seem that the ideal choice here is a diffusion box, and yes, they really are very handy for this. But with extremely reflective objects, even the seams joining the box’s walls start to become visible.
In that case all you can do is improvise and try different lightings and different positions for the diffusion box.
The key thing here is to darken the room. Mirror-type surfaces are just itching to react to every window in the room, every ceiling light, and every light source overall. If on top of that you’re unlucky and you catch reflections with differing color temperatures, then you will get distracting yellow (or blue) reflections on the object.


If the reflection of the diffusion box’s edge on the shiny ladle is a problem, we can eliminate that using a gradual light transition, for example by lighting through a cloth that is larger than the light source. So the most complex variant looks like this:


While in this case the difference isn’t so striking, you can see it in, for example, the ice cream scoop’s bowl and especially its shank.
Complex Composition
For illustration here’s a scene with a non-uniform background and an object that’s more complex than any of our earlier examples.

Right from the shot setup you can see that this is a complicated setup:

There are four lights here, with three of them devoted to the product: two are in front of the swords—off slightly to their sides, and one (the bowl-shaped “beauty dish” light) is shining from above to create a bright leading edge. The fourth light is also shining from above, and its role is to create a nice smooth light gradient.
Nothing says products can’t be also in motion:

This photo was taken on the ground on a piece of paper with very simple lighting, and with a pre-focused camera activated via a timed trigger. Then all it took was a few dozen throws of the dice to get a few interesting shots.

Closing Words from Behind the Scenes
As a last tidbit from behind the scenes, I’ve chosen a scene from the job that’s perhaps the toughest I’ve ever done—photographing sleeping bags. This picture is probably worth a thousand words:

Ignore all the other bags laying around for a moment and take a close look at the one “in processing.” It’s vertically fastened to a wooden board, which will be digitally edited away later. The sleeping bag also needs to be stuffed and properly arranged, which takes a lot of work—but many products take a lot of work. That’s because in product photography even more than elsewhere, photography is all about problem-solving.
LJ and Mike
Thought this might be of interest to Mike and Billy-Billy!
Love,
Dad
Clive
Great article on product lighting. Showing lighting set-ups very useful to aspiring photographers.
Zoner
Thank you, Clive, we’re glad you like it!
Gilbert Goodall
These are great tips. The product I work with is polished granite monuments and ceramic tile. any tips and how to light these?
Aja Vorackova
Are there any significant difference between those stone products and those mentioned in the article? I mean you can use those described principles to reduce shining of polished stones too, can’t you?