Need a Portrait Spot? Try a Nature Spot
When you’re outdoors with your friends or a model and you want to take a few portraits, nature is quite the ideal backdrop. It’s right there, with hardly any “do not enter” signs, and there’s so much of it around you that you can take even quite wide shots without including passersby. Read on for a few tips on taking great nature portraits.
Before telling you about how to take portraits in nature, I’d like to note that by “portrait,” I don’t just mean “head and shoulders,” even though that’s a stereotypical portrait. Portraits also include other depictions of people, such as full-length shots.
Focal Length and Aperture
When preparing this article, I went through my photo archive, found 38 relevant photos, and then picked out the ones you see here. Browsing their technical data, I found out that all but two of them used the best aperture the lens allowed.
So my first tip is: unless you have some special artistic aim in mind, go down to the lowest f-stop you can when shooting portraits outdoors. For example to f/2.8, or even lower if you can. This will give you a maximum of background blurring, to optically highlight your model.
Another measure that will blur the background even more is to use a long focal length. Lengths of around 100 mm (full frame equivalent) are typical. These lengths are very important for a truly tight portrait containing just the subject’s head. For full-length shots, there’s no problem in using wider angles such as 35 mm. But long focal lengths do give you a better contrast between the sharp model and their blurry background.
Compare these two pictures, which are at completely opposite ends of the spectrum of shot possibilities. The first was taken with a very wide angle and a high f-stop, making the surroundings stand out:

Canon 5D Mark III, Canon EF 16-35/2.8 II, 1/200 s, f/16, ISO 100, focal length 16 mm
The opposite and more usual variant, with a long focal length and a low f-stop, suppresses the surroundings:

Canon 5D Mark III, Canon EF 70-200/2.8 II, 1/125 s, f/2.8, ISO 100, focal length 120 mm
I personally lean towards the second variant, and I think other photographers use it a bit more too. But neither version is downright bad. The first one uses and defines the surroundings more, while the “blurred” version suppresses them, highlighting the model.
Camera Height
Note how for the full-length shot my camera is held low. Ideally you want to shoot at waist level. For certain artistic purposes you can go even lower.
There’s also a trick for analyzing other people’s pictures: if you want to know the height at which the picture was shot, just find the horizon. It will either be in the shot directly, or behind a forest or hill, but even then you can guess it—you see, the photographer is at the same level where the horizon goes past the model.
Composing a Full-length Shot
Our comparison photos above are compositionally similar. That’s no accident. Our golden crop puts the model roughly one third of the way in from the side, and to balance her out, there’s a path heading into the distance on the opposite side. This squeezes every last drop out of the width. Nothing’s keeping you from using the same principle vertically, like in the next picture.
The bridge in this picture crosses a river in an urban park, and so I’m showing it in this article, since you can find similar structures out in the country.

Canon 5D Mark III, Sigma 50/1.4 Art, 1/200 s, f/1.4, ISO 100, focal length 50 mm
But a golden crop is only one composition. Placing the model in the center is fine too. The model is the picture’s rightful subject, and in the center they’ll definitely shine—like in the next example. Beginners have a tendency to focus on the head (which is OK in itself) and then put it in the middle of the photo, leaving a large gap above.
I recommend that you work like this when composing: first aim at the face—ideally the eyes. This lets your camera focus and set the exposure. Once your camera is ready, just find the right composition. Note for example how this photo is centered not on the model’s head, but on their stomach.

Canon 5D Mark III, Canon EF 70-200/2.8 II, 1/200 s, f/2.8, ISO 200, focal length 102 mm
Our last picture shows yet another element that can make a photo special: blurred objects in the foreground. You can’t take them for granted, and if you don’t put real thought into them, you almost certainly won’t fit any into your photos. I had to think to put them in the shot above too. I could have taken the shot from one meter to the left where there were no trees, but instead I placed the camera right next to the nearby trees, which then gave my photo more depth.
It’s always hard to gauge how much to use foreground objects. Sometimes people won’t even notice them; other times they’re in the way. So I recommend taking a while sometime to focus on just this issue—to train shooting past objects you find. Experienced photographers are used to thinking about the background, but if you manage to include the foreground too, it will take your photos up a level.
Here’s yet another illustration, which I actually took by breaking into the bushes and stooping there, surrounded by brush, barely able to shoot. But I’m satisfied with the results, and so it was worth a bit of discomfort:

Canon 5D Mark III, Sigma 50/1.4 Art, 1/200 s, f/1.4, ISO 100, focal length 50 mm
Model Poses
I’ve been writing this whole time about composition, but if you go back through the photos above and focus just on the models’ poses, you’ll find that they’re generally leaning on, or sitting on, or at least touching something. This is natural and practical, for several reasons.
First, this way they interact with their environment. A model can stand out in the middle of the road, but if they’re touching something, they’ll fit into their surroundings more, and it won’t feel as if someone retouched them into the picture.
Second, this eliminates the “hands go where” problem, or at least “feet go where.” They don’t have to think up unrealistic artistic poses; they just need to lean on a tree, about how they would normally. This simplifies things, especially for beginners (the models above aren’t), because working with your environment feels more natural than posing with your hands out in the air.
Medium Shots
You don’t have to capture the subject in full. Just a part is enough. This is more complicated, though. Before moving on to the hardest shots, let’s talk about those that show half of the subject.
A model looks bad when they’re cut off at the elbow, so the practical choice is to shoot from mid-thigh. Here again you can go for sophisticated crops with the model at the edge, or even the center. Like here for example:

Canon 5D Mark III, Canon EF 85/1.8, 1/200 s, f/1.8, ISO 800, focal length 85 mm

Canon 5D Mark III, Canon EF 85/1.8, 1/200 s, f/1.8, ISO 100, focal length 85 mm
The Closest
If half the subject is still too much, the next step is a crop somewhere above their stomach, or a “pure-blooded” portrait: head/shoulders.
In general and put simply, the more detail you show, the more you blur the background. In the extreme case—a pure head shot—you create a background made of very blurry light and dark blotches that say nothing about the surroundings. This approach can be used anywhere, but it’s especially useful when the environment is boring. Just blur it as much as you can—problem solved. The more distant the surroundings, the stronger the effect.

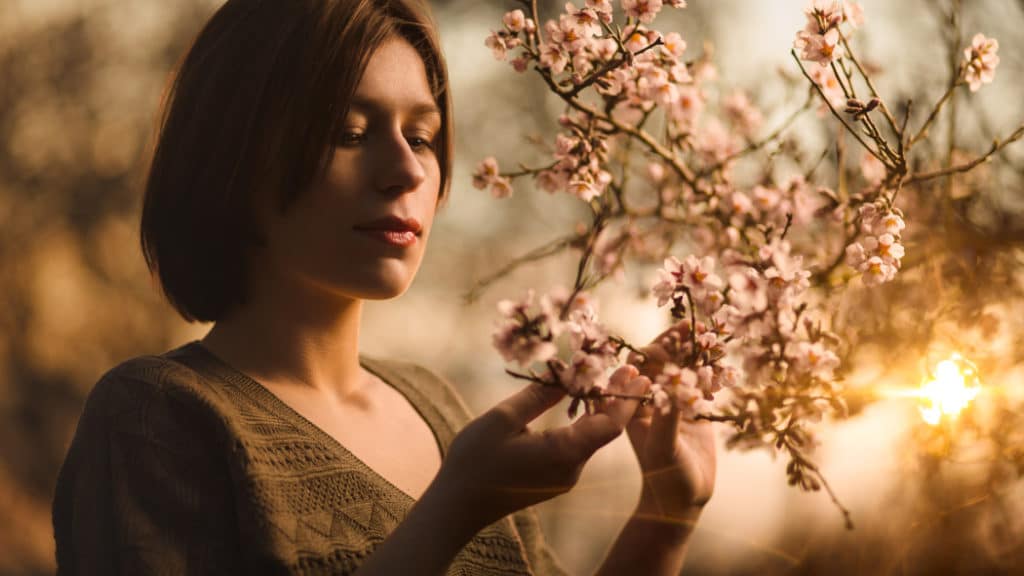
If you want to include some natural beauty too, there’s usually the option of shooting between trees. Great photos can be taken among the leaves, but photographers especially love spring’s blooming trees. You can use them for impressive shots:

Canon 5D Mark III, Canon EF 85/1.8, 1/100 s, f/1.8, ISO 200, focal length 85 mm
But you can take good pictures in every season, as you can see in this similar photo from midwinter. (The light from the right comes from my flash with a violet filter attached.)

Canon 5D Mark III, Canon EF 70–200/2.8 II, 1/200 s, f/2.8, ISO 100, focal length 100 mm
That last picture is proof that even in close-ups your model can still interact with their environment. But there’s an increased risk of a “stranger’s hands effect”: an unfortunate crop where the model’s hands, rising from below, look like they belong to someone else. Thankfully most people won’t harp on this, and many pictures will look right even without fiddling with their arrangement.

Canon 5D Mark III, Canon EF 85/1.8, 1/200 s, f/1.8, ISO 100, focal length 85 mm
Discover New Tricks
The tips I mention are just a few of the many ways you can approach portraiture. With experimentation, you’ll definitely arrive at other ideas for how to approach a shot.
And if you already have some right now, I’ll be glad to see them in the comments.
yakout
It is very good. I have benefited a lot from it
Andre
Very interesting and useful tips !