Photographing Kids Worry-free, Even Against the Light: We’ve Got 8 Tips to Improve Your Photos
Backlighting doesn’t have to mean ruined pictures with dark faces. And in fact, it can be good to take advantage of it when you’re photographing children. It can help you create magical silhouettes, make hair shine, and more.
Backlighting is the situation where light is shining onto the photographer from in front. The light source is thus behind the photo’s subject. When the background is very bright, this leads to photos with silhouettes. But if you learn how to work with backlighting, you can take advantage of it much more. And you can give your pictures a dazzling atmosphere or a pensive mood.
Make Hair Shine
The most popular use of backlighting is tied to the evening’s Golden Hour. The sun slides down towards sunset, it has a beautiful golden color, and its rays are more diffuse. That way there’s not such a strong contrast of light and shadow as when the sun is high in the sky.
The light behind the child that you’re photographing creates a shining aura around their hair and bright contours along their body. When you’re doing this, it’s important to watch your exposure above all. Even though your eyes are telling you otherwise, your subject child is in shadow, and thus darker than usual. Fortunately, raising the EV slightly will help you with this.
Meanwhile, make sure that your exposure is balanced and that no major blowout (overexposed spots) appears in the picture. Watch the histogram, and especially any blowout warnings for the pictures you take. And shoot to RAW just in case.

Canon EOS 6D, Canon EF 35 mm f/1.4L USM, 1/4000 s, f/2.2, ISO 100, focal length 35 mm
Shoot to RAW
When you’re shooting to RAW, you have more possibilities for later edits, especially for brightening shadows and darkening lights. You can also correct exposure or change white balance to some extent.
And white balance is an important element when you’re shooting at the Golden Hour. That’s because your camera’s automatic settings will push your pictures towards cool tones. So you’ll actually want to set your white balance to Daylight, to give your pictures the right color atmosphere.

Canon EOS 6D, Canon EF 35 mm f/1.4L USM, 1/100, f/2.8, ISO 1000, focal length 35 mm
Use a Reflector
It pays to use a reflector when you’re photographing children. Even though this can sometimes be complicated. Children like to run, and it’s not easy to get them to sit still. But when you do manage it, you’ll definitely appreciate a reflector.
That’s because a white or golden surface comes in handy during the Golden Hour. Naturally you can also use a silver reflector, but I personally avoid these. I don’t like their cold silver color when I’m photographing children outdoors. With gold (or silver) reflectors, meanwhile, watch out for blinding your subject.
The size of the reflector and its distance from the child are also important. Keep in mind that the farther away from the child you position it, the more it will function as a point lighting source. You can also use alternative reflecting aids such as a white sheet or a house’s facade.
Watch the Background
Don’t underestimate your choice of the child’s background. A simple surface with no distracting elements works best. Also keep in mind that contours from light stand out wonderfully against a darker background, so avoid including large parts of a too-bright sky in your composition.
Try taking your pictures from an elevated spot with the help of a long focal length. By taking pictures from above, you avoid blowout caused by the bright sky, and you also don’t have to worry as much about the horizon.
Meanwhile thanks to your long focal length, you won’t face the risk of heavy deformation caused by taking the picture from above. If you used a short focal length, your subject’s head would look very large, and their body too small.

Canon EOS 6D, Canon EF 100 mm f/2.8 Macro USM, 1/1000 s, f/5.6, ISO 100, focal length 100 mm
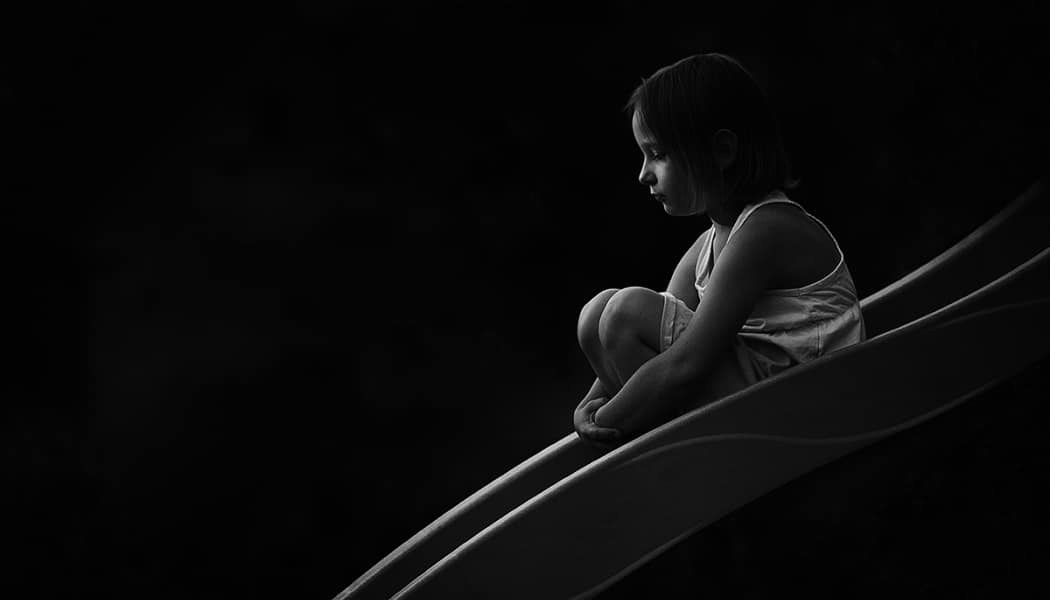
Create Mysterious Silhouettes
The bright light of the sky, and especially the evening sky, works well for photographing silhouettes. Sometimes a silhouette turns out unexpectedly well thanks to your camera’s automatic exposure metering. But at other times, you have to help your camera out a little by adjusting its settings, to keep it from correcting your choice of exposure to the “right” one. In any case it’s good to know how to do it.
There are several ways. But first you have to be clear on whether you want to have the silhouette completely black (without details) or leave a few details (a “partial silhouette”).
To create a completely black silhouette, work like this:
- Put your camera in aperture priority mode and set a f-number that fits your goal for the picture.
- Leave the lowest possible ISO; this is generally 100.
- Your exposure compensation must be set to zero.
- Set spot measuring on your camera and choose the center focus point. Using it, measure the exposure in the brightest part of your upcoming shot (if the sun is in the scene, don’t aim at it directly, but more “around” it).
- Make a note of the exposure time that is calculated.
- Now switch your camera to manual mode and enter all three parameters—aperture, ISO, and also the exposure time.
And you’ve got your result—a beautiful silhouette against a blowout-free sky.
Keep in mind that even if you change your camera’s metering during your shots from spot metering to evaluative metering or you choose a different focus point, the manually-set exposure is not changed.
This method works even when you leave the metering set to evaluative the entire time. With the difference that the sky behind your photograph’s subject will likely not be as striking. That’s because in this case your camera measures the scene based on the entire frame.
With this kind of metering, not even your silhouette will necessarily be completely without details. You can wait to darken the picture until you’re post-editing in Zoner Studio.
And if you want to create a partial silhouette, measure exposure based on the child’s face instead. You can then adjust the picture’s overall brightness using exposure correction.

Canon EOS 6D, Canon EF 35 mm f/1.4L USM, 1/500 s, f/2.8, ISO 100, focal length 35 mm
Aim for Simplicity When Creating Silhouettes
Pictures with silhouettes are popular among both photographers and their audiences due to their strong emotions and mysterious atmosphere. To get a perfect result, you need to compose the photo as simply as possible.
So watch out to make sure that objects don’t end up touching each other or blending together. Otherwise it won’t be clear who or what is actually in the photo.
And don’t forget that silhouettes of people often look better in profile.
Use Your Lens Hood
When you’re shooting against the light (and not only then), your camera’s lens hood is important. It prevents the penetration of parasitic light onto the front lens of the lens assembly.
That ensures better detail for your picture and reduces lens flare. If lens flare and a “milky” image are your goal, then just take the lens hood off.
Know Your Equipment
When you’re shooting against the light, your camera’s automatic focus may not be able to focus on the subject. This mainly happens when the scene is short on contrast or details.
In this situation, the cross-shaped center focus point works the best (it can focus on both vertical and horizontal lines). So test in advance to see how your camera performs in unusual light conditions. Then take advantage of this knowledge when taking your pictures.
Create Unforgettable Pictures
When you’re doing photography, don’t forget that backlighting is an impressive tool that you can use to enchant people with your photos. And not only when you’re photographing children. So don’t rely on your camera’s automatic mode alone, and create memorable pictures with the help of backlighting and exposure correction.
There are no comments yet.