Portrait Lighting III: Master Portrait Photography Under Artificial Light
Artificial light has one large advantage—you have it entirely under your control, and there’s nothing to hold you back from your creative goals. So learn to master flashes and continuous lights, and you’ll take your portrait photographs to the next level.
When you take pictures under natural light, you’re limited by its characteristics, which you have no way to directly influence. You have to adapt to that light, both in your composition (the placement of your subject relative to the light) and in your creative expression. That’s because your available exposure settings (aperture, shutter, and ISO) will always depend on the conditions at the moment.
When you’re taking pictures with an artificial light source, you have full creative freedom. You can set all of your exposure values precisely how you want and then adapt your light to these values.
Artificial Light Sources
Artificial lights can be classified into two basic types:
- Continuous lighting – these provide constant lighting, and so unlike flash lighting, with these you can immediately see how they’ll influence the final photo. In the past, their use was limited, because their strong bulbs emitted a lot of heat, which was very uncomfortable for the portrait’s subject. In our current age of compact fluorescents and, above all, LED panels, this problem falls away.
- Flash lighting – you’ll encounter this in the form of studio strobes and system flashes (speedlights). Both types work the same. The difference between them is that for studio strobes you have a much higher output available and a pilot light that partially eliminates the basic disadvantage of flashes. That’s the fact that unlike for continuous lights, you’re working with them “blind.”
With flashes, you’re obtaining light for only a fraction of a second during the exposure. So you can’t visually check it while you’re taking the picture. The pilot light lets you at least partially (at a lower intensity than what you’ll get when you use the flash for your shot) see how your subject will be lighted by the flash during the shot.
Thanks to digital photography, where you can see your results on your camera display almost immediately, you can also correct the light almost immediately.
The greatest advantage of a flash is its very short exposure time. That freezes away any motion by your subject. And that, in turn, lets you take perfectly sharp photographs where you’ve eliminated motion blurring.
Adapt Your Flash to Your Goals
Taking your pictures with flashes alone makes sense when you can eliminate sources of natural light. You can do this in a windowless studio—but you can also do it in an ordinary room, or outdoors in the evening or night.
To keep natural light from influencing your final exposure, set a short exposure time on your camera. In an ordinary studio or a dark room, this can be 1/125 s or less.
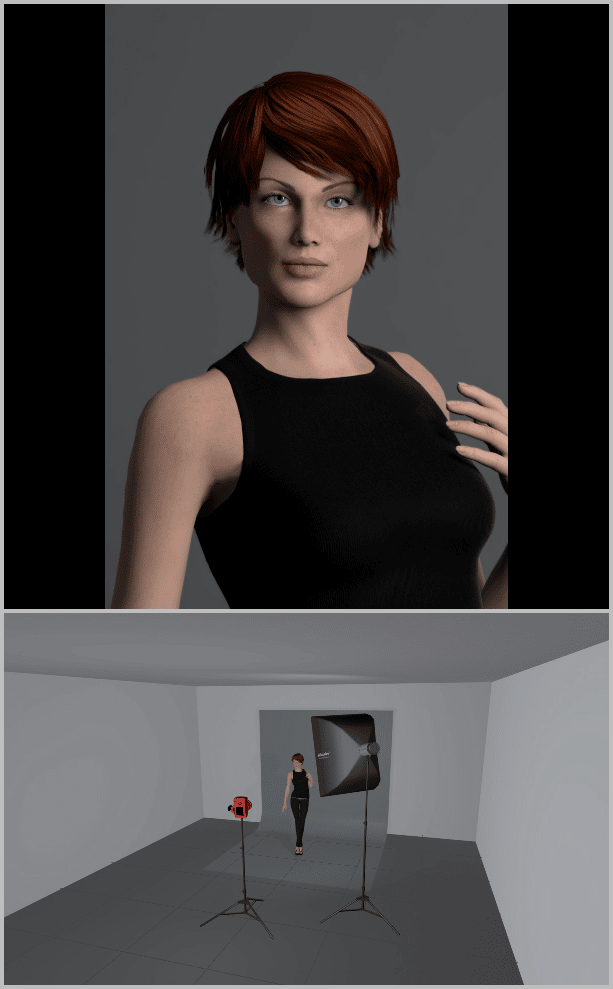
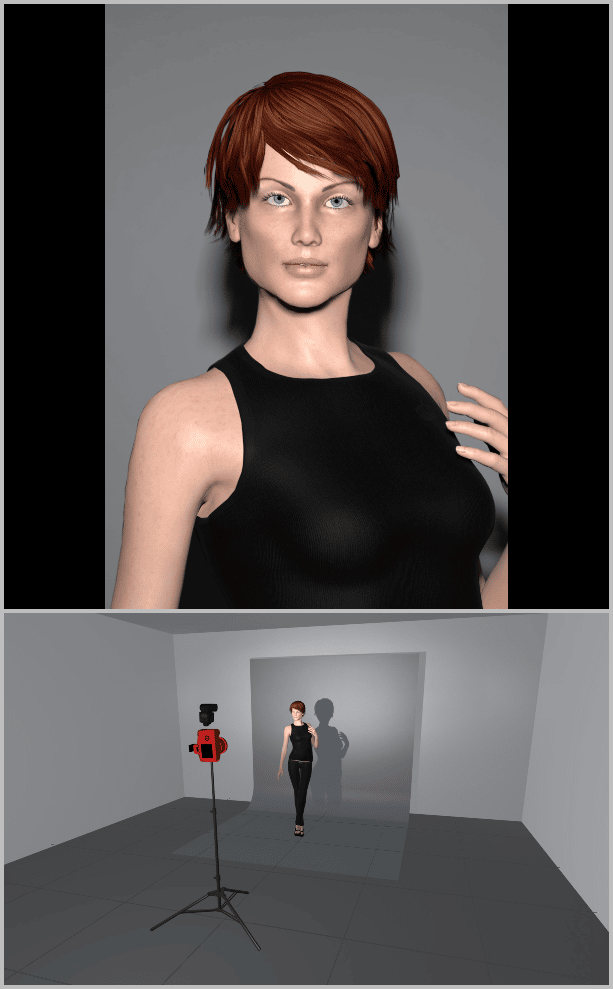
The fairly weak (250 Ws) flash is set to half of its output and is placed relatively far from the subject. (“Ws” stands for “Watt-seconds,” and it describes how much light the flash can deliver per second.) Due to this, the subject’s whole body is lighted, enabling a broad shot of it.
Once you’ve eliminated the surrounding light, set the aperture that you need. The studio strobe or system flash will deliver all of the light that you need for your exposure during a fraction of a second.
This will be on the order of thousandths to tenths of thousands of a second. So clearly a shutter speed that’s a few hundredths of a second will have no effect on the final exposure. The only thing that will affect the amount of light during the exposure is your aperture. So if you’re using a tight aperture, you have to increase the output of your flash or move the flash closer to your subject.
To learn more about how light’s intensity changes depending on its distance from the subject, read our article Discover the Power of Artificial Light in Photography. Within it you’ll find an explanation of the term “inverse square law.”
By moving your flash closer to your subject, you get more diffuse light. This gives you a portrait with a greater feeling of life and depth. The background is lighted less strongly, and so the portrait pops out of it more strongly. When you’re doing this, reduce your flash’s output to nearly the minimum.
You won’t be able to configure your flash output precisely without one basic photographic aid—a flash meter. This is a light meter enhanced with a function for measuring the light from a flash.
How do you work with it?
- On the flash meter, you set the ISO and aperture used.
- For your initial flash output strength, choose some value in the middle of the range.
- Position the flash relative to your subject based on the portrait lighting principles that you learned in Portrait Lighting I: Keeping Quality, Intensity, and Light Temperature in Mind.
- Place the flash meter against your subject so that the sensor (usually located in the white dome) is turned towards your light source.
- Let off a test flash and read the aperture value on the flash meter.
- If the value that you read matches the aperture that you need, you’re done with your configuration.
- If the aperture measured is lower, increase the output of your flash.
- Likewise, if the aperture measured is higher, you need to reduce the output of your flash.
If you run into the limits of your flash’s power settings, move it closer to your subject to increase its effective output. Or move it farther away to reduce its output.
To learn more about measuring exposure, check out our article How Measuring Exposure Works. However, a flash meter is a rather expensive accessory. If it’s beyond your budget, you can measure your exposure using a gray card. For tips on doing that, see our article Use a Gray Card to Measure Exposure.
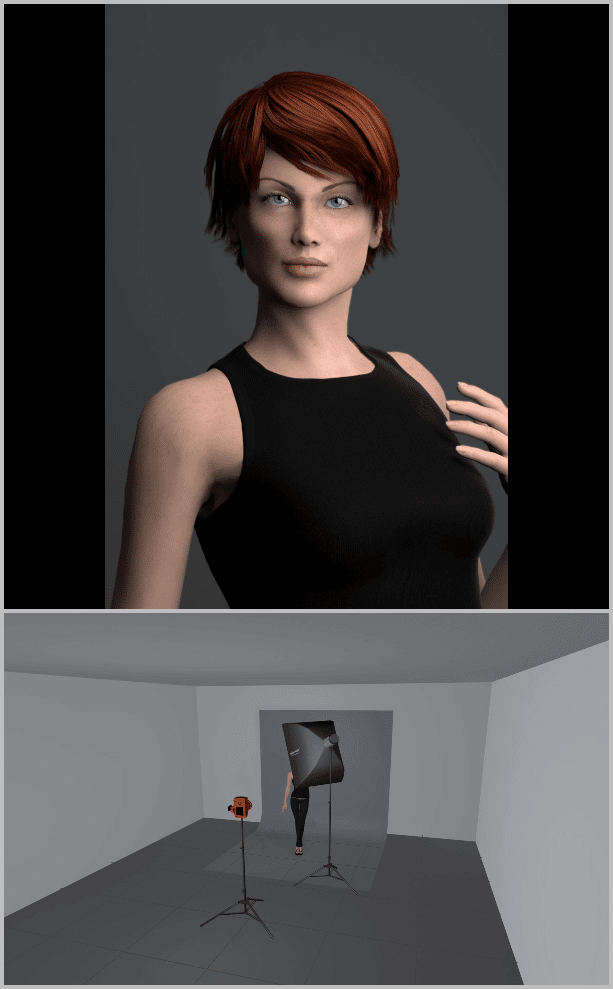
When using a sufficiently powerful flash (in this case, 1000 Ws set to minimum output), you don’t have to aim the middle of your softbox towards your subject; you can angle the softbox towards one side instead. This is important because different parts of the softbox have different light quality. The lowest-quality light is in the middle, while the highest-quality diffusion occurs at the edges. As a bonus, you’ll get a light gradient in the background.
Shooting With a Speedlight
Speedlights are something you’ll see out there very often. Although they have a limited output compared to studio strobes, it’s usually enough for the job. When a speedlight is at its full output, you can set an aperture in the range from F5.6 to F8. At the same time it’s not a problem to work with even a wide-open aperture.
Today you can buy sufficiently powerful and high-quality system flashes even from third-party manufacturers. If you’re willing to part with various features for automatic output control (TTL), they aren’t even particularly expensive.
With speedlights, you’re limited by both their output and their charging time. Fully charged batteries are able to ready a new full-output flash within 3 to 5 seconds, while this can take up to 15 seconds for depleted batteries.
Studio Strobes Give a Higher Output
One more expensive solution is to acquire studio strobes. These are very powerful units (hundreds to thousands of watt-seconds), that are much more powerful than system flashes and have a significantly shorter charging interval. So they let you shoot long series of pictures quickly. They are especially useful in fashion photography, where the model smoothly transitions from one pose into the next.
For portrait photography, on the other hand, the high minimum output of these lights can be a problem. Even for those with a relatively low output (400 Ws), you have to work in restricted spaces with an aperture of F8 or higher. In conditions like these, you’re thus unable to use a small depth of field.
Studio strobes are thus mainly appropriate for large spaces where you can position them far enough away from your subject.
Don’t Camera-mount Your System Flash
System flashes have a connector for placing them onto a camera’s hot shoe mount. But this is mainly useful for basic reportage photography. It’s out of place in art photography—which creative portraits are a part of.
To learn how to position off-camera light sources, read the introductory article of this series – Portrait Lighting I: Keeping Quality, Intensity, and Light Temperature in Mind.
This illustration shows what happens when you use a flash positioned on a camera’s hot shoe mount. The flash itself has a relatively high output. It has been set to 1/4 output to ensure a correct exposure. Meanwhile the camera’s aperture is set to F9. You can see that the portrait has flat lighting and feels “2D.” There is a strong, sharp shadow under the subject’s chin, as well as on the background. Light like this is absolutely unusable for portraits.
For speedlights, three basic methods are used for controlling an off-camera flash.
- A synchronization cable is the most basic solution here.
- But an infrared wireless connection is a better choice. However, for this connection, there has to be direct visibility between the flash and its control unit.
- So what pays off best today is to use radio-based flash firers. These can be used to control even flashes that are hidden behind obstacles. Also, their control range is several times larger than for infrared rays.
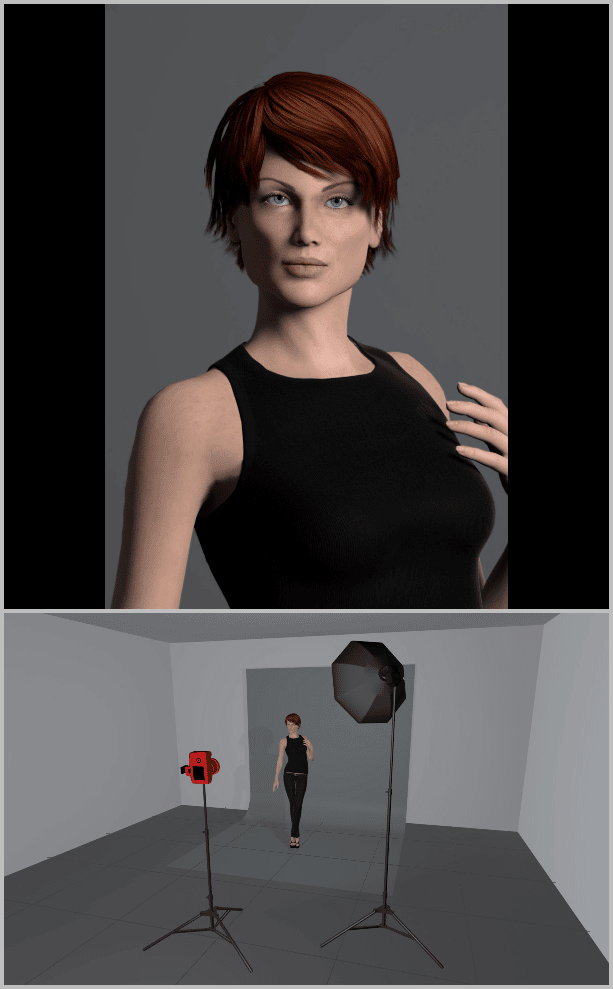
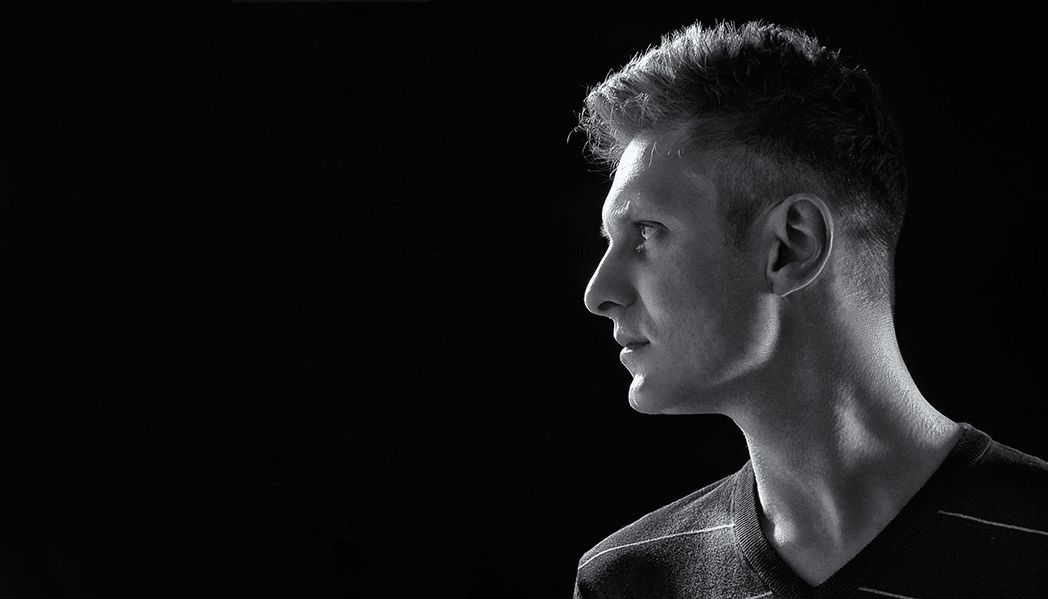
When your flash has been placed inside a softbox, its light is pleasantly diffused, giving your portrait pleasant soft shadows. By placing the light outside of the lens axis, you give your portrait a greater feeling of depth. Unlike when you’re using a direct flash, you need to increase its output to 100%, since the softbox’s diffuser is consuming a large part of the light (1 to 2 EV). Further light intensity is lost through the fact that the light is not aimed directly at the subject, but instead is reflected several times inside of the softbox. Because of this, you will need to lower your f-stop down to F4.5.
Most flashes also have a sensor that responds to other flashes in their surroundings. So you can use multiple flashes, where you fire one at a distance from the camera, and the rest respond to its flash.
In this case, however, the firing sensors of the added flashes have to directly “see” the flash of the main flash. This solution helps to significantly reduce the costs involved in acquiring firing units for multiple flashes.
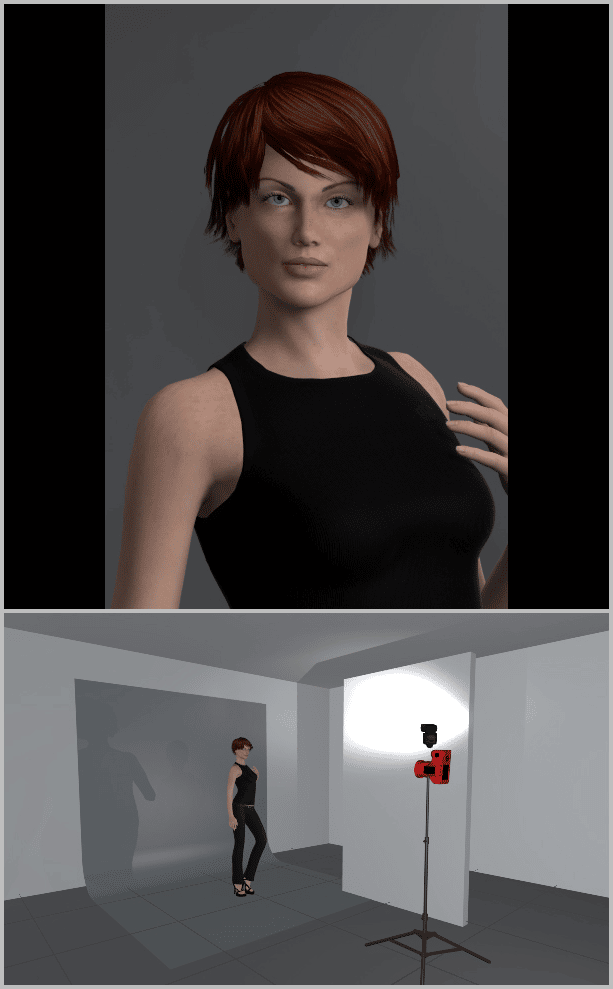
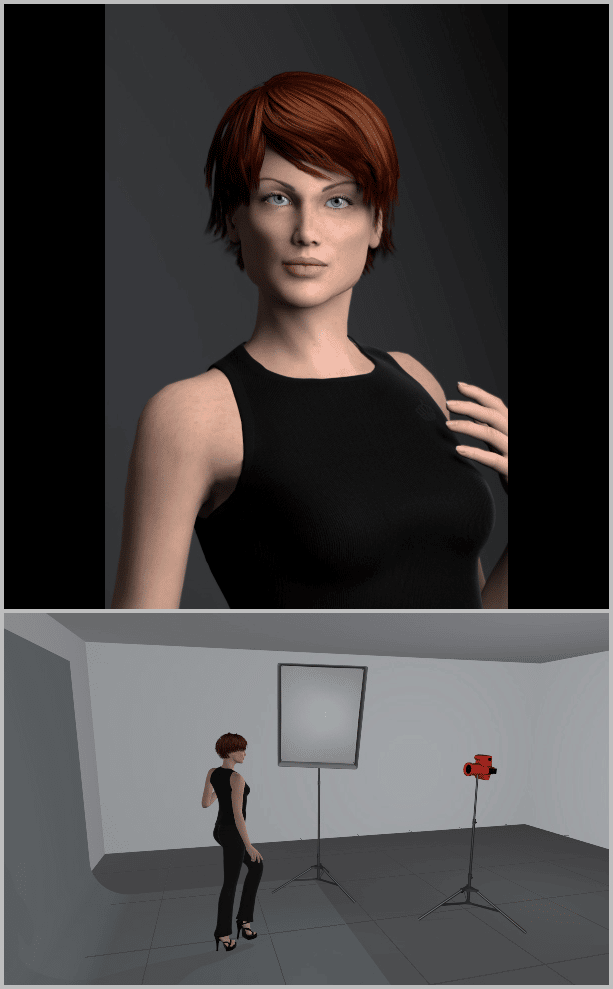
If you don’t have access to a softbox, or you can’t have your flash off-camera, you can compromise by using the reflection of your flash off of some kind of neutral surface. In practice flash reflections from a ceiling or from walls are often used. Or if appropriate an assistant can hold a reflector for you. In this case, the light’s intensity dropped slightly—by 2/3 EV—as it was reflected.
You can buy radio transmitters and receivers separately as accessories for flashes and your camera. Some flashes have a receiver already built into them, and you only need to buy a transmitters. The highest-range cameras even have a remote flash transmitters built into them by their manufacturers. However, these transmitters generally only communicate with flashes from the same manufacturer.
Synchronization Time (X-sync)
When setting the shutter speed for any camera with a focal-plane shutter (traditionally this means DSLRs), don’t forget about the shutter’s synchronization time.
The way that a focal-plane shutter works is that it has two curtains. One of them covers the camera sensor and opens up during an exposure. Once the requested exposure period ends, the second curtain covers the sensor again.
However, for short exposure times, the second curtain starts covering the sensor again even before the first curtain has fully revealed it. Thus the sensor doesn’t receive all of the light at once; instead, the slit formed between the shutter’s first and second curtain moves in front of the sensor.
In this situation, you can’t use a traditional flash, because it would only light one portion of your photograph.
The camera’s synchronization time expresses the shortest period for which the entire sensor will definitely be uncovered. It’s thus the fastest possible speed for flash photography.
For today’s DSLRs, you’ll most frequently see an X-sync value of 1/250 s. However, I’ve already encountered situations where the camera’s real x-sync time was shorter. The best way to verify this is by photographing a white wall illuminated by your flash.

The first photo was taken within the shutter’s synchronization time, and the second photo was taken with a time that was 1/3 EV shorter. You can see a mild shadow at the right edge. However, in practice, this speed is still usable for this specific camera. But any speed faster than this is too short for flash photography.

For cameras with a central shutter, you can use much faster speeds than for cameras with a focal-plane shutter. For the Panasonic LX100 advanced compact, the image is problem-free at a speed of 1/1000 s, and even a speed of 1/2000 s can be used for portraits. The mild vignetting that it causes is not a problem for portraiture.
Modern flashes include high-speed synchronization that lets you take pictures at speeds that are faster than the X-sync speed. These flashes work by dividing up the overall flash into several flash bursts in sequence. Each of these illuminates the slit that is currently open over the sensor, and their combined effect is to illuminate the whole sensor.
However, this approach brings very high energy consumption, and there’s the risk of quickly overheating the flash head. Because of this, you won’t encounter it too much in practice.
Take Pictures With Continuous Light
For continuous lights, you generally can’t regulate their output as smoothly as you can for flashes. Also, unlike with flashes, shutter speed comes into play.
While flashes lasts for a fraction of a second, leaving nothing exposed during the rest of your exposure time, when you are using a continuous light, you whole exposure period gets used.
You have to watch out for this in connection with possible motion blurring of your subject—due to either camera shake or small movements by your subject. But on the other hand, here you’re not restricted by your camera’s synchronization time. Thanks to this, you can still set fast-enough shutter speeds.
There are no comments yet.