Portraits Painted with Light II: Working with Models, Posing, Lighting, and Colors
Learn how to maintain sharpness when light painting. Flash is not the only way—lighting, color, and movement can be utilized in creative ways. Learn to light your models so they look natural. Also, learn how to create depth while working with multiple light sources. Finally, where does color theory come into play? In this installment, we’ll take a look at advanced techniques that will take your light painting portraits to the next level.
This article is a follow-up to Portraits Painted with Light: The Art of Light Painting, Step by Step. There, you can find the basics of light-painted portraits. If you want the whole picture, be sure to read it!
Maintaining sharpness
Capture sharp portraits using long exposures. This is something that everyone who starts light painting struggles with. The first thing that comes to mind is to use flash, as many photographers have been doing for years. Flash freezes movement and prevents the model from being only a silhouette. But the result often doesn’t look natural. The model looks like they’ve been cut out from another frame and added to the scene in post-production.

TIP: Be careful from which side of the model you light them. Imagine you weren’t light painting, but shooting a normal portrait. How would you work with light? The same rules apply when light painting. No harsh light from the front and no flat light. The light should be soft and malleable.
I rarely use flash when light painting. I find it too harsh and unnatural. Instead, I use continuous lighting for my models, paying special attention to its quality and direction.

Another trick is to ask your model to exhale and not breathe in. When light hits them, any movement of the chest is visible in the photo. It’s also important not to blink or look directly into the light or at the photographer. Otherwise, the eyes can turn an eerie white.
These are a few methods I use to maintain sharpness, for different situations:
- Shine the light briefly
This method is similar to the concept of flash, only you use a light tube instead. Move it along the model from the head down, then turn it off, and don’t direct any more light at the model’s face for the remainder of the exposure. This method is perfect for shooting in complete darkness and works best for standing poses.
- Add an anchor point
If your model keeps moving while standing or can’t stay still, have them lean against something, sit down, or even lie down. When shooting your model in the lying position, you can allow for exposures of several minutes and let the ambient light work the whole time.

- Use a wide-angle lens
I recommend a focal length between 14–35mm. With wide-angle lenses, small movements are less noticeable than with longer portrait lenses.
When movement is useful
Light painting can be combined with model movement. I call this “body painting.” Part of the pose stays static while another part moves, with continuous light shining throughout the exposure. In these cases, flash can be helpful, but it must be carefully dimmed for the remainder of the exposure.

If you want the model to leave a light trail, clothing plays an important role. Black and dark clothing doesn’t reflect light well, and soft materials like velvet will almost disappear. If you want the model to “etch” themselves into the image, use lighter-colored clothing.

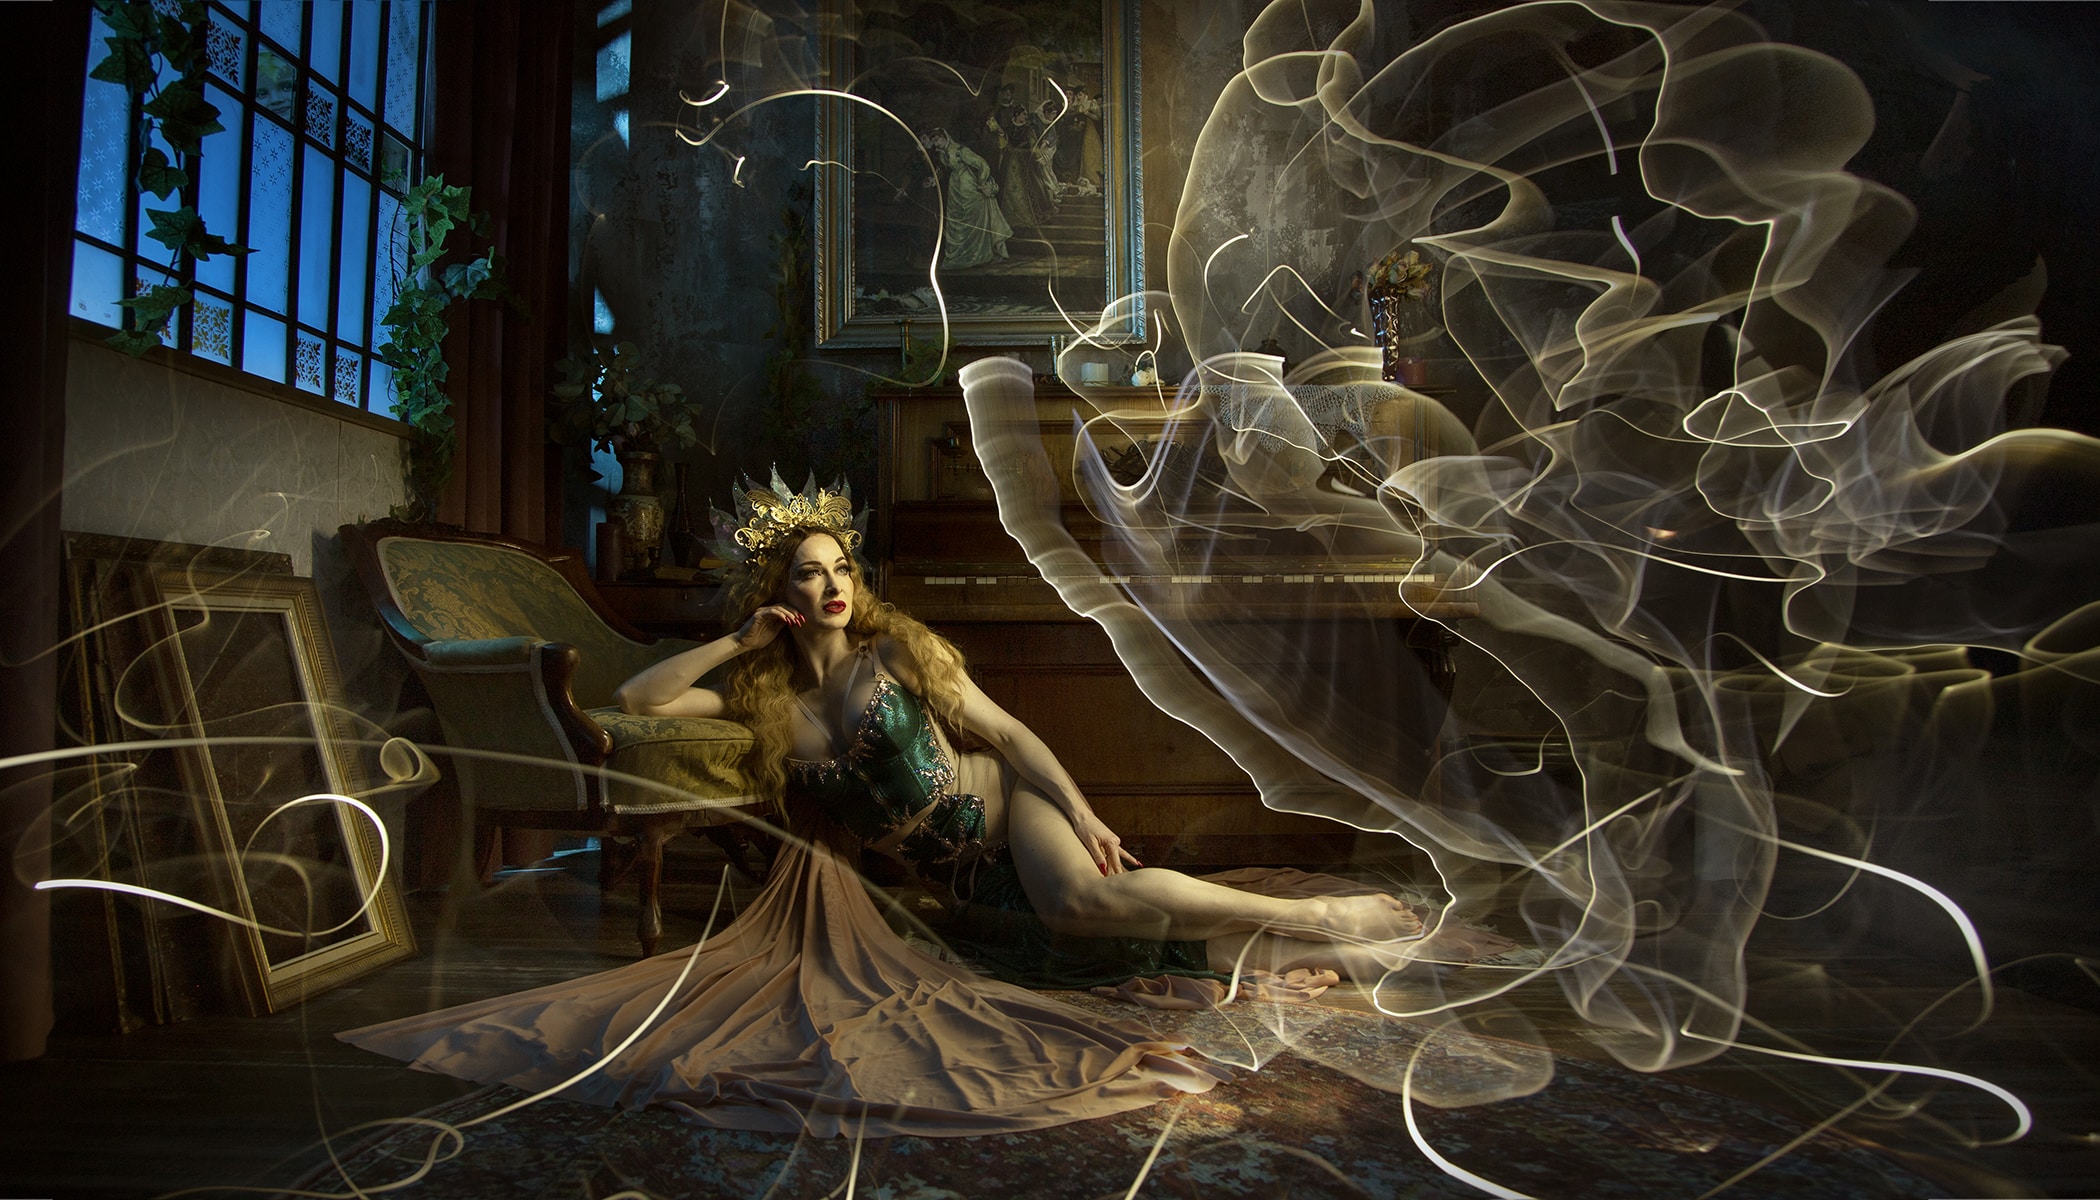
Multi-layer Light Painting—Creating depth
Typical light-painted portraits are often limited to a circle or other light shape behind the model. The model is usually lit by flash, while the background and foreground stay black. This makes sense because light shows up best against black. But if you really want your portrait to really stand out, it needs to feel like a complete scene.
The background should include interesting details that you light during the exposure. It’s the same as regular photography—if there’s something for the viewer to explore, they’ll linger longer.
TIP: Don’t be afraid to shoot against a white background. It beautifully picks up the color of the light. The best conditions are just after sunset, when the light is weak but still softly illuminates the surroundings, adding depth to the photo.

It’s also important not to stand behind the model for the entire exposure. Move around, let the light fall naturally on the model, mix with other light sources, and create a harmonious composition where all elements work together.
Using multiple light sources
In light painting, you either work with a single light source that you shine on your model and draw a pattern with or combine several multiple lights. For example, you can use a wide, soft light to illuminate your model, a flashlight with a Plexiglass attachment, and a colored flashlight to light the background and foreground.
This technique requires skill, experience, and usually a few helpful assistants. The key is balancing the light sources. Each one must be adjusted carefully so they don’t overpower each other.

You can create a beautiful light pattern, but if your background light is too strong, the drawing will get lost. A great effect is drawing a line of light in front of the model. But for it to be visible, the light must be weaker than the one illuminating the model. Otherwise, it will overpower them. Sometimes with nudes, I intentionally make the light in front stronger to comply with Meta censorship guidelines.
Color theory—The psychological effect of color mixing
Just like painters, photographers fall into two camps. Some see their pictures graphically and others artistically. Graphic perception builds on shapes and lines and often works in black and white. If you convert a graphically composed color photo to black and white, it still holds together. I know several photographers who take a graphic approach to light painting with impressive results.
Artistic light painting, on the other hand, is based on color. It’s all about the mood, shaped by a unified color tone or a carefully planned combination of colors. I personally identify more with this approach. I enjoy experimenting with colors, blending them, and discovering unexpected shades that emerge naturally. You could say I use an additive color palette in my color painting.

I rely on color theory when choosing my colors, concepts that apply across photography. The psychological influence of color on human perception has been built up over centuries. The associations are strong. Red evokes love and passion, but also danger. Blue, on the other hand, is calming and stable. Green feels fresh, but can also suggest toxicity. Yellow is warm and cozy, while purple is mysterious and luxurious.

I follow a simple rule when combining colors: use either complementary colors or analogous ones, like turquoise and blue. Sometimes mixing two colors creates a third shade, which can be visually interesting, but be careful not to distort the original mood of the photo.
One of the most important pieces of advice for light painting is: try, try, and keep trying! Don’t get discouraged if things don’t turn out exactly as you imagined. Each experiment moves you forward.
If you’re curious about something specific, please let us know in the comments! I’d be happy to answer. And if you’d like to dive deeper into light painting, join one of my workshops. I’d love to see you there!
There are no comments yet.