Make It Miniature With the Tilt-shift Effect

The article is over 5 years old. The information in it may be outdated.
![]()
We are working on its update. In the meantime, you can read some more recent articles.
Tilt-shift is an effect that makes the objects in a picture look like miniatures. You may know those special tilt-shift lenses for cameras, but did you know that you can create this attractive effect in Zoner Photo Studio as well? We’ve taken a closer look at this fun feature, and we’re bringing you a guide to working with it.
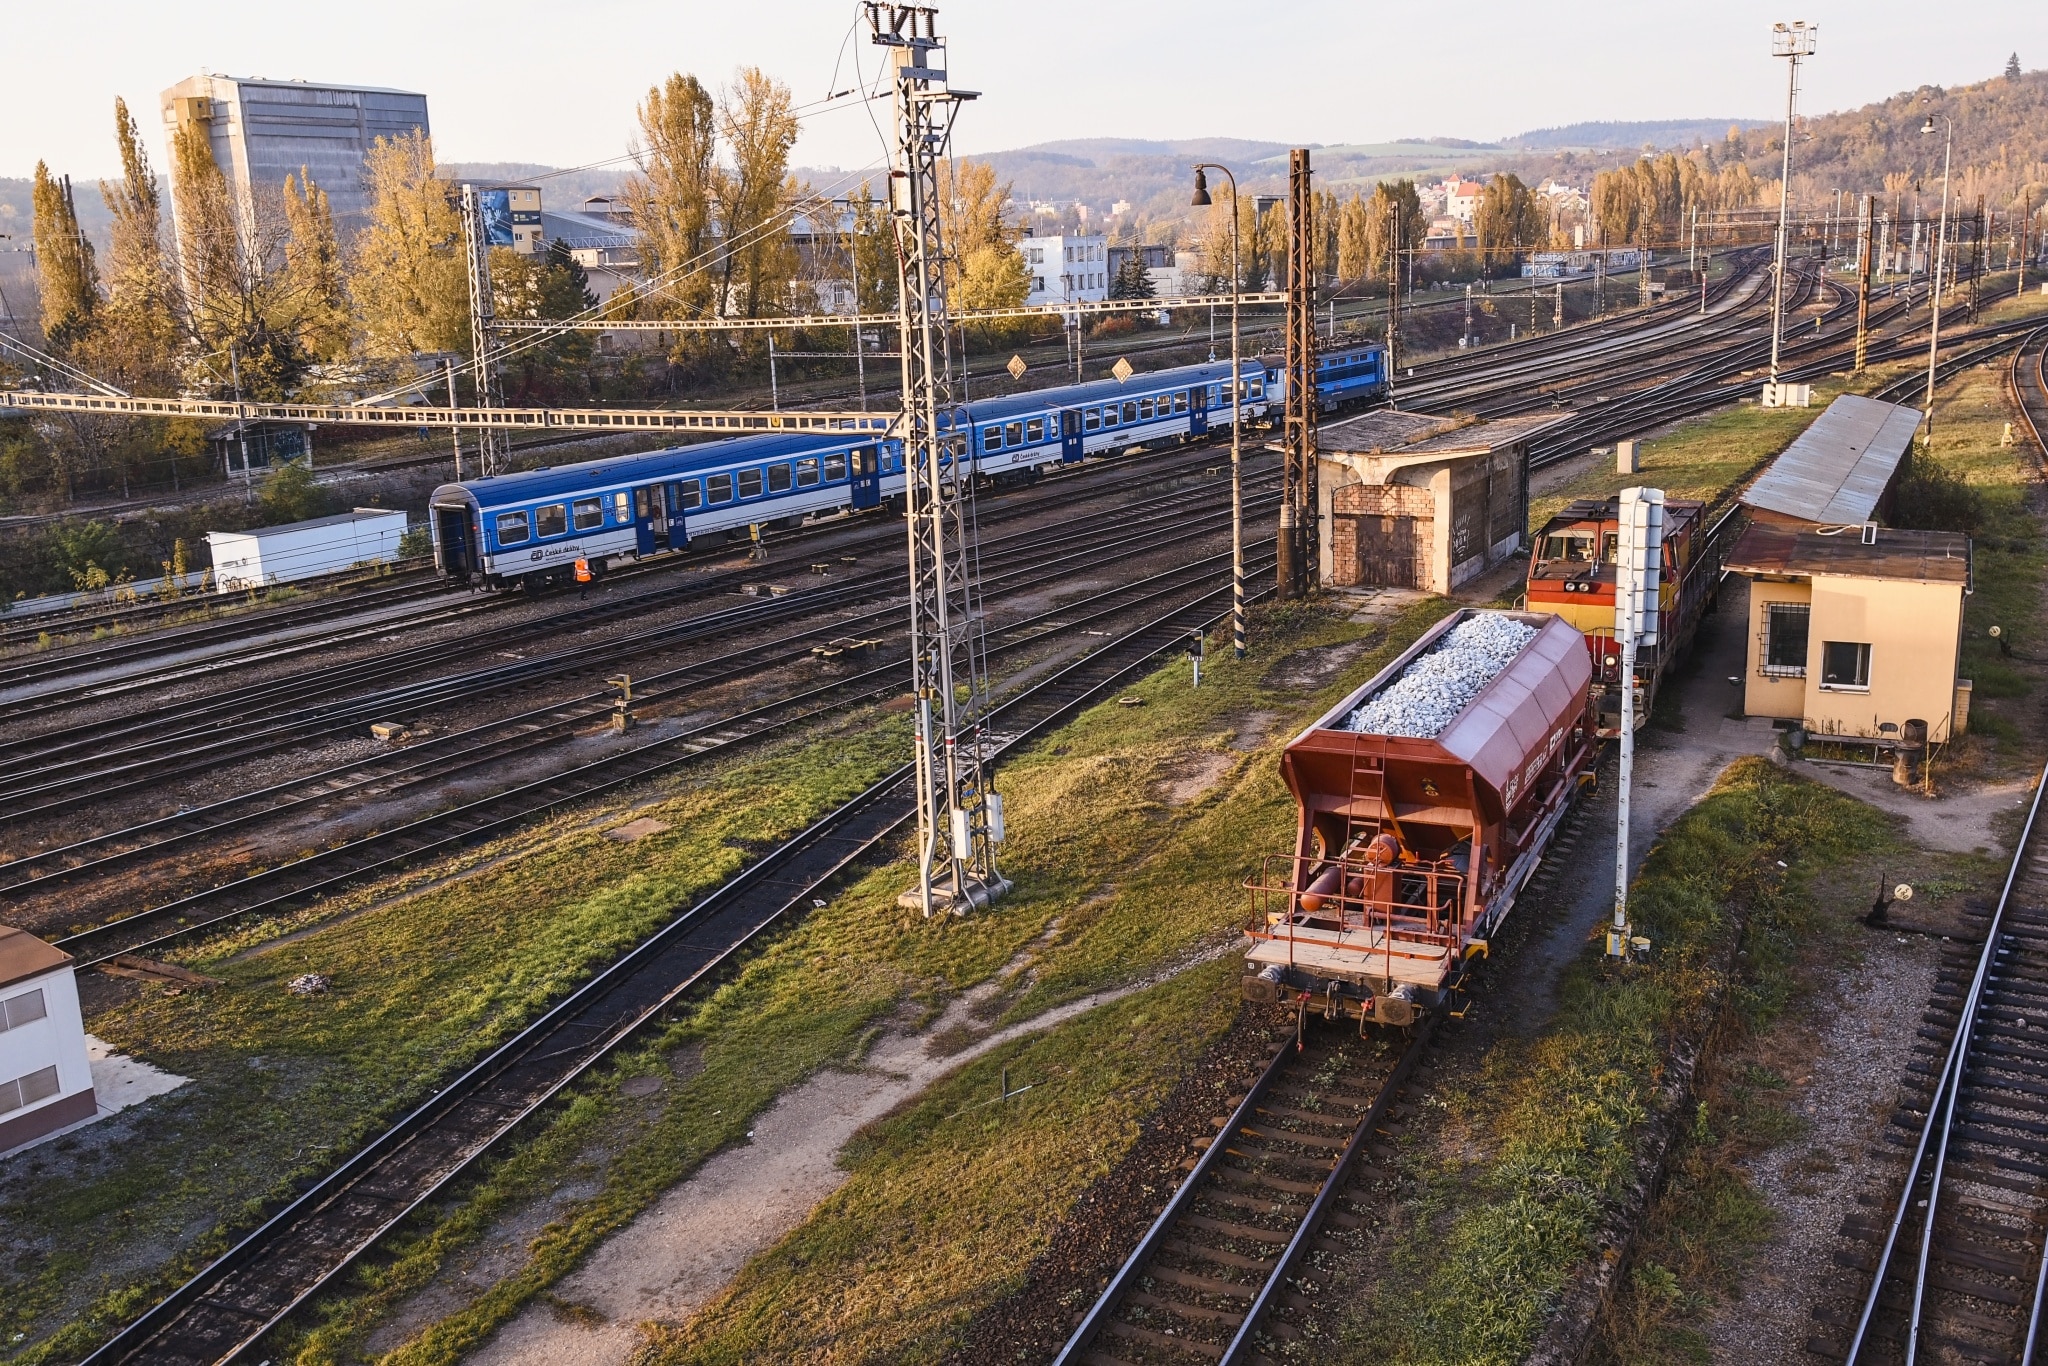
We’d like to start out by asking you if the photo below show a model train set, or a situation on real-world train tracks:

If you guessed that it’s real train tracks, you’re right. But it does strongly resemble a model train set. That’s because it’s a photo edited with precisely that goal. The feature to use to achieve an effect like this is called the Tilt-shift Effect. You may have heard about the special tilt-shift lenses out there, but those serve a somewhat different purpose.
All you’ll need is an ordinary photo, ideally taken at least slightly from above. The whole trick to getting a miniature-like effect lies in artificially creating a low depth of field. This is done by gradually blurring the top and bottom horizontal edges of the photo while leaving the central motif sharp. Zoner Photo Studio X offers not one, but two methods for achieve this effect in the Editor. We’ll describe them in the upcoming text. They are both called Tilt-shift effect, and they only differ in their details.
The First (Faster) Method
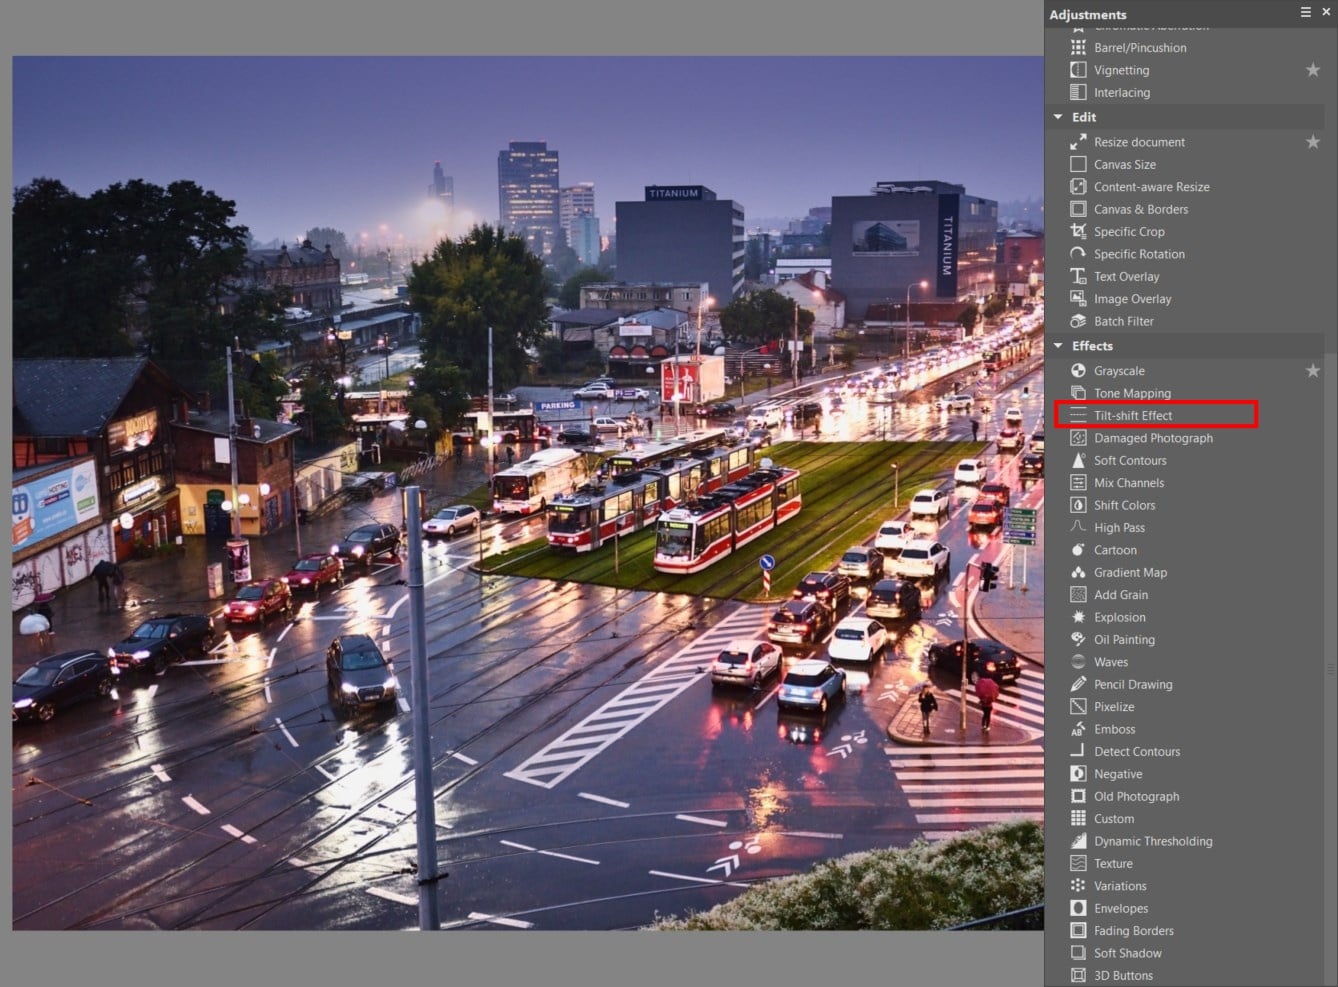
Let’s start by taking a look at the Tilt-shift Effect feature found in the Editor, in the right panel under Effects Tools – Tilt-shift Effect (Shift + F). We generally recommend this method over the second one, since it’s faster and more intuitive.
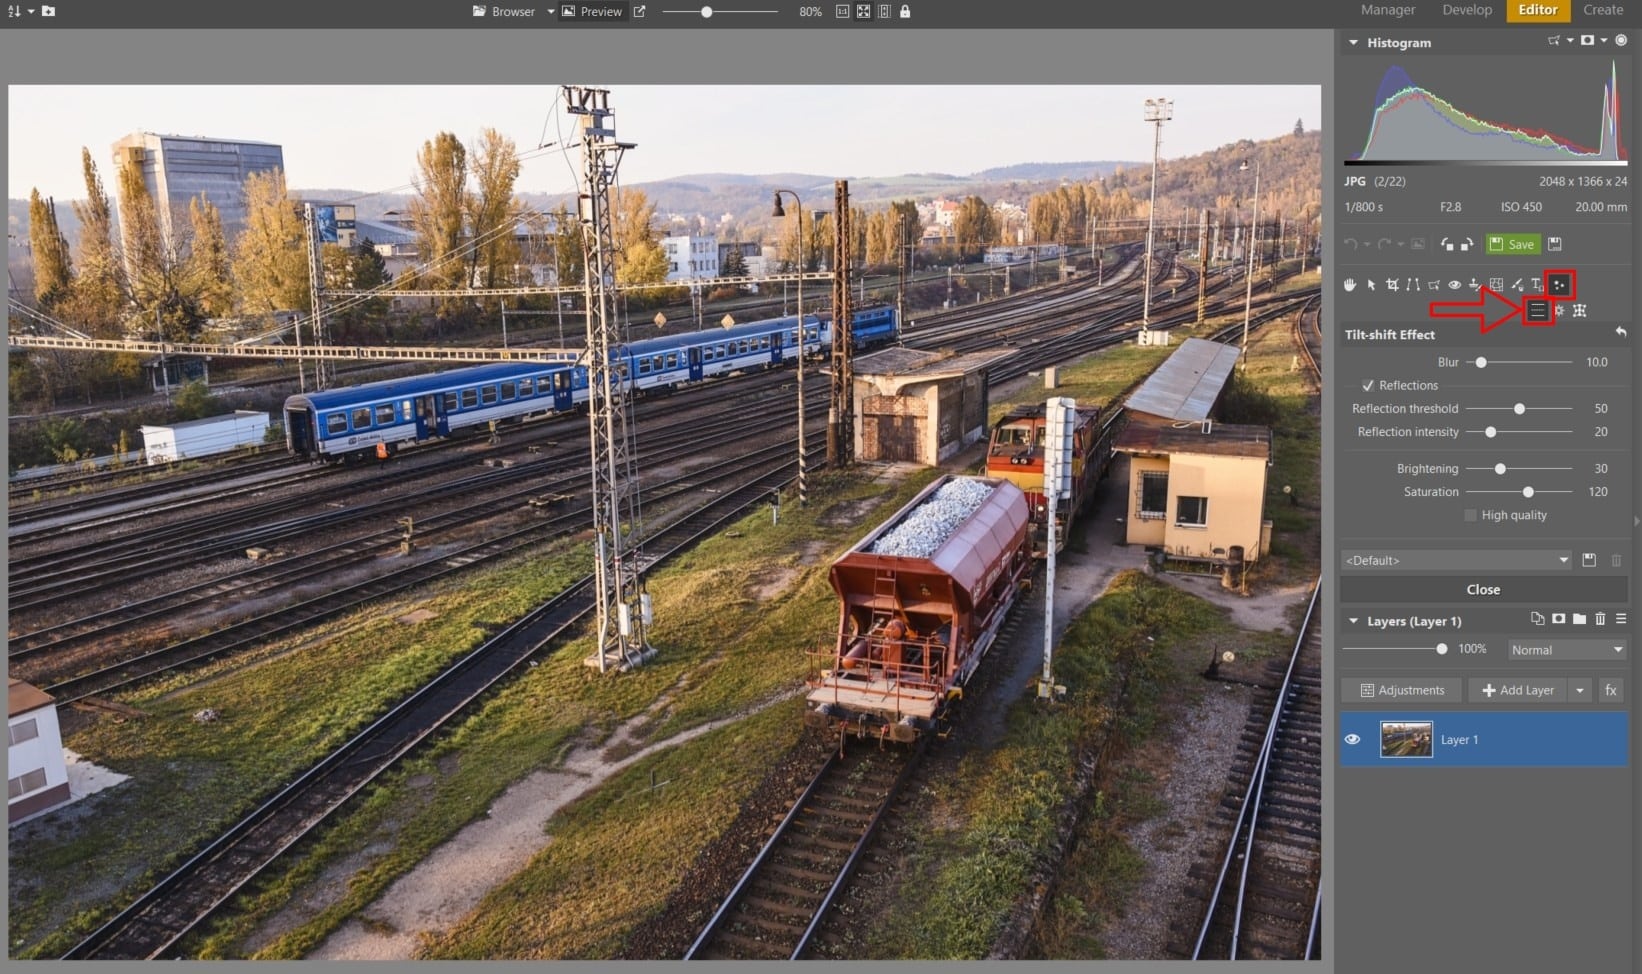
After activating tilt-shift, left-click the photo and hold down the left mouse button. Now drag the cursor to define the position and angle of the line that sets the center of the area in focus and the two transitions. Let go of the mouse once you’ve positioned the guidelines. If you need to change the center of the guidelines later on, you can.
Now a long line setting the center of the effect has been added to n the photo, along with two shorter lines out from the center in the bottom and the top parts of the photo. The shorter lines closer to the center set what’s in focus. To make the area in focus larger or smaller, just click on one of these lines and move it as needed. The other line will automatically shift so that both lines are the same distance from the center. Lines farther from the center mean a broader transition into the effect. For these lines, you can regulate their position separately for each one, which can sometimes be useful.
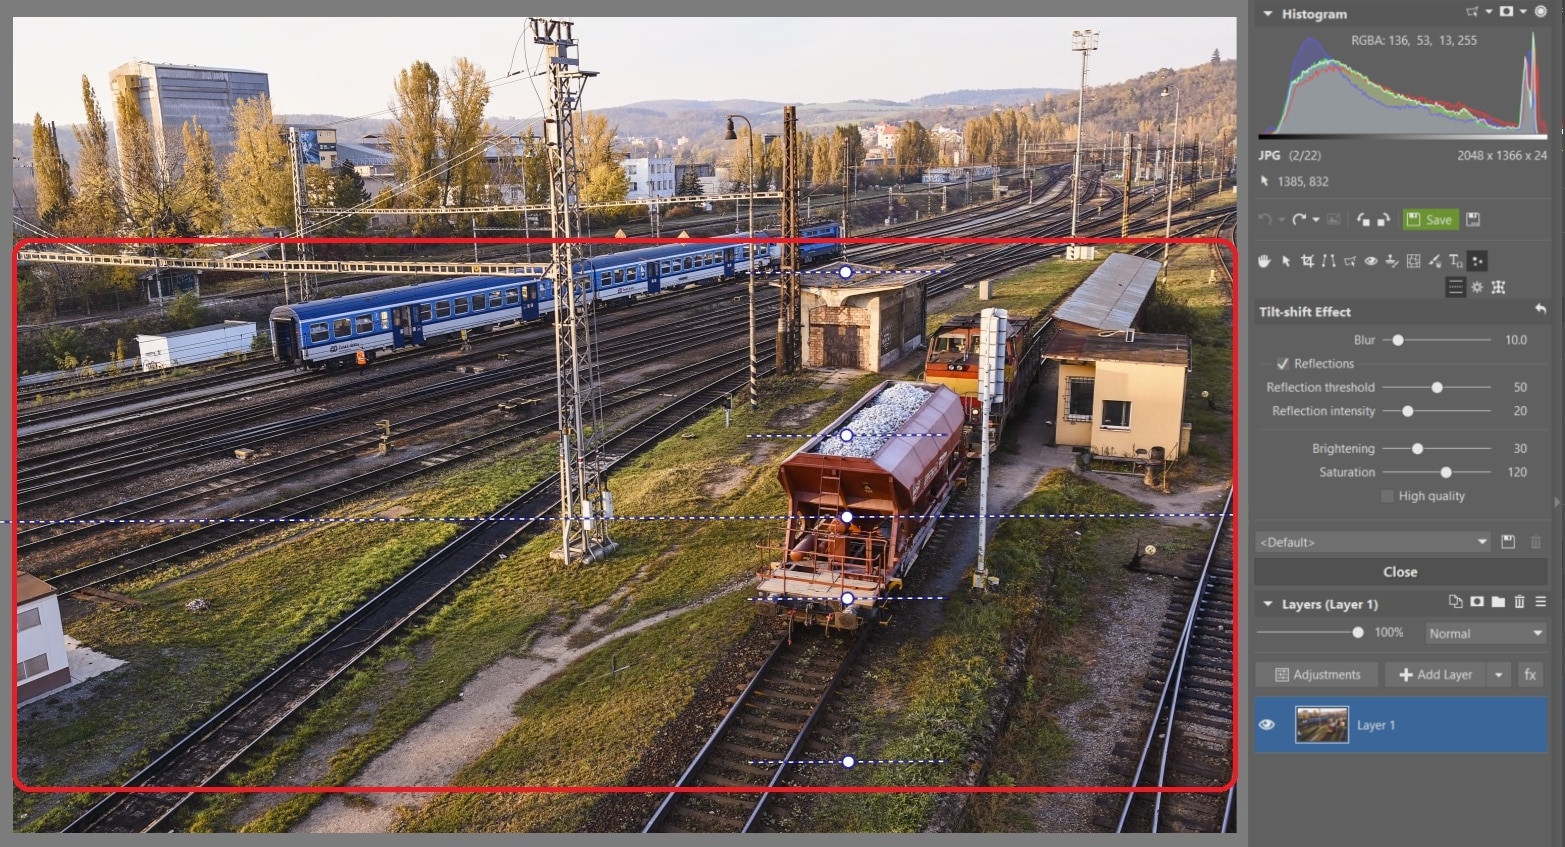
For the sample photo here, I slightly rotated the guideline relative to the top of the photo to make the effect fade in more smoothly.
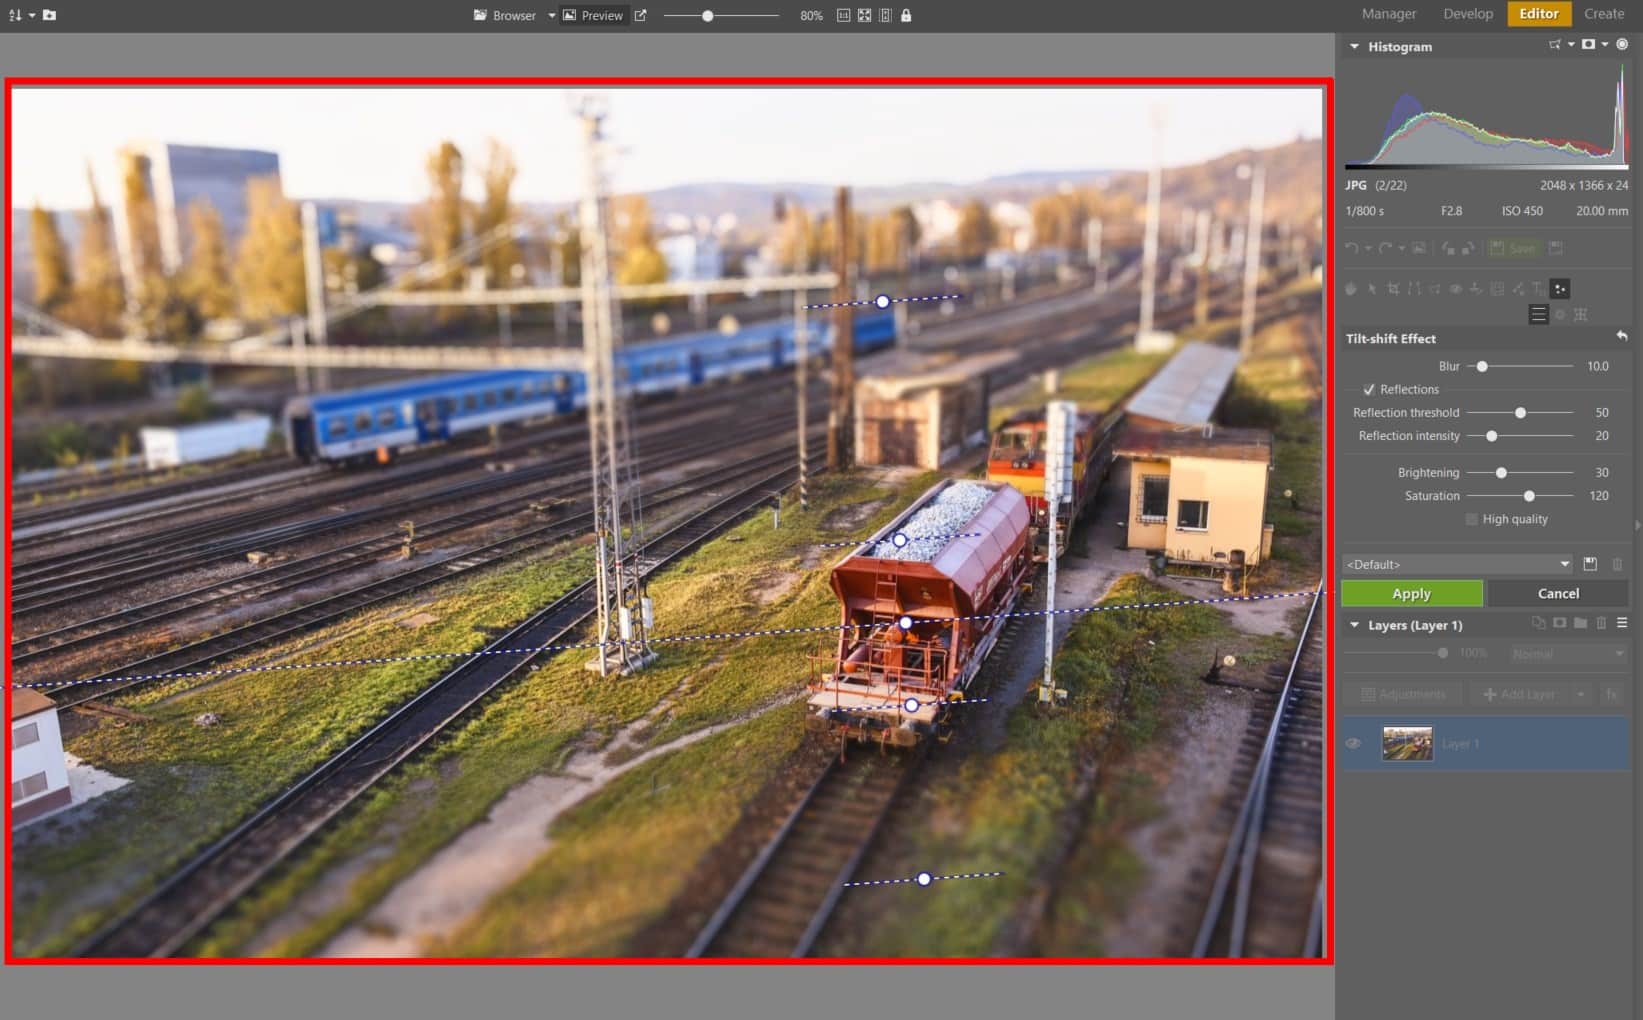
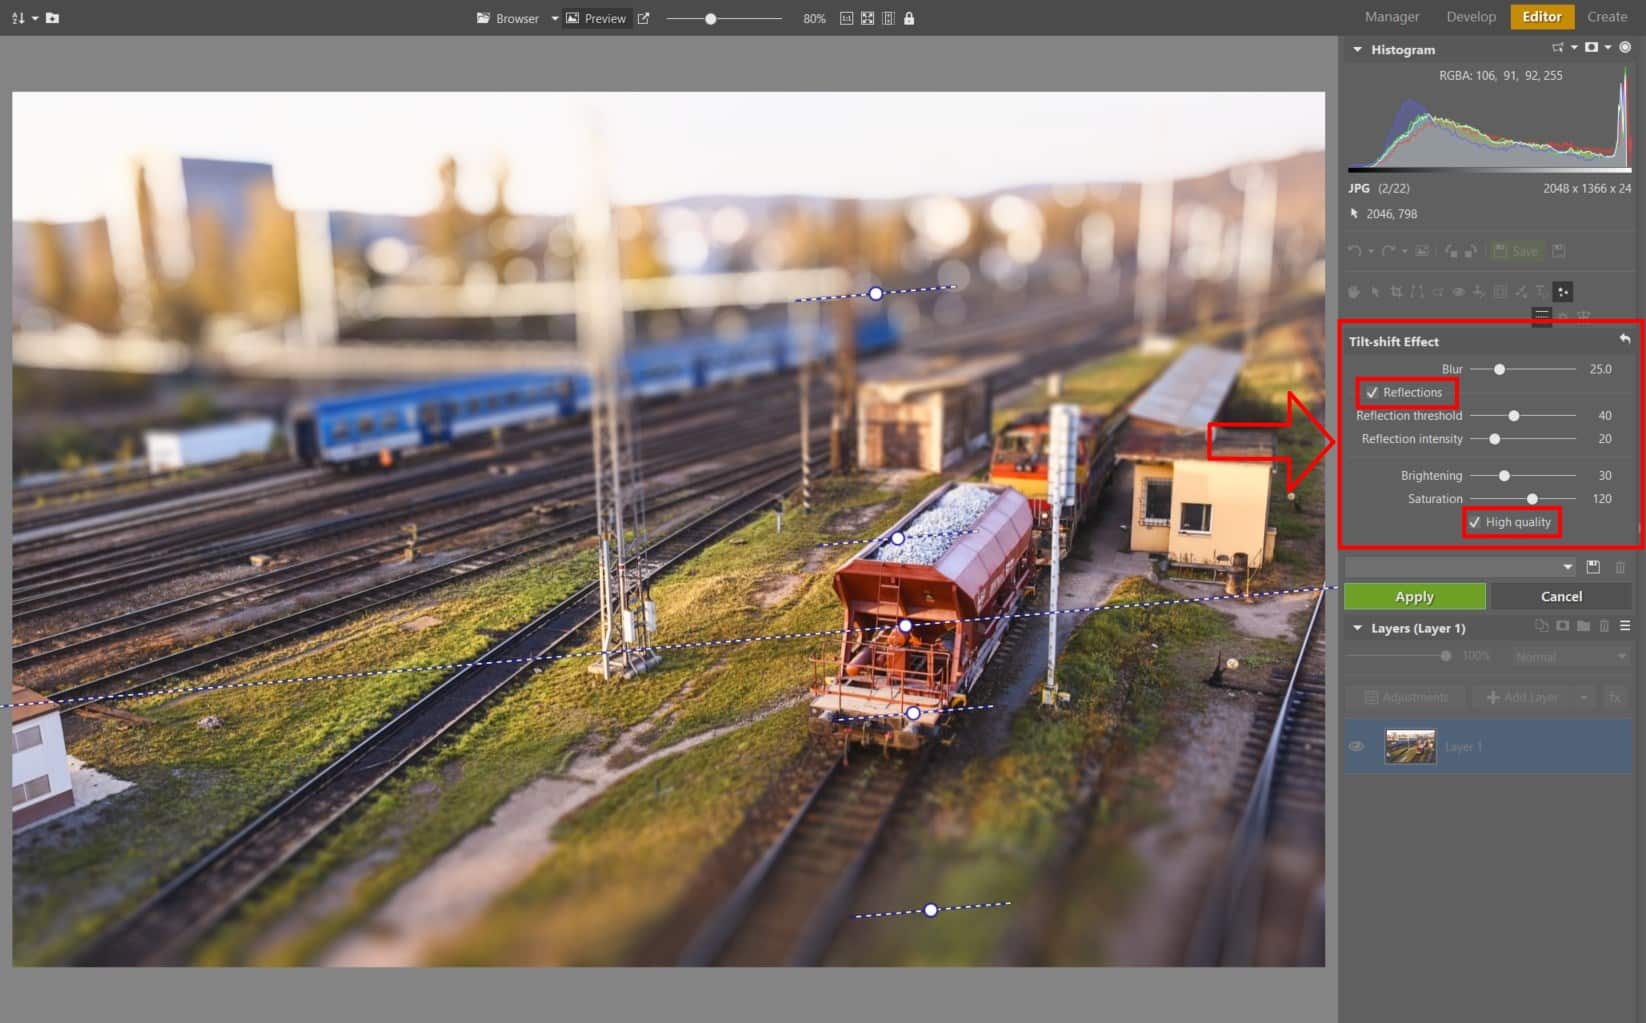
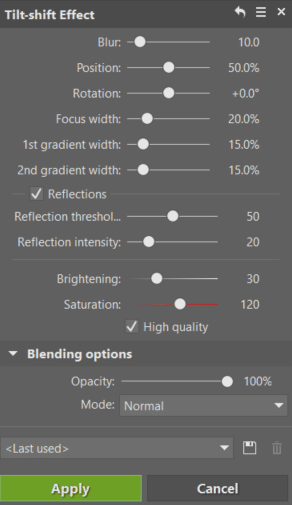
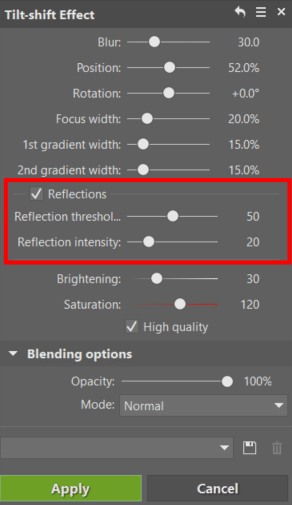
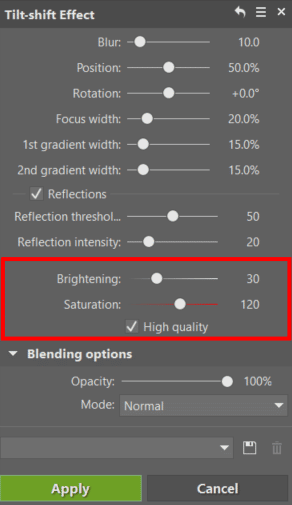
Once you’ve defined the sharp areas and the transition, you can set the effect’s properties. Settings are available here for Blurring, Reflection threshold, Reflection intensity, Brightening, and Saturation.
Blurring sets how much edge areas will be blurred (the “bokeh effect”). We recommend that you keep this value low, to keep the tilt-shift looking realistic. Turning on reflections gives more realistic bokeh.
Use the Reflection threshold and Reflection intensity sliders to regulate the amount of reflections and their strength. With our second sample photo, where the reflections stood out even more, you can see just what a large difference you can produce by using them.
The last two sliders are likely clear enough. Brightening brightens the photo, and Saturation regulates the saturation of its colors.
But what about the High quality checkbox? Turning this option on makes blurred areas look more realistic.
After setting up the effect, click Apply to use it. Now let’s compare the original and the final version of our sample photo.
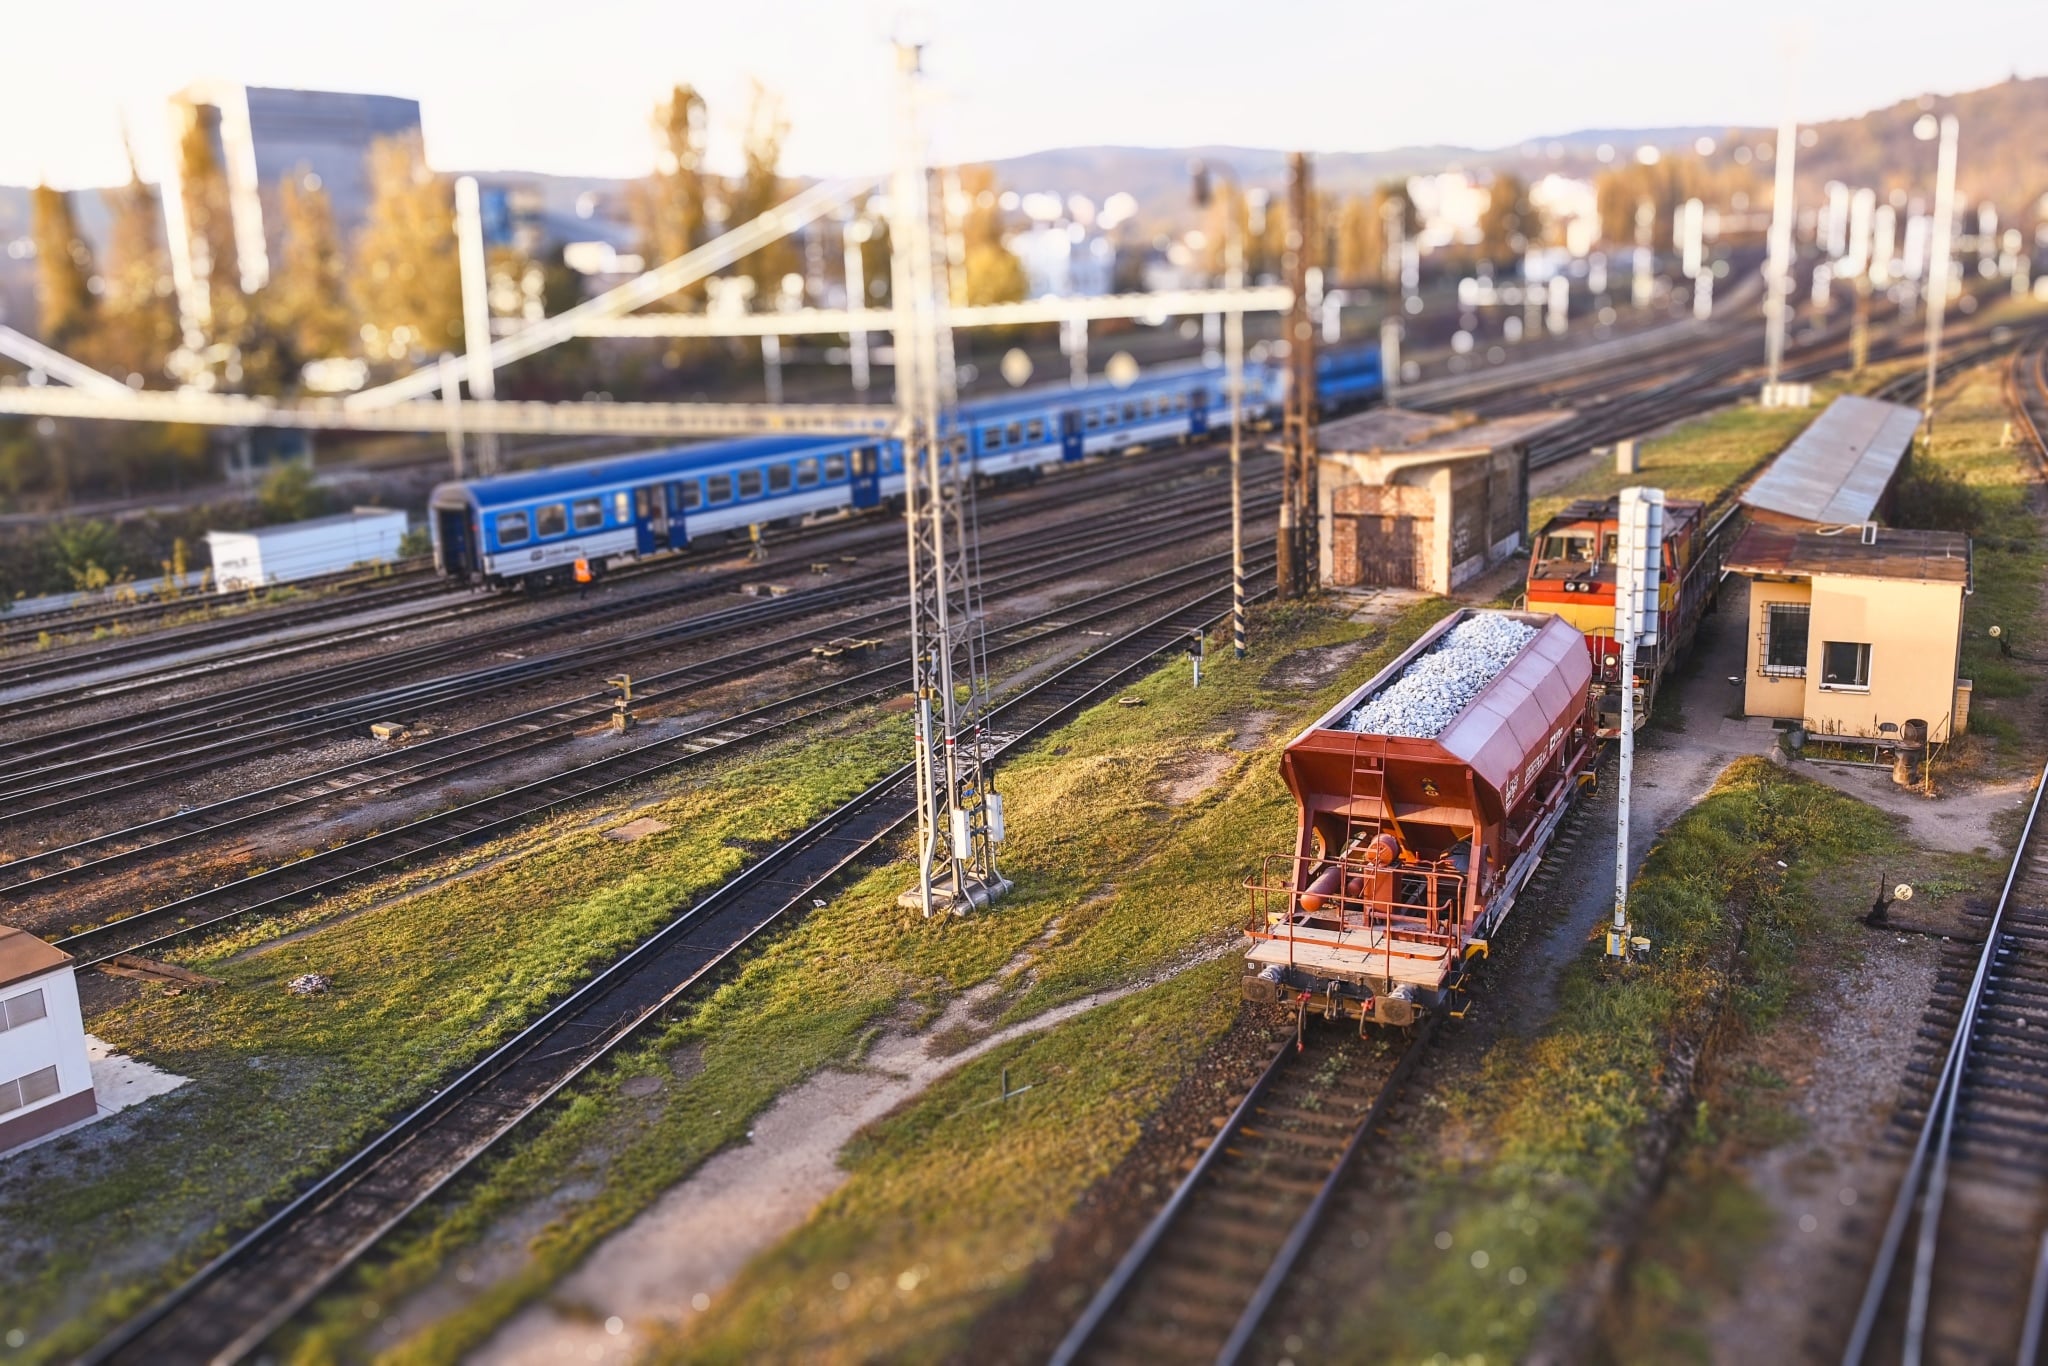
A comparison of our original sample photo and the same photo after Tilt-shift edits.
The Second Method
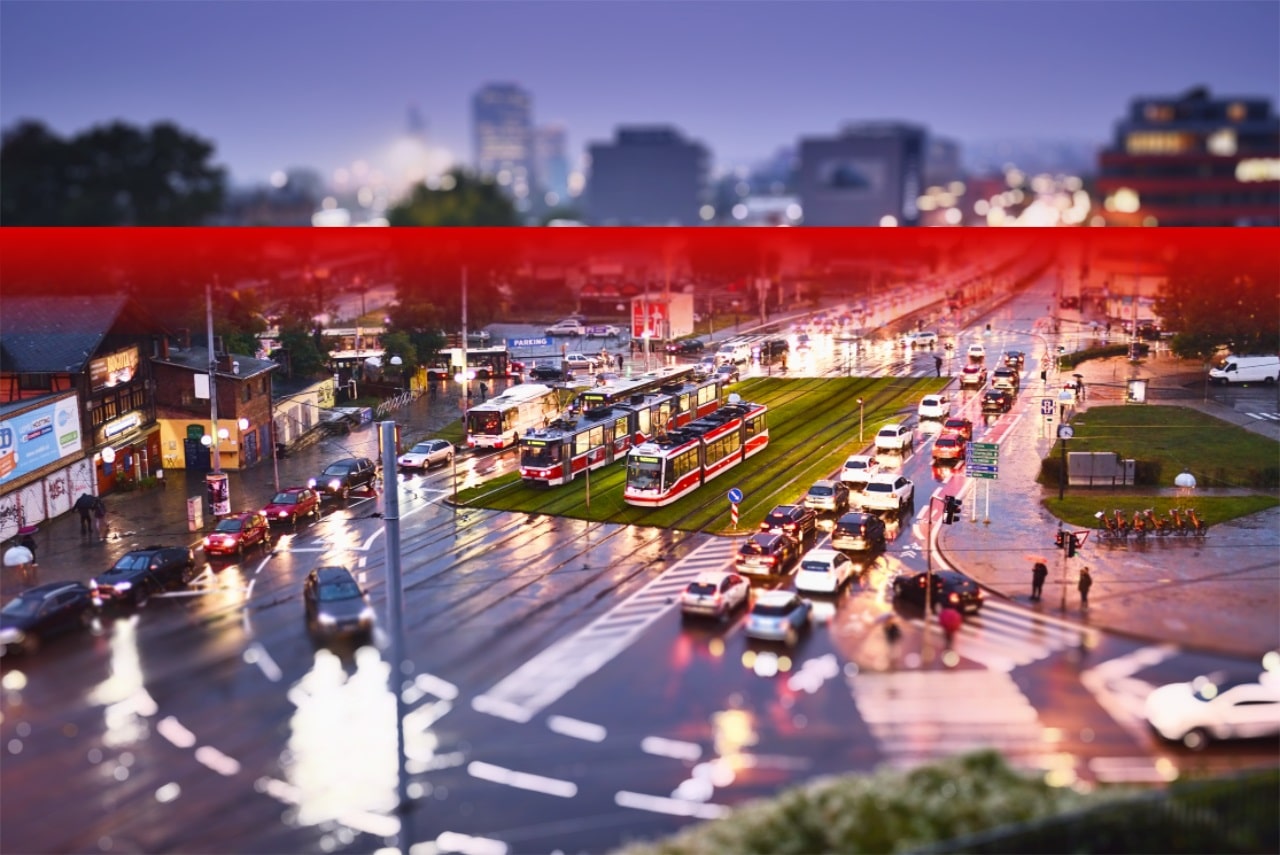
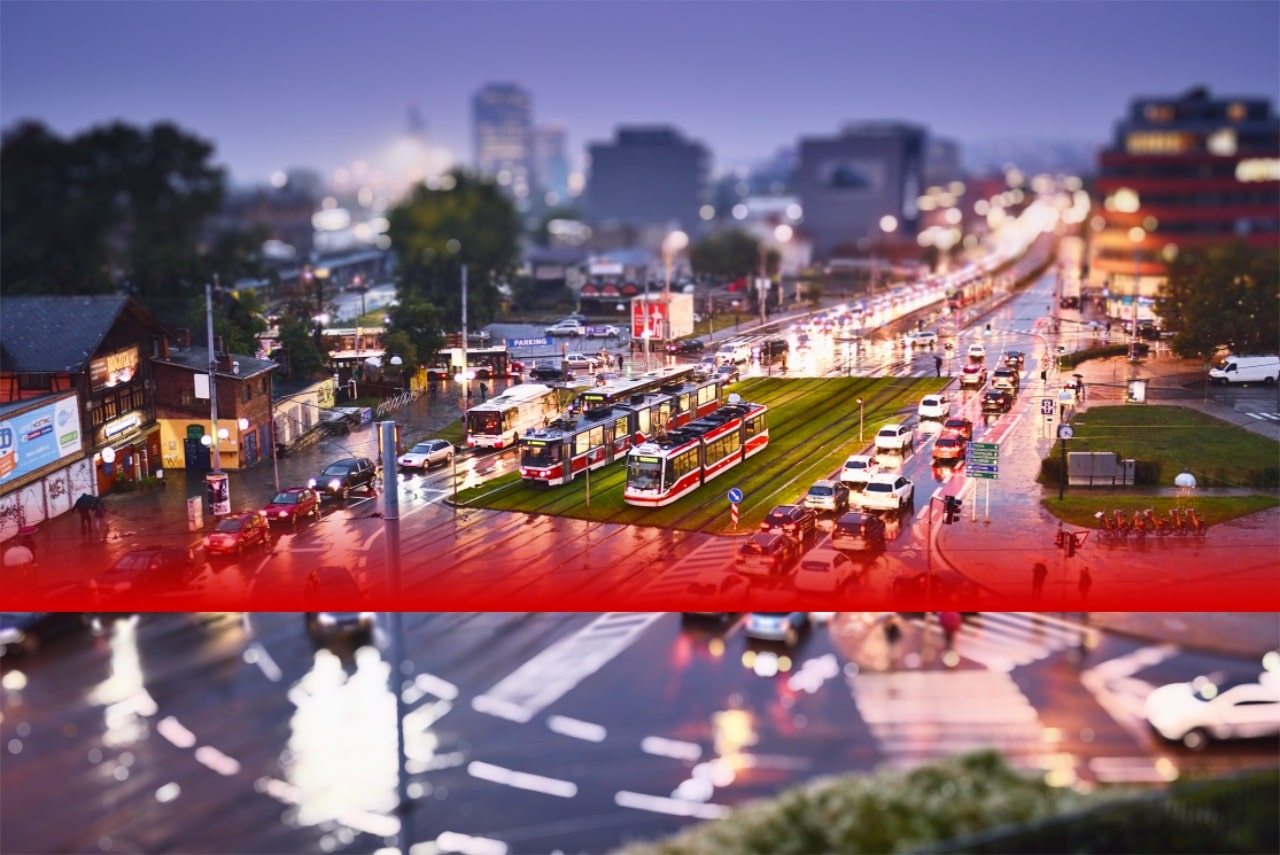
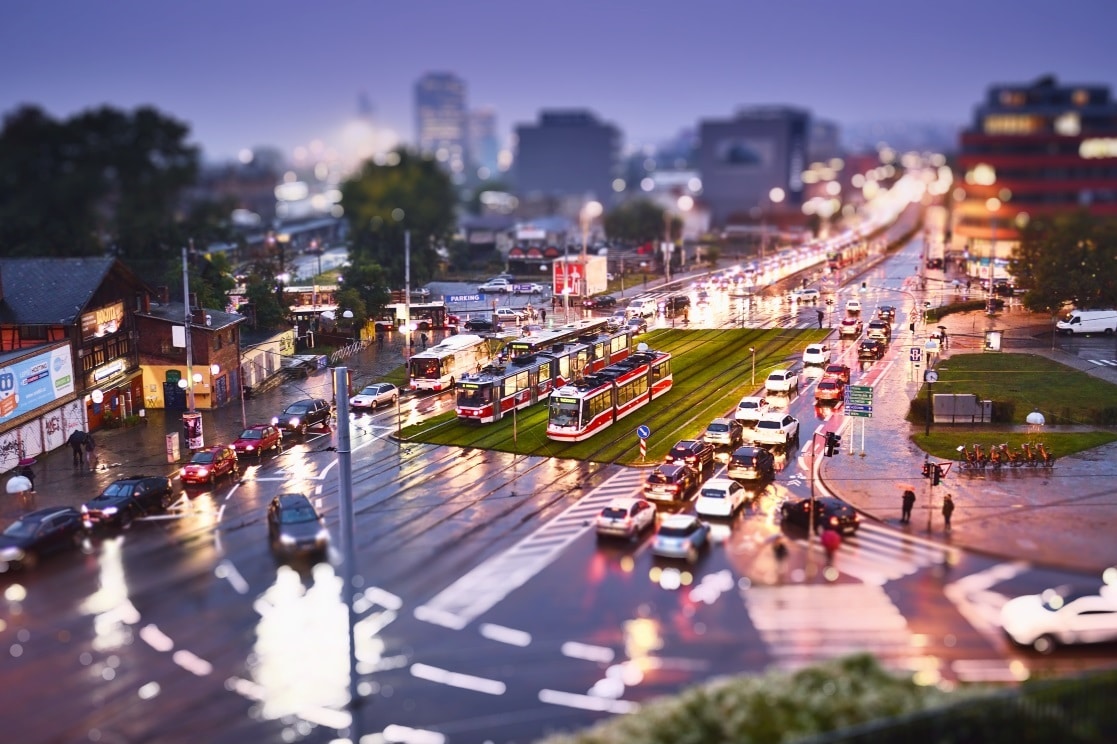
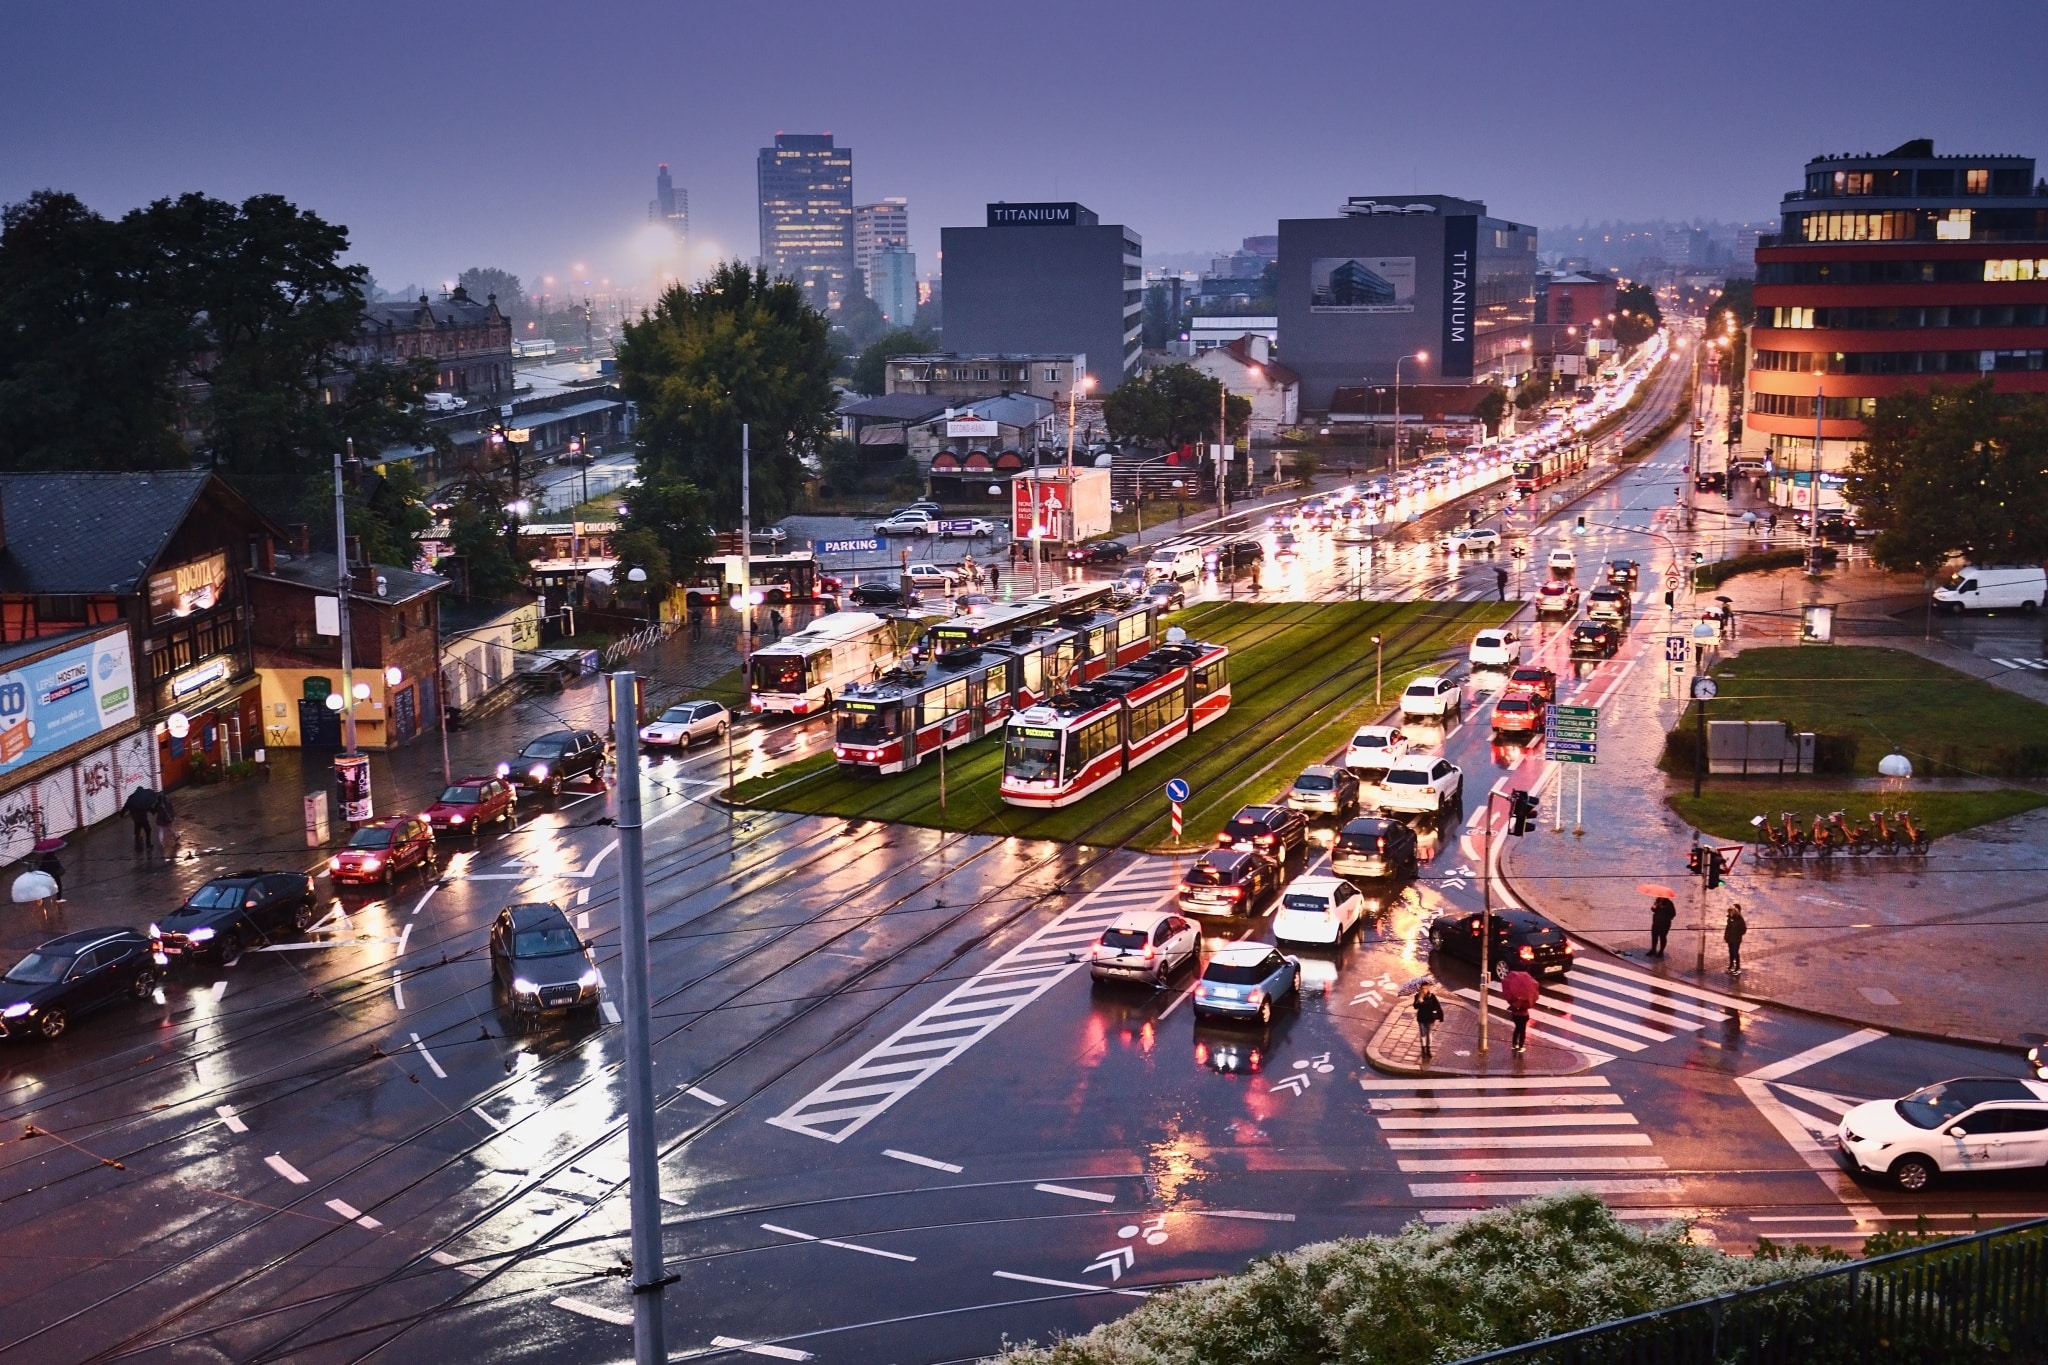
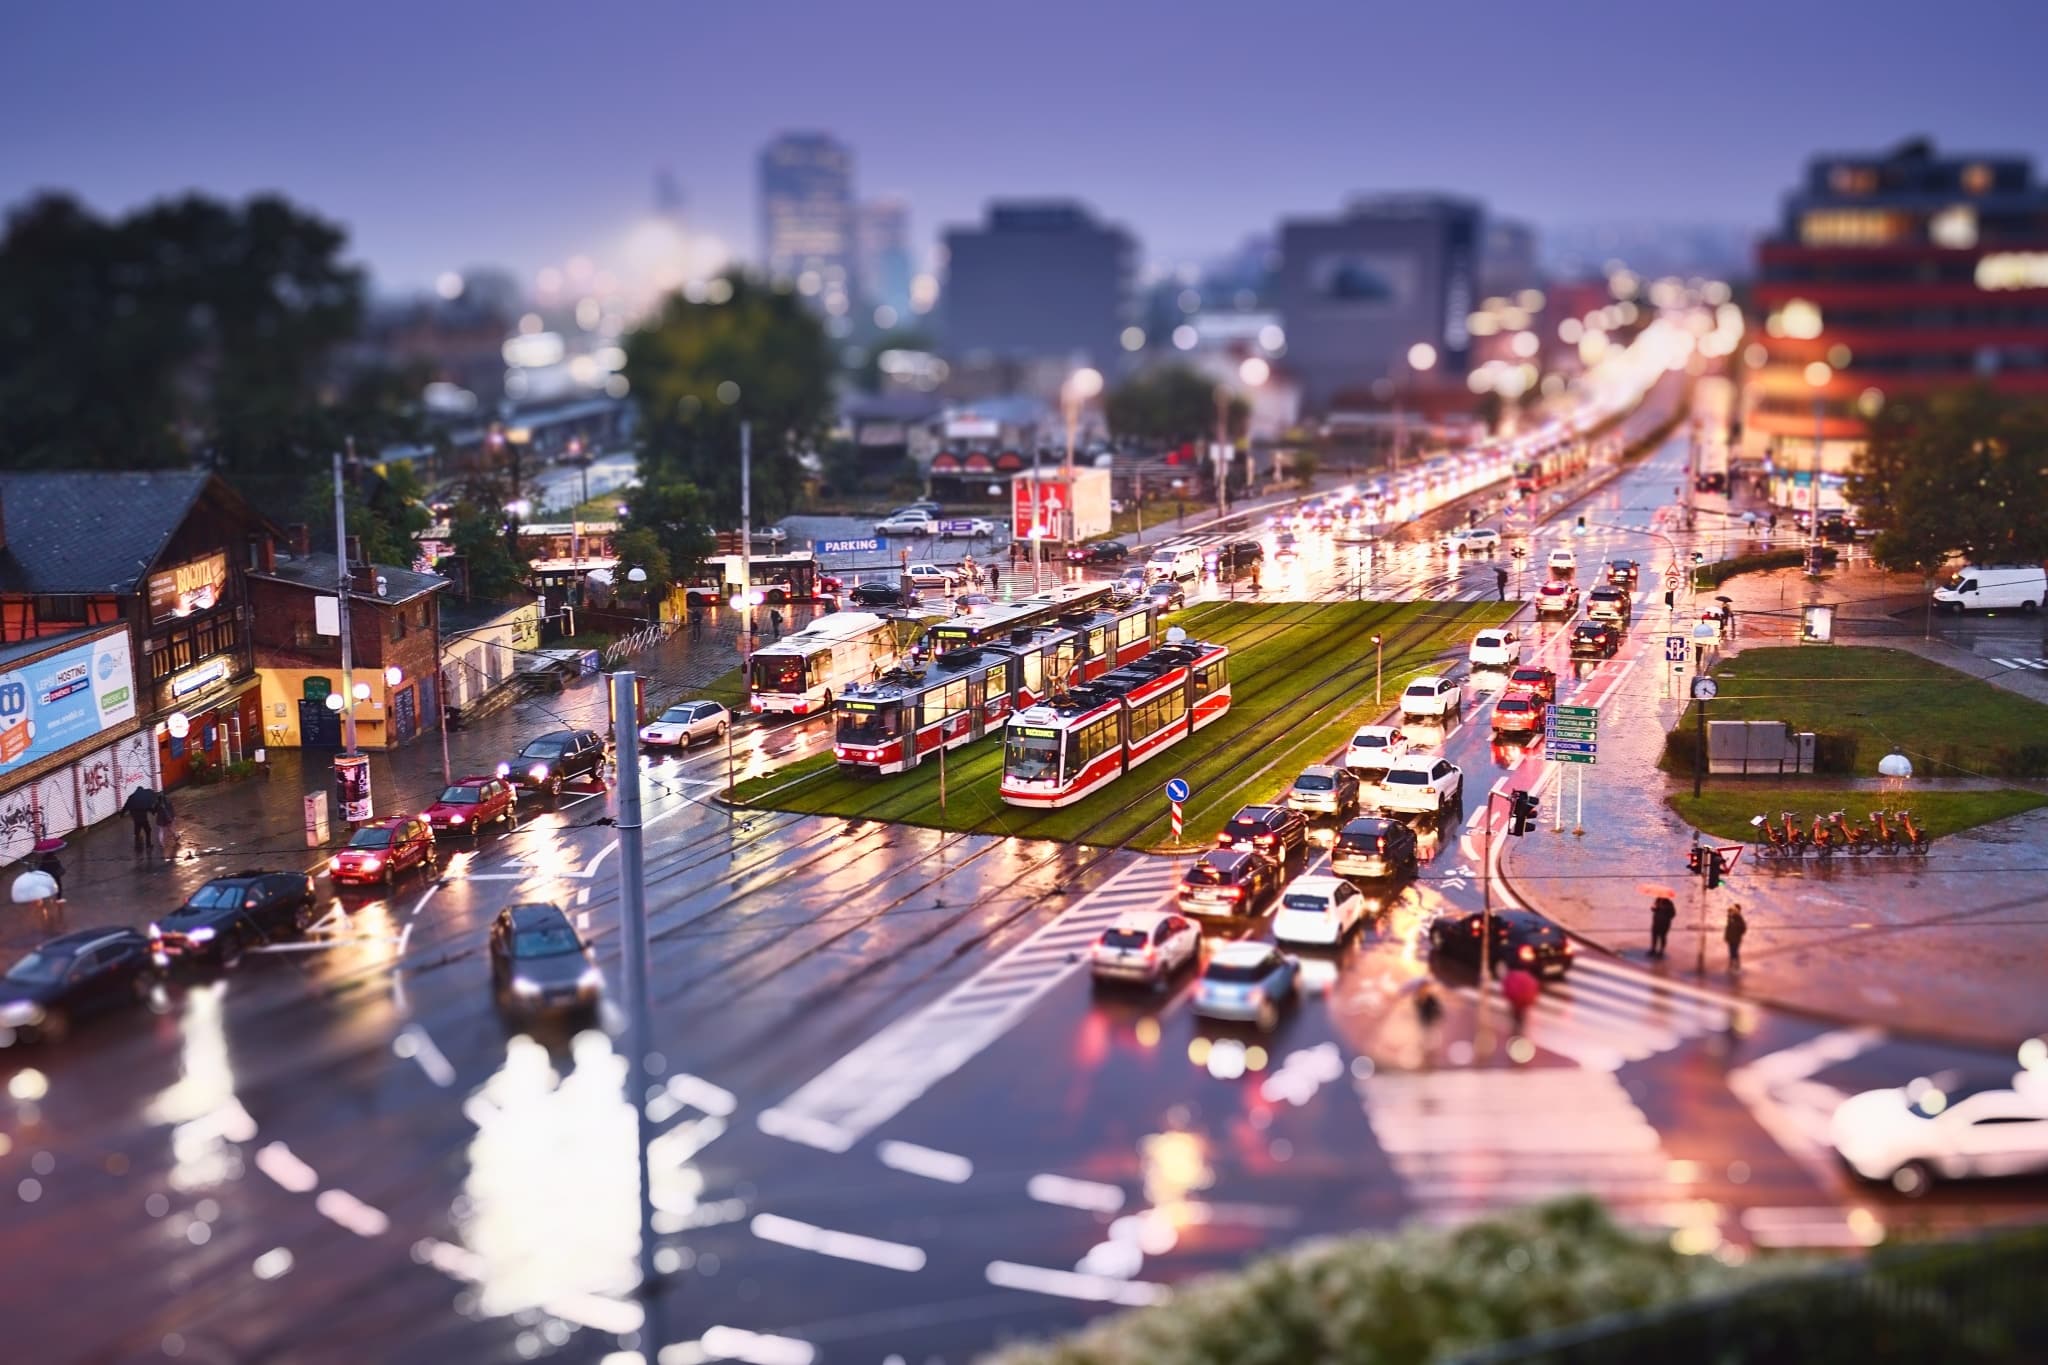
To illustrate work with the other option for Tilt-shift in ZPS, we’ll use a photo of evening traffic in the city:

To reach this version of the Tilt-shift function, go to the Editor, click Adjustments, and then click Tilt-shift in the Effects section of the adjustments. This method is useful in certain special cases, such as batch edits of a large number of photos.
Unlike in the first method, where you could set the area in focus and the transition areas using guidelines, here you have to set these areas using sliders. In the settings panel, you’ll find several settings that you can use to adapt the Tilt-shift effect to optimize its results.
When you first select this effect, it is immediately applied with default settings. For our explanation of the individual sliders, we’ll divide the photo into three parts:
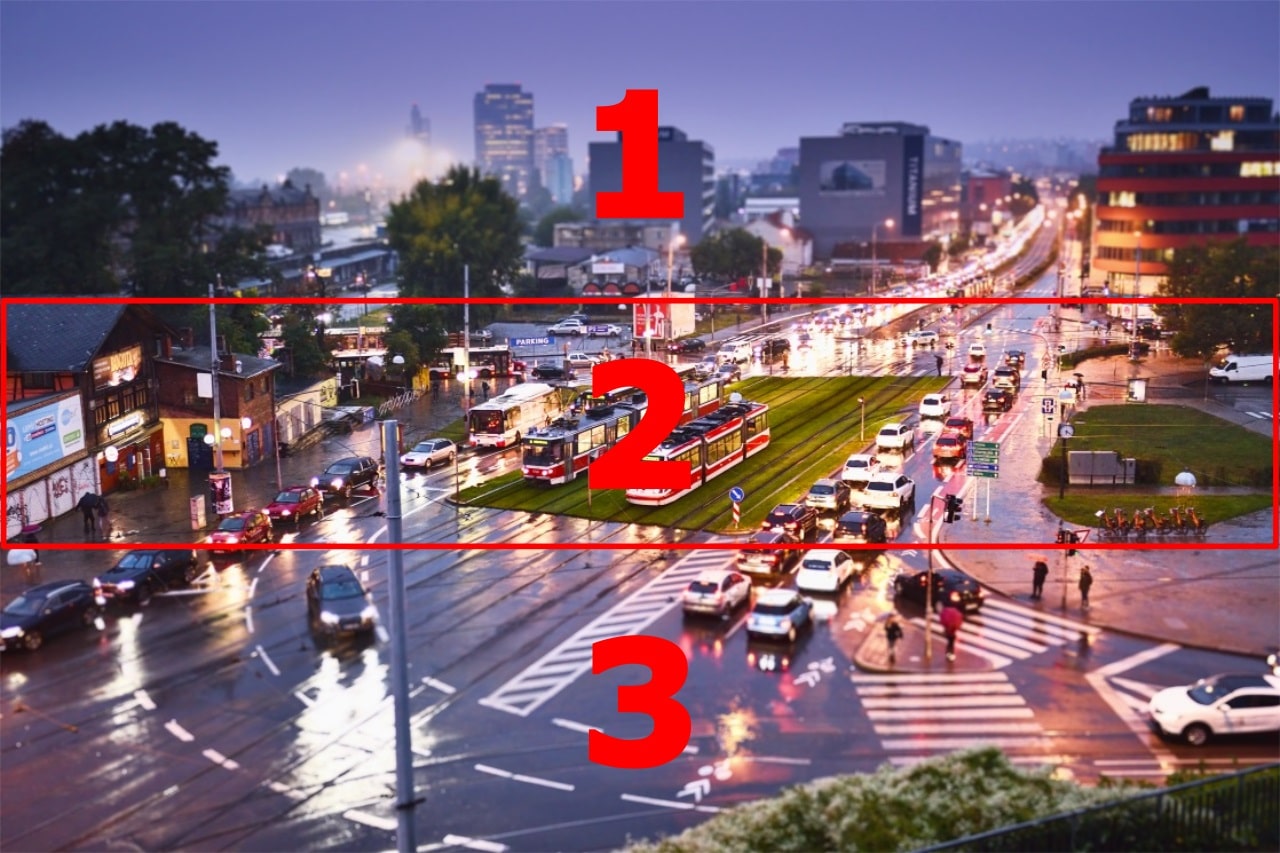
As you can see, areas 1 and 3 are blurred, and the center area 2 is sharp, similarly as in the first example.
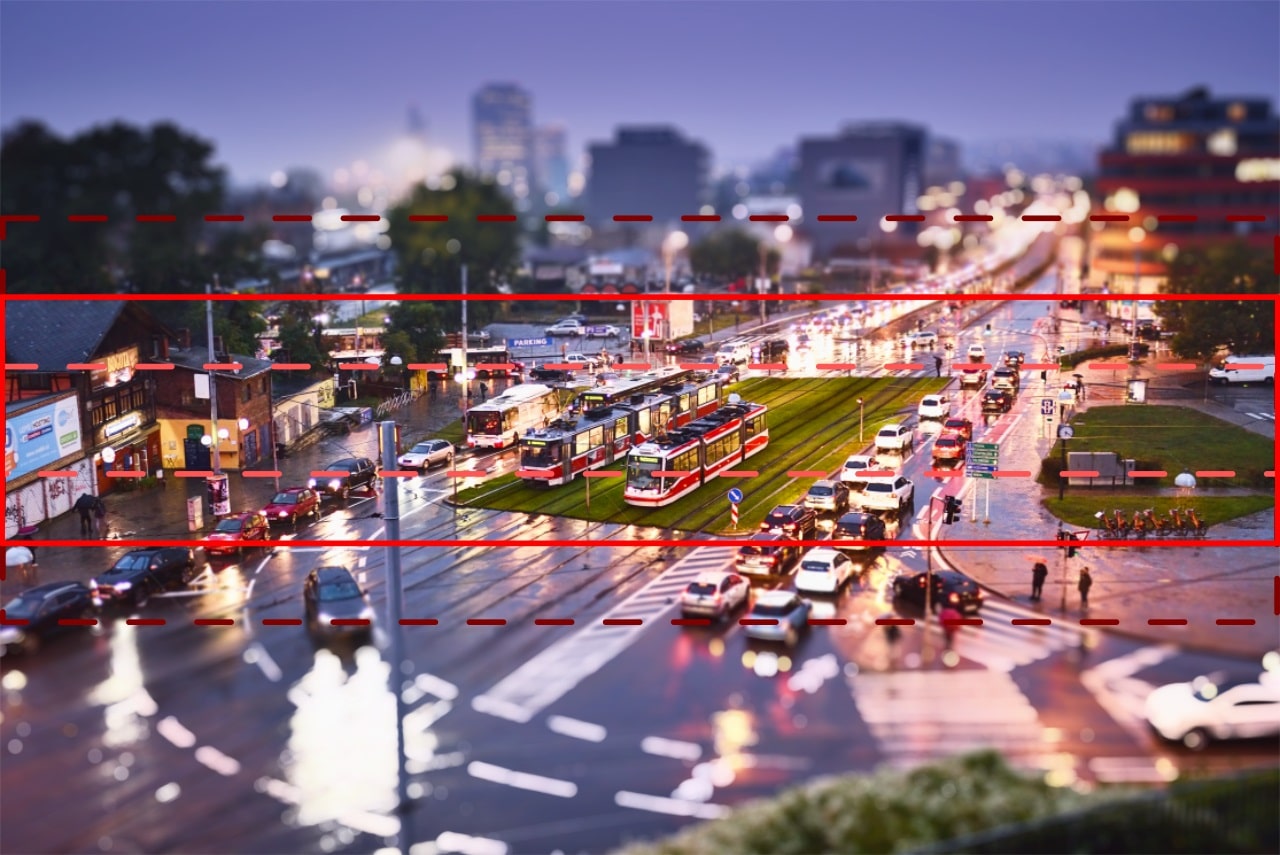
Blurring: sets how much areas 1 and 3 are blurred. For the sample photo, we’ve used a value of 30.

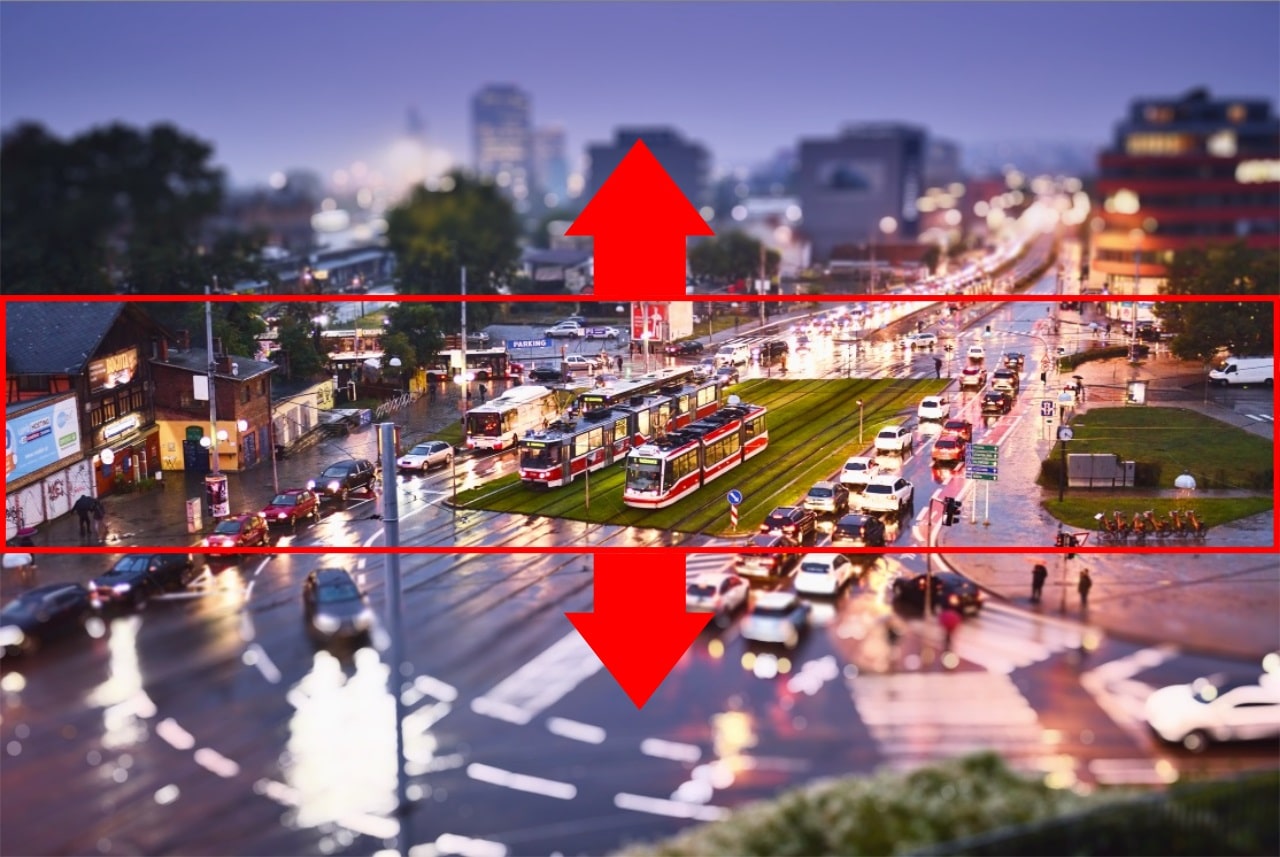
Position: sets the position of the part that is in focus. With a setting of 50%, the sharp area is right in the middle. Higher numbers shift the area in focus towards the bottom of the photo, while lower numbers shift it towards the top. Here we’ll set a value of 52% for a slight shift.
Rotation: sets the sharp area’s angle of rotation. Rotation is only useful when you don’t want the area in focus to be horizontal. We’ll leave the default, horizontal setting here.
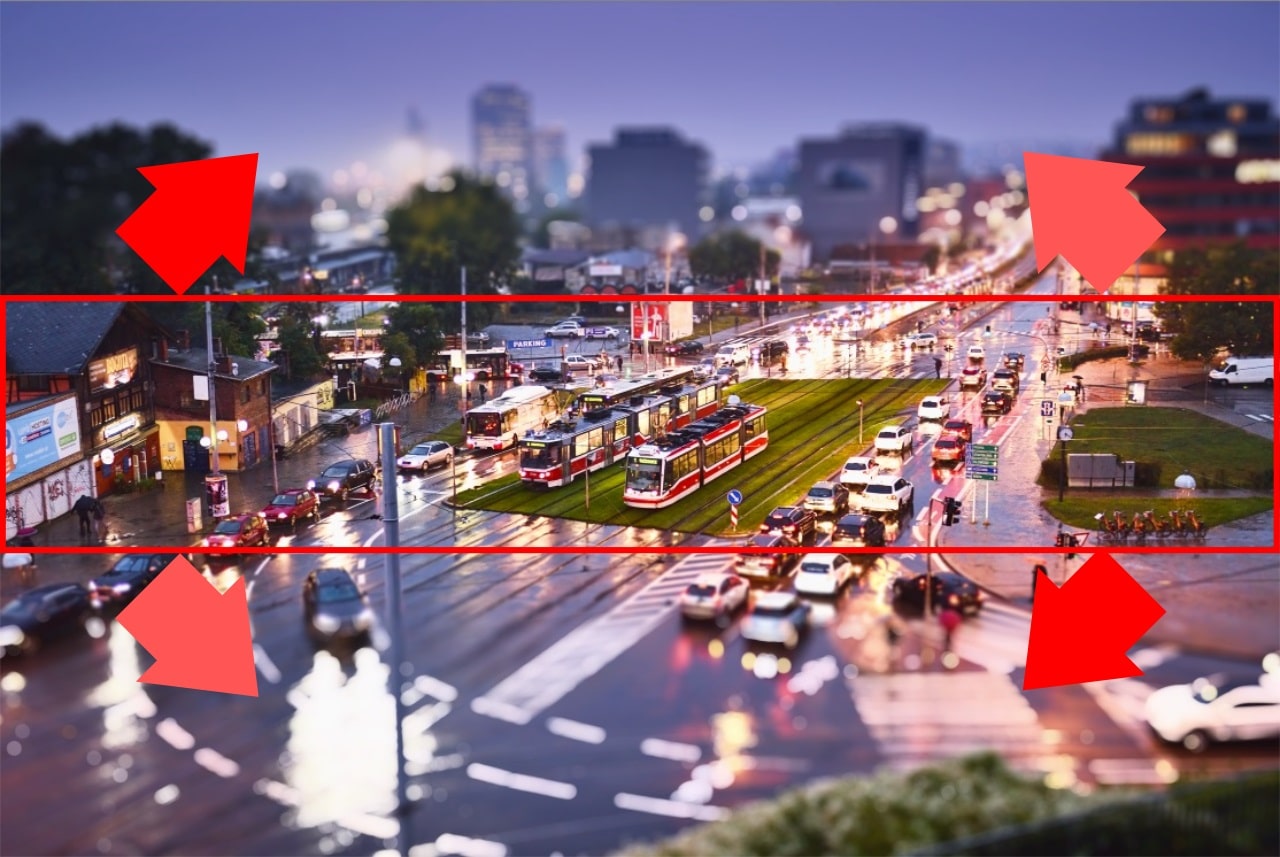
Focus width: sets the width of the area in focus—our “area 2.” We’ll leave the default setting here.
1st gradient width: sets the smoothness of the transition between areas 1 and 2. We’ll leave the default setting here.
2nd gradient width: sets the smoothness of the transition between areas 2 and 3. We’ll leave the default setting here as well.
Now we’ve configured the settings for the sharp areas and the blurred areas (the simulated bokeh), so let’s take a look at a few final edits. Just like in the first example, you can apply Reflections, and these can be adjusted using the Reflection threshold and Reflection intensity settings.
The following comparison shows the difference between how a picture looks with reflections on and off:
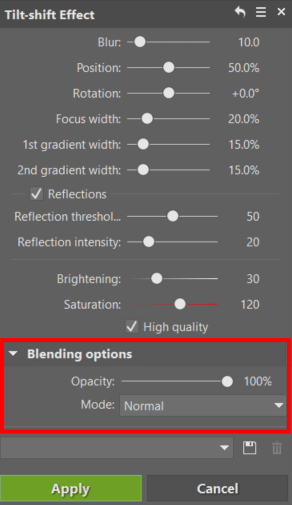
As you can see, adding reflections significantly changes how the blurred areas look. Try out a variety of settings here, but be careful with extreme values—you want the result to look realistic. You’ll also find the Brightening, Saturation, and High quality settings here that you already know from the first method. The very end of this group of controls contains one last subgroup, Blending options, which includes two items, Opacity and Mode. These control how the edited, “tilt-shifted” version of the picture is blended into the original. The Opacity is set in percent, and the Mode dropdown contains a number of ways to blend the edit into the original. In Normal mode, the edit simply completely covers and replaces the picture as it was before the edit. Let’s wrap up by comparing the original and the final photo: We’ve just looked at two ways you can apply a Tilt-shift effect in Zoner Photo Studio X. The first method is faster and more intuitive. But it doesn’t provide any control over how the edit is blended with the original picture. Which method you pick is up to you. The Tilt-shift effect is an interesting and creative function that you can use to make things look miniature with a minimum of effort. Want to receive a selection of the best tutorials and article right in your inbox every week? Sign up for our newsletter, and we’ll take care of it!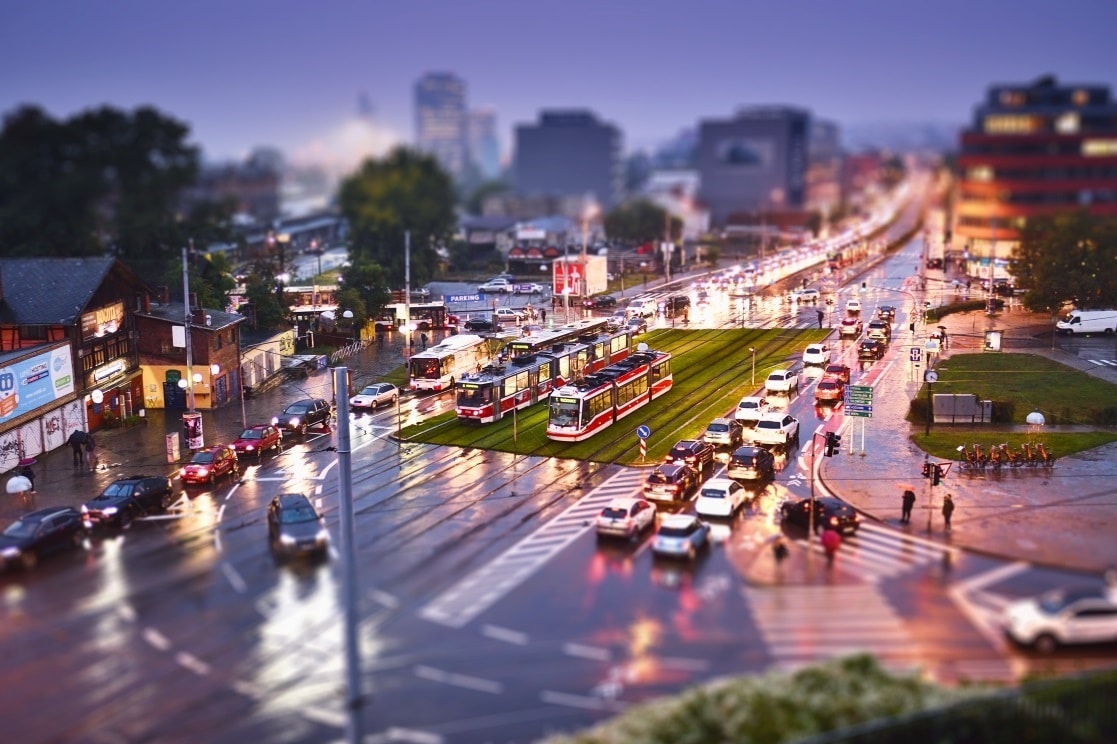
There are no comments yet.