Check Out These 10 Tips for Cleaning Your Lens and Sensor
Dust and grit can really make life hard for your camera. Fortunately there are several tools and techniques you can use to clean its lens and sensor yourself, to remove the grit without having to head in to a shop. We’ll show you what to do.
Keeping a camera completely clean is impossible. Even if you clean it flawlessly, it won’t stay as good as new for long. So camera cleaning makes the most sense when the dirt is making your photos—or your camera—less than beautiful.
For Lens Cleaning Sometimes a Rag Is Enough
Fingerprints and smudges on the front piece of the lens assembly are the most frequent problem. Normally these aren’t visible in your photos, but when you’re shooting against the sun, they can reduce contrast or produce ugly reflections.
But you can generally fix these problems without much effort. For example, you can clean a lightly soiled lens by wiping it with a small optical cloth.

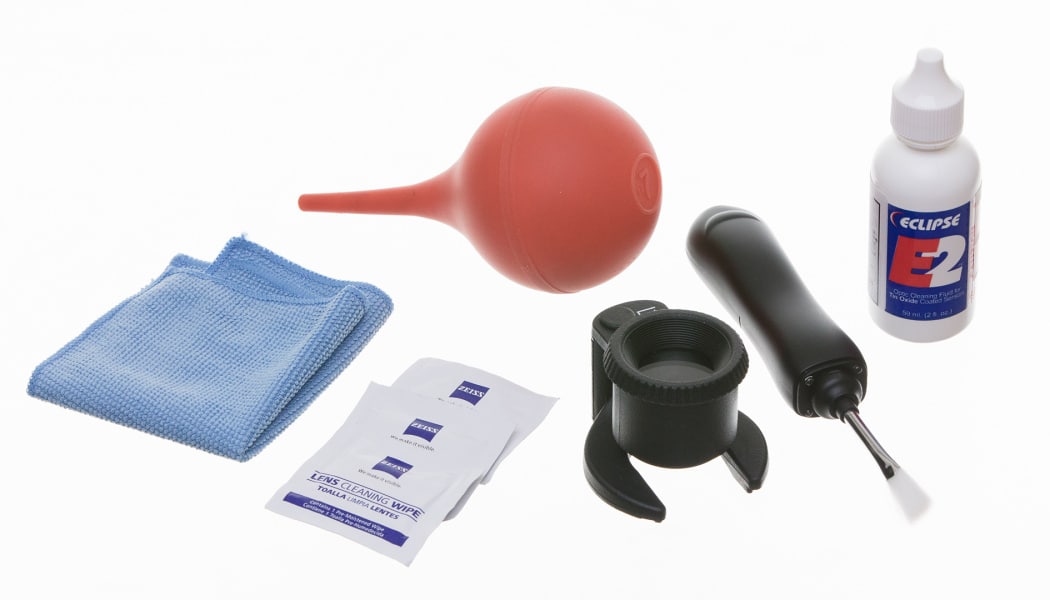
For tougher grime, I’ve also bought a supply of moistened optical wipes. They’re small and come in individual sealed packages. So it’s no problem to carry a few in my backpack just in case.

If you wear glasses, you’ll probably consider breathing on the lens and then wiping off the breath’s moisture. You’ll find debates on the web as to whether or not this approach damages the special coatings on your lenses. But it seems like it shouldn’t be a problem. I use this technique myself.
Watch out for Scratching When Cleaning Your Lens
On the other hand, don’t use any aggressive chemicals when you’re cleaning your lens. These actually can disrupt its coating. And when you’re cleaning with a cloth, remember that you’re cleaning not the hard glass itself, but the layer on top of it. So avoid pressing too firmly.
If a hard material gets under your cloth, you can end up carving a scratch in the anti-reflection layer. This mainly applies for metal shavings and similar particles. Ordinary dust won’t do this.
You can rid camera filters of dust similarly.
Sometimes you’ll also need to clean the lens assembly’s rear lens, which lies deeper. For that job, don’t breathe on the lens, and stick to just using a cloth.
And definitely don’t use an air blower on this lens. The lens assembly isn’t protected in the rear at all, and so dust can be blown into places from which you’ll never get it out.
How to Clean the Rubber Lens Rings
The lenses aren’t the only part of the lens assembly that gets dirty. Over time, grime builds up on the camera body too. While it won’t hurt your photos, the rubber zoom and focus rings, above all, lose their visual elegance after heavy use.
However, you can easily pull them off using a credit card. (A debit card will work too, of course.) Then wash them in soapy water and put them back on once they’ve dried.

Be Careful With Dirty Sensors
If small dark circles appear on your pictures of blue skies, then particles on the sensor are probably at fault.
You’ll especially notice these defects when you’re shooting at high f-stops. If you always shoot at f/1.4, you probably won’t even notice a problem. But for example in a landscape photo taken at f/11 or higher, the dust will be very visible.
So—how do you check how dirty your sensor is? Set a high f-stop and photograph something that’s just one color. For example a white wall or a cloudless sky. Use a rather dark exposure for this, and a telephoto lens if you can. These both help to highlight the dark dust circles.
Ideally, set a long exposure and move your camera around. That blurs the whole shot, and so only the spots will remain sharp.

Canon 5D Mark III, Canon EF 24-70/2.8, 3.2 s, f/22, ISO 100, focal length 70 mm
A dirty sensor is a bigger problem than a smudge on the lens, and you can’t just use a cloth. Fortunately there are several solutions. Here’s an introduction to them, from the simplest to the most complicated.
Try Automatic Sensor Cleaning
Many cameras have an automatic sensor cleaning function. Generally this function works by vibrating the sensor to shake off dust. So hold the camera sensor side down when using it. That will help it do its job better.
Automatic sensor cleaning will often start up automatically when you you turn the camera on or off, and it’s also available at any time in the menu. So it’s by far the simplest approach. Always try it first.
Manual Sensor Cleaning: What to Know Before You Start
When automatic cleaning isn’t enough, manual cleaning comes next in line. It likewise starts from the camera menu. Why? Because access to a camera’s sensor is normally blocked by the mirror or the shutter blades (depending on the camera type). So when cleaning your camera, you’ll need to find the menu item to activate to lift these elements out of the way.
Some cameras block access to this function unless the battery is at least half-charged. They do this in “self-defense,” because if the power runs out, everything quickly flips back into its original state, and so damage could occur during cleaning. To tell your camera that you’re done with cleaning, just turn it off.

So that you’ll be able to tell if your cleaning succeeded, photograph a blank wall before you start. Then take the same picture after you’re done. That makes it easy to tell if you’ve solved the problem.
If you want to be really precise, then buy and use one of the special magnifying glasses that are sold for camera cleaning. These shine LED lights that give you a better view of the sensor space. However, they’re not an essential part of your kit.

Naturally, you need to clean your camera in the least dusty place possible. Some people recommend the bathroom for this.
Use a Blower for Cleaning
You can blow off ordinary dust. But if you blow it with your mouth, you’ll spit in worse things than what you wanted to get rid of. That’s why they make balloon-based blowers that only send in fresh air. You can either buy a designer photo blower or a cheap, ordinary medical blower.
Since a simple balloon sucks in the surrounding air including its dust, which it then passes on, filtered-intake versions also exist. These filter the air they take in. I don’t have any experience with them, but some people recommend nothing less.

Attract Dust With an Electrically Charged Brush
There’s another interesting invention that will help with sensor cleaning: a brush with a small built-in motor. It can rotate its hairs, charging them with static electricity while also shaking the dust from them.

Then when you turn the brush off and touch it to the sensor, its charged hairs attract dust. Then you just draw it out and shake the dust off outside of the camera. Note that this means that the system doesn’t work like an ordinary brush, and so you shouldn’t make any strong strokes along the sensor. That would be more likely to spread the dust around than wipe it off.
A Sophisticated Stick Can Make Sensor Cleaning Easier
Gel-stick cleaning also gets mentioned in a good light. Slap one of these sticks on the sensor, and dust sticks to it and becomes easy to remove. These sticks come with small pieces of paper onto which you stamp the collected dust so that you can then continue on with a clean stick. However, I haven’t tried gel sticks myself.

Wet-cleaning Your Sensor: A Brief Guide
That just leaves the most thorough method—wet cleaning. There are special sets to help you with this, containing:
- a flat stick,
- special wipes, and
- a cleaning solution.
Cut a small strip off of a wipe and fasten it to the stick. Drip 1-2 drops of the solution onto the stick, and then wipe the sensor to remove dust and grease. Keep in mind that with one strip, you can make just one movement there and back. You’ll then need to replace the strip with a new one. And don’t forget to drip the solution onto it again before your next go.

From my experience, I have to say that this camera cleaning method brings very good results. But you have to wipe with the stick about five times. Also, my very first wipe ever brought more dust onto the sensor than it removed. So, my initial efforts were a little nerve-wracking.
Do I Always Have to Run to the Shop?
For certain new DSLRs (e.g. from Nikon), several vouchers for cleaning at a repair shop are included in the price. At the shop, they don’t use magic, but rather approaches very similar to the ones I’ve described above. The difference is that someone else takes responsibility for your camera.
Unfortunately if you live far from the nearest shop, or the shop doesn’t offer while-you-wait service, you have to accept that you’ll be without your camera for a while. So it’s good to try at least basic cleaning at home.
Prevention Is the Best Cure
Ideally you want to simply keep dirt from getting into your camera at all. And meanwhile, that doesn’t have to mean storing your camera in an airtight safe. Just covering your lens when you’re not using it at the moment helps a lot.
As for dirt on the sensor, waiting for the wind to blow before you replace the lens and holding the camera face down during that job are good preventative measures.
But when prevention and cleaning both fail, and some kind of speck does show up in one of your pictures, you can usually cure this easily in Zoner Studio.
There are no comments yet.