Color management in Zoner Studio A few more features
In part one of our miniseries on color management in Zoner Studio, we described the customizations you can make in the Color Management tab of the Preferences.
These settings normally determine what color space is used for a picture that you’ve opened in Develop or the Editor. However, you can also set the working color space in either of these modules later on, after you have opened a given picture.
Changing the working color space after opening a picture
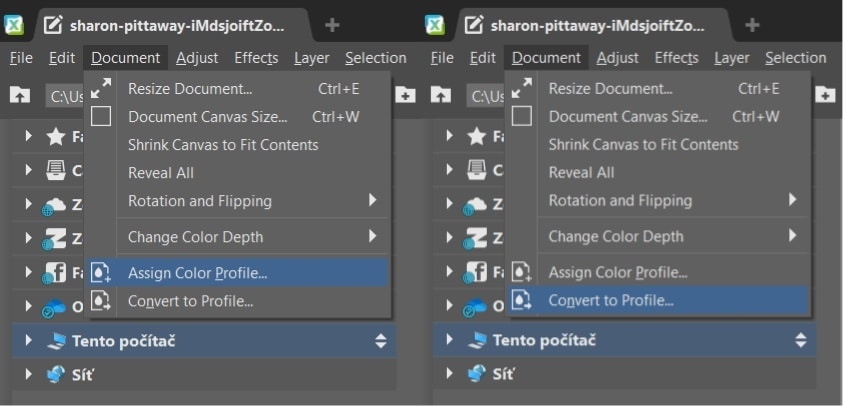
To do this in the Editor, use: Document / Assign Color Profile or Document / Convert to Profile. The first of these two options leaves the picture’s data unchanged; all it does is assign the color space of the given profile to it and thus change the interpretation of its image data (e.g. if you assign an Adobe RGB profile to image data in the sRGB format, the picture is displayed with lower saturation). With the second option, the data is physically converted to the chosen profile’s color space.
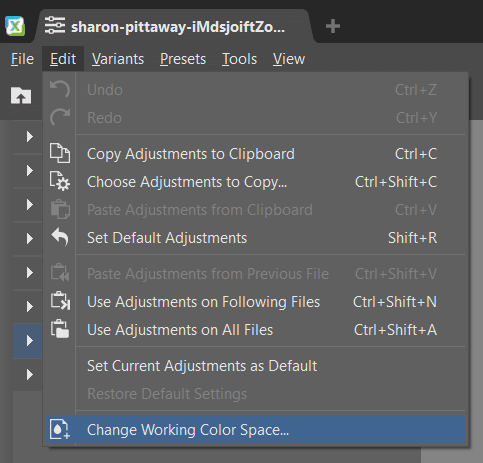
You can change a picture’s color space after opening it in Develop as well; to do so, use Edit / Change Working Color Space. As mentioned earlier, the working color space functions slightly differently in Develop: it sets the color space into which the picture is converted near the end of processing. However, some operations are performed in the working color space, so changing it can produce a slightly different image.
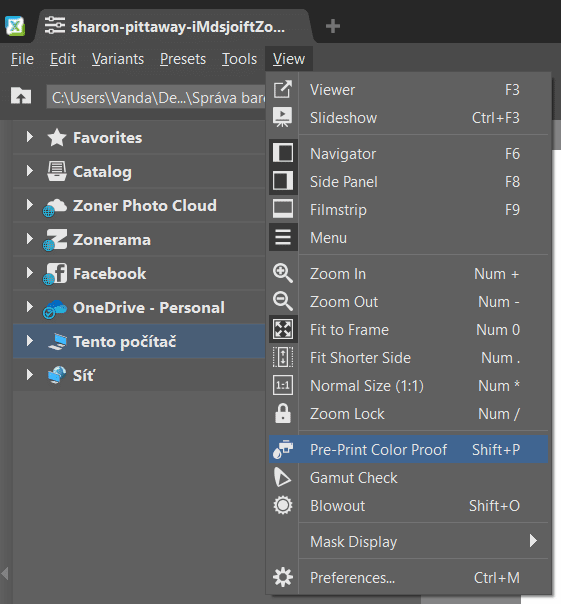
Pre-Print Color Preview
Because the monitor gamut is generally significantly different from the printer gamut, some colors cannot be printed on a printer. Both the Editor and Develop offer the View / Pre-Print Color Proof option, which simulates a specific printer’s output on your monitor, letting you visually evaluate how colors will be shifted during printing. For Pre-Print Color Proof to work correctly, you must set the profile for the printer whose output will be simulated.
Gamut check
This works similarly to Pre-Print Color Proof, but here any colors that cannot be printed on the given printer are shown in gray.
Some color management recommendations
Color management is a powerful tool, but in the hands of an uninformed user it can do more harm than good. So in closing here are some recommendations on what color space for your photo processing.
Most modern cameras let you choose between the sRGB color space, which has become a de facto standard, and Adobe RGB, which is a color profile from Adobe. It has a wider gamut, especially among the green and turquoise tones. That sounds tempting, of course, and quite a large few photographers use this color space because of this. However, this brings several complications that they may not know about.
First of all, an application that supports color management must be used when browsing or editing these photos. Otherwise the photo will be displayed as less saturated in the Adobe RGB color space. This brings a second, related problem: publishing these kinds of photos. Here as well we have to be sure that color management will be applied correctly.
This especially applies for web browsers. Although most of them now support color management, when testing this in practice we found fairly major differences, and in some cases color management worked entirely incorrectly (for example when using a second monitor).
To do any serious work with photos in Adobe RGB, you need to also have hardware that supports it. This primarily means a monitor – most monitors only cover the sRGB space (laptop displays often do not even cover this much), and only the high-quality and expensive models can display a larger color space. As for 100% coverage of the Adobe RGB space, this is almost exclusively the domain of pro monitors at pro prices.


LEARN: Stick with the sRGB color space
In light of the above, our recommendation is probably unsurprising – if you want to avoid the described problems, simply stick to the sRGB color space. Even an average monitor can display this space, it will be shown correctly in all applications and on web pages, and you can send it to someone else without concerns. And meanwhile the sRGB space’s gamut is entirely sufficient – for hobbyist use at minimum.
If you have a good understanding of color management and you have the needed hardware and software, then of course it’s no problem if you decide to use the Adobe RGB space (or another space with a wider gamut). But if you want to pass your photos on to someone else, and you’re not 100% sure their setup fully supports color management, or if you’ll be publishing your photos on websites, we recommend converting to sRGB even if you yourself are “Adobe RGB ready.”
We’ll also point out that the mentioned option to choose a color space in the camera applies for the JPEG format only. For the RAW format, the final color space is not set until export. So if you’re shooting to RAW and you want to work in e.g. Adobe RGB, choose this color space as the working color space for the Develop module.
There are no comments yet.