Great Dynamic Range: The Best Way to Save Your Sky
Dynamic range is a term often used when describing scenes, reviewing cameras, and exorcising a variety of photographic demons. But there’s nothing supernatural about it. By understanding how it works and learning to work with it as you shoot, you can prevent overexposed and underexposed scenes.
What Is a Scene’s Range?
The “dynamic range” of a photographed scene is the ratio between the brightest and the darkest place in that scene. Sometimes this is also called the tonal range. Careful; it’s not the overall brightness of a scene that matters—just the range of lights and shadows that we want to capture.
So for example the following two scenes each have, in their own right, a very small dynamic range:
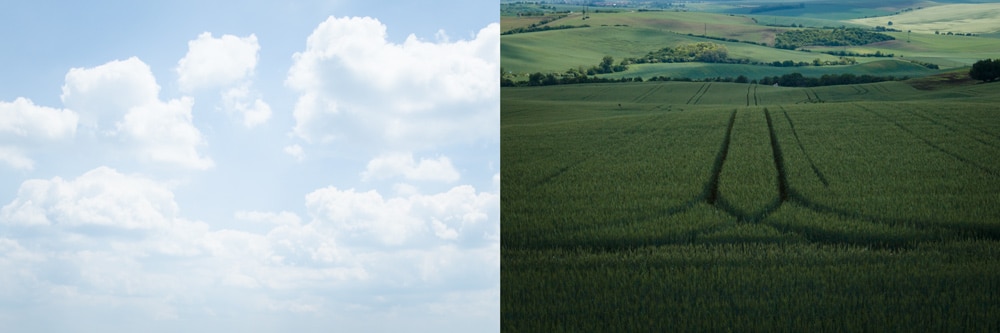
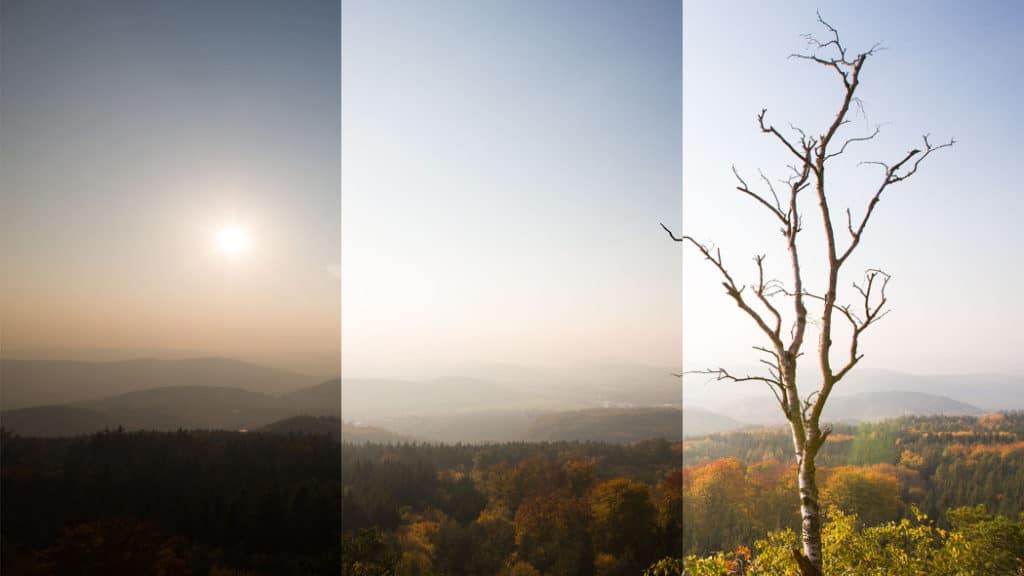
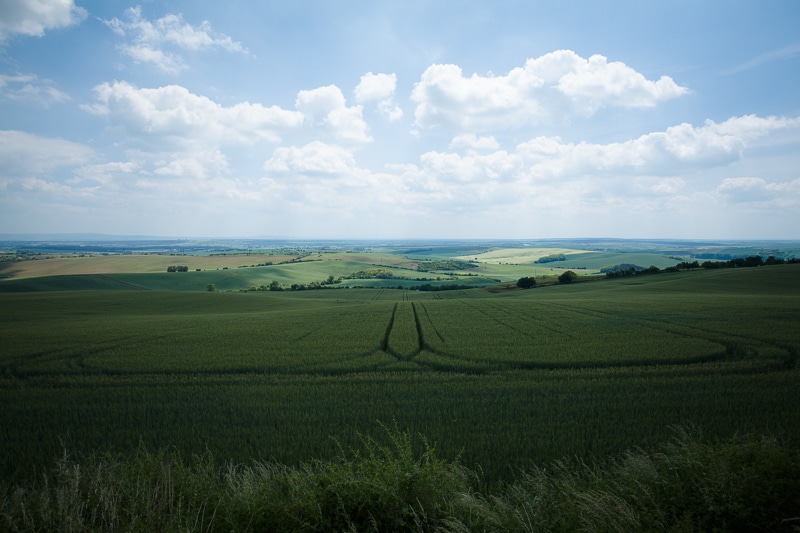
However, if you’re trying to photograph both of them at one, the picture’s overall dynamic range becomes significantly higher:
If you want to be precise and measure a specific range, then the unit to use for that is EV: the Exposure Value. A 1-EV shift means doubling the light, so for example a dynamic range of 10 EV would mean a ratio of 1 : 210, i.e. 1 : 1024 between the lightest and darkest place.
Camera Range
For a camera, the definition of dynamic range is a little different. Naturally in this case we’re not interested in how dark or bright the camera body is—we’re measuring the ratio between the brightest and darkest pixel it can represent in a single photo.
Technically the darkest pixel that it can represent in a photo will of course always be 100% black. But due to noise, you can’t precisely tell the original true color of an object. Because of this, the darkest representable pixel for a sensor is slightly above its noise line.
This means that a camera’s dynamic range may vary with the settings you use, and especially with the ISO sensitivity you use. The higher the ISO, the stronger the noise, which means that you’ll see more and more dark pixels melting together (in the sense that you won’t be able to tell the difference between actually-different brightnesses and the effects of noise), reducing your usable dynamic range.
Modern technology is driving noise levels down, and so effective dynamic range is getting better. You’ll also find in general that larger sensors can achieve better dynamic range than smaller sensors (assuming the same level of advancement—so don’t expect this to apply when the larger of two sensors is also ten years older).
The best DSLRs today have a dynamic range of around 14 EV.
For you as a photographer, your key task is to achieve a dynamic range for the scene that lies tautly stretched out across the camera’s dynamic range. But if that isn’t possible, then you just have to deal with it. In the next few paragraphs we’ll look at how to do that.
Watch the Histogram
The histogram is a graph that shows the brightness distribution in a photograph. Some cameras let you view it on the LCD before you take a picture, while others only let you after you press the trigger.
The histogram shows the darkest pixels on the left and the brightest on the right. Each individual sliver of it shows the number of pixels with a particular brightness. You don’t get information on the specific number of pixels at that brightness—just their relative amount.
A histogram is an important aid that lets you know if your scene’s dynamic range will fit within the range of your camera. Let’s take a look at the histograms for some sample photos.

This illustration clearly shows how the first two photographs each have only a narrow range of brightnesses (extremely narrow in the case of the clouds), but when they’re joined together, they cover practically the whole range of values.
But this situation is still fine. The trouble begins at the moment when your graph “bumps” into the right edge. Then you get what’s called blowout—where the brightness of certain pixels exceeds what the camera can record. All such pixels are 100% white (there isn’t a “101%”) and so, with the colors pushed up against the wall like this, you start to see blobs that are all one color:

How to Maximize Your Shots’ Dynamic Range
A photograph where the ground is dark and the sky is bright (but blowout-free) is a showcase for the best that an ordinary camera can produce. Now, you can do even better. Not everything can be done directly inside the camera; some things need a computer. But if your out-of-picture stands out from the rest, it will still stand out from the rest after editing on a computer.
When you want to capture the largest possible dynamic range, the best foundation is to use the lowest possible ISO. As we mentioned earlier, ISO directly influences dynamic range, and so the lowest ISO will give you the best results.
For some cameras there’s an exception, because they have a certain natural baseline ISO (e.g. 100) but are able to lower it to a special value (e.g. 50) with “tricks”—but have a lower dynamic range at that value. Fortunately these special ISOs are usually specially marked to reduce confusion (for example “Low” instead of “50.”) But I recommend reading the camera’s manual or a review to make sure.
The next “rule” is to shoot to the RAW format. It gives you more data and often lets you draw out colors that, if you shoot JPEG, will all be cropped to the same pure white. RAW usually increases your effective dynamic range. Don’t expect miracles, but a 10 to 20 percent improvement is realistic, and that can get some work done for you. The RAW format is also useful for practically every kind of photography. So if you’re not already using it, then read our article about RAW files, full of practical examples that should convince you that RAW is worth your time.
The rest of the battle depends a lot on your genre. For example for landscapes it’s typical to use a gray gradient filter, which is a sheet of glass that is darkened towards one end and completely transparent at the other end. It will help you to darken the sky while leaving the ground the same, thus reducing the scene’s dynamic range and leaving you with no barriers to using a longer exposure time.
When photographing people with a bright sky behind them, you can use a flash, a reflector or a second light source. It’s good to keep in mind that these tools are often used precisely because of the issue of dynamic range.
Computer Edits
After you’ve gotten the best possible data out of your camera, you can jump into editing. If you like the picture, then of course there’s nothing to worry about. And if you’re photographing a landscape with the sun behind you, then there’s high chance that the range of lights and shadows won’t cause major problems and you won’t have to worry.
But sometimes the landscapes we as photographers want to photograph have the sun in front of them. If you’re not toting gradient filters, then you can simulate one on your computer, for example in Zoner Studio using the Gradient Filter tool (which is important enough to get its own icon on the toolbar on the right in the Editor). It lets you set which parts of the picture to brighten or darken and what intensity you want to use. I’ve applied two digital filters to this picture, giving this result:

Software gradient filters have a significant disadvantage compared to real filters: while they’ll help to enable you to brighten the ground, they won’t keep that from introducing noise into the picture. How much noise will depend on how dark the ground was originally and how much brightness you’ve added. With major brightening, the noise starts to be very ugly, but even this effect will only be visible when used at large sizes (usually this means large-format prints). If you just want to show off on Facebook, noise will only rarely be a real problem.
If you don’t have the sky precisely separated from the ground, then you can use automatic edits. The ideal tool for this situation is the Develop section with its Lights and Shadows sliders.

Just by darkening the lights and brightening the area in shadow, Zoner Studio has helped to compensate for the tonal problems. After this simple edit we get the following results:

While we’ve lost some contrast, was a simple way to escape from an otherwise complex situation. Also, we can try to liven up the photo later using the Contrast and Clarity sliders.
HDR
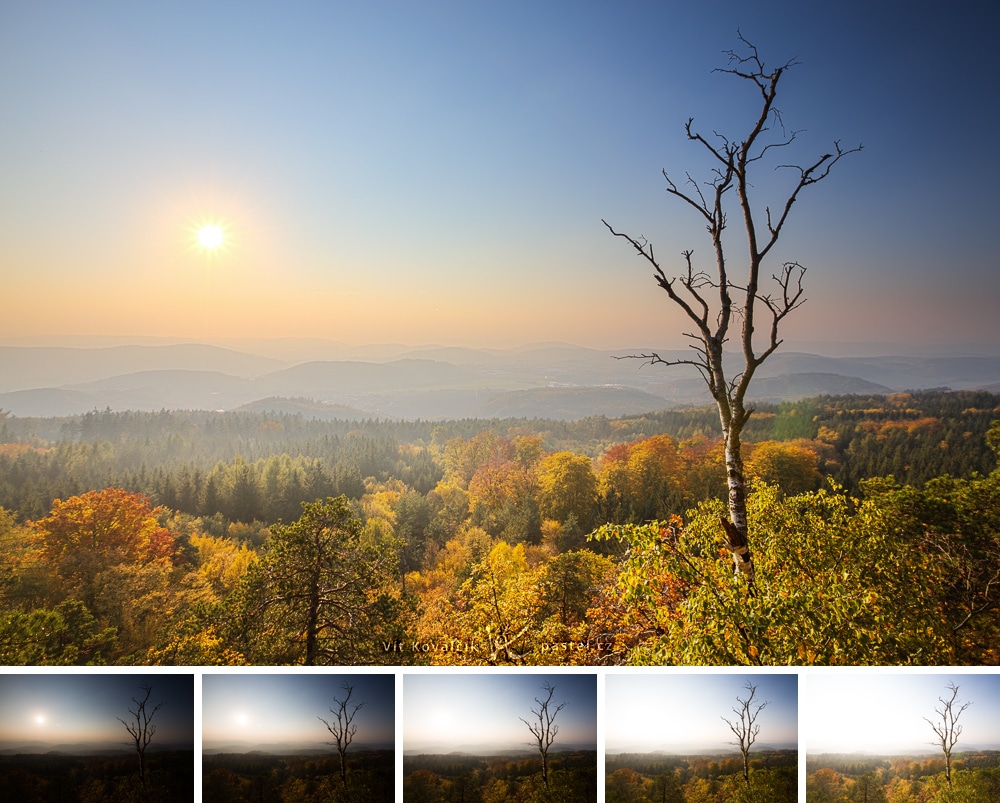
The abbreviation HDR is short for High Dynamic Range. It’s used for images that were created using a special technique that overcomes a camera’s innate dynamic-range limitations. The approach used is to take several source shots at various exposures so as to get a series of pictures that are identical except for their exposure. By joining them using special algorithms, you then get one final picture, for example as shown below.
Keep Calm and Check Exposure
Understanding dynamic range is key if you want to get technically perfect photos. With this understanding, you’ll capture a maximum of lights and shadows, reduce noise, and avoid ugly blown-out areas.
No matter what your workflow and no matter how complicated the scene, there’s always a good chance that you can work your way to a usable picture. It’s enough to keep calm, regularly check your results as you shoot, and avoid blowout. Then you’ll be able to get the maximum out of your camera.
Farmer
Where is the curvature?
Zoner
We are very sorry, we are not sure, what you mean by that in context of this article.
alexkassir
The article is good just you must to write in simple words that be helpful for those how don’t have good English
Zoner
Thank you Alexkassir, we try to write quite simple and we want to be interesting as well, not boring for native speakers. Thank you for your feedback.
John M
Excellent article. It ties the dynamic range concept together nicely in a very cogent way. I would have like some additional details on the HDR merge process but I understand that particular topic was likely outside the scope of this article. Thanks for writing on the subject.
Zoner
Thank you John for your comment. You gave us an idea to put a link to HDR article in this one, thank you.