How to Photograph Burning Candles
Winter’s here, and it’s brought early sunsets that handicap outdoor photography. But there’s plenty of opportunities indoors. Candles are a natural here. They’re easy to get, and around Christmas they’re often right at hand. Read on to learn how to handle the technical aspect of a shoot like this, plus some ideas for arranging the candles.
For almost all of these photos, I used ordinary tea lights—they’re very cheap, and so you can buy plenty to enable complex compositions. I picked up a ten-pack, and so ten is the most candles you’ll see in my photos here.
Safety First
Do I even need to say that fire is dangerous, and you should be careful not to burn anything? But what might not be so obvious is: wax. Tea lights sit low, and when they’re burning, their puddles of molten wax can reach out to the edge of them. When you’re arranging them into patterns, you can easily bump one of them a bit too much and make the wax spurt out. Because of this risk, put them on top of something that you can easily clean or throw away after your shoot. I chose a table with a black-glass plate on top, which also plays a part in my compositions—the candles are reflected off of it.

When shooting at low angles, even normal transparent glass will give you reflections. Just be aware that in some cases you’ll get two reflections right on top of each other, which can make part of a picture look blurry. These are reflections off the upper and lower surfaces of the glass.
If you plan to shoot from close up, then you want to check your lens’s minimum focusing distance before you shoot. Some lenses let you zoom in a lot, but offer this at the cost of making you get very close to the subject. But nobody is going to be very happy with a smoked-up front lens, so if it’s at all possible, go instead for a lens that will let you shoot from farther away.
Exposure Settings
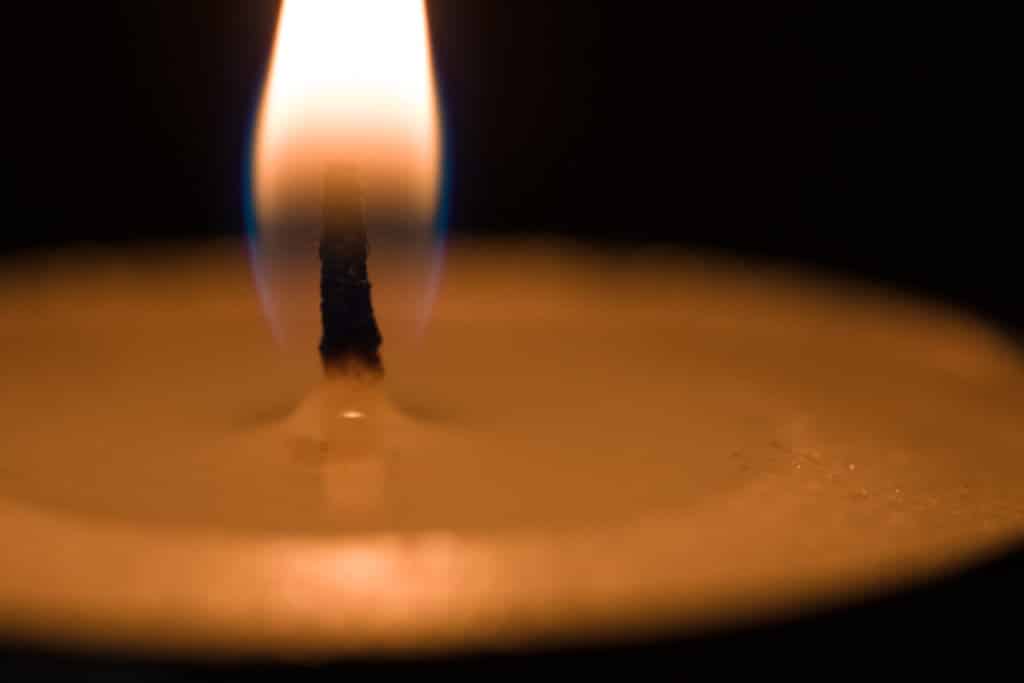
Things get dicey when you’re photographing candles. And it’s not at all about a lack of light. It’s just that it’s in the wrong places. A candle doesn’t give off much light, and so its surroundings are barely visible. But its flame, meanwhile, shines so brightly that part of the flame usually suffers from blowout.
Take a look at this series of pictures with different exposure levels:

Every shot suffered blowout except the last, which had a time of 1/1000 s. Sadly that’s so short that not even the white wax a centimeter from the flame is still visible. So it’s not practical here to stick to the rules about avoiding blowout. It’s better to use a longer exposure. This will create blowout in the flame, but here it’s acceptable. The rest of the scene will look OK.
One way to reduce blowout is to take a dark picture and then brighten it in Zoner Studio, and then darken the brightest parts again (using the Lights slider in the Develop module). But this will increase noise, so it’s not an ideal solution.
So in my experiments I hovered around 1/60 s, although I did sometimes shorten it to 1/250 s. Generally without later brightening—these were just photos with more candles and more light.
I can’t advise you to use automatic exposure when you’re shooting, because it typically gives each picture a different exposure time, and thus a different brightness. Different situations will come up depending on whether you point your lens at a flame or a dark place, and that will confuse the camera’s algorithms.
That’s why it’s simpler to use manual mode. Once you have things set up right, you won’t need to make any changes for a series of similar photos.
White Balance
Candlelight is yellowish, and cameras will make it look yellowish, but problems can arise when other light is mixed into the scene.
In the next example, light from a window is shining from the left. That light is much cooler, and so the final photo has a blue tint. This may or may not be what you want. If it is not, then you can just raise the white temperature—concretely here from the original 3100 K up to 5400 K. This yellows the light from the window. This will make the candles even yellower than they were before… but that’s not a problem.
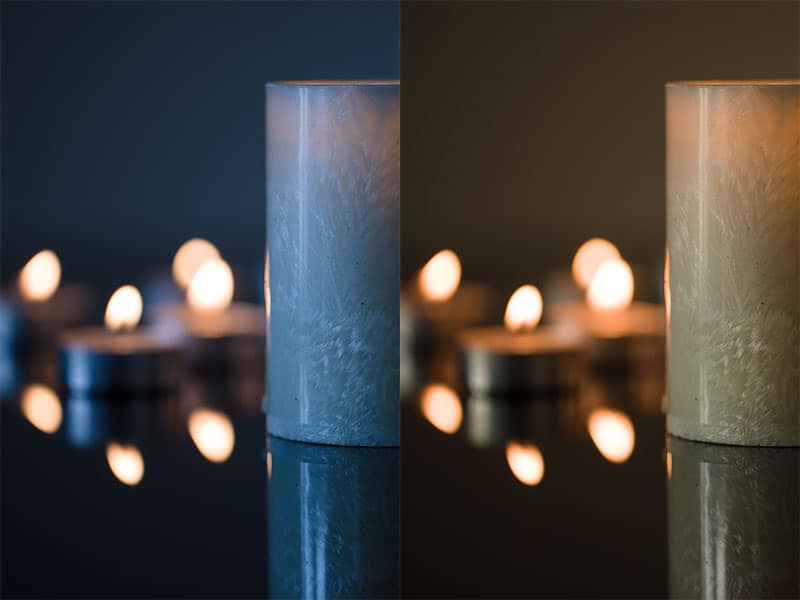
It’s best to shoot to the RAW format and set your white balance later, on a computer. For RAW, no quality losses occur when you do this, unlike for photo editing in the JPEG format.
When you’re using this trick you can mix various lights to help yourself out when a scene is too dark. Here it’s a matter of taste. The other photos were not taken at night—just with the curtains drawn. And yet, surprisingly, it’s no real problem to shoot in complete darkness. You get used to “darkness plus one candle light” quickly, and even a ten-year-old Canon 350D DSLR can still focus well enough. (On the candle, that is. It can’t handle more.)
Composition—From One Candle to Many
Just one candle is not much fun. You can use it to light up interesting surroundings, but mine were boring, so I tried to do something else: create a close-up. Here the warning against getting close to fire comes into play. But with a macro lens I was still about 15 cm away—that’s still OK.
Canon 5D Mark IV, Canon EF 100/2.8 IS MACRO, 1/60 s, f/5.0, ISO 1600, focal length 100 mm
Combining several candles offers many times more combinations. Here you can play with their positions and their distances. In combination with the lowest possible f-stop, this produces a background full of shining circles.

Canon 5D Mark IV, Canon EF 100/2.8 IS MACRO, 1/60 s, f/2.8, ISO 100, focal length 100 mm

Canon 5D Mark IV, Canon EF 100/2.8 IS MACRO, 1/60 s, f/2.8, ISO 100, focal length 100 mm
If you find a larger candle, you can include it in your composition too. Also, the candle I used had burned into the middle and was now shining through wax on the walls. That’s another effect worth using.

Canon 5D Mark IV, Canon EF 100/2.8 IS MACRO, 1/60 s, f/2.8, ISO 100, focal length 100 mm
Other Props
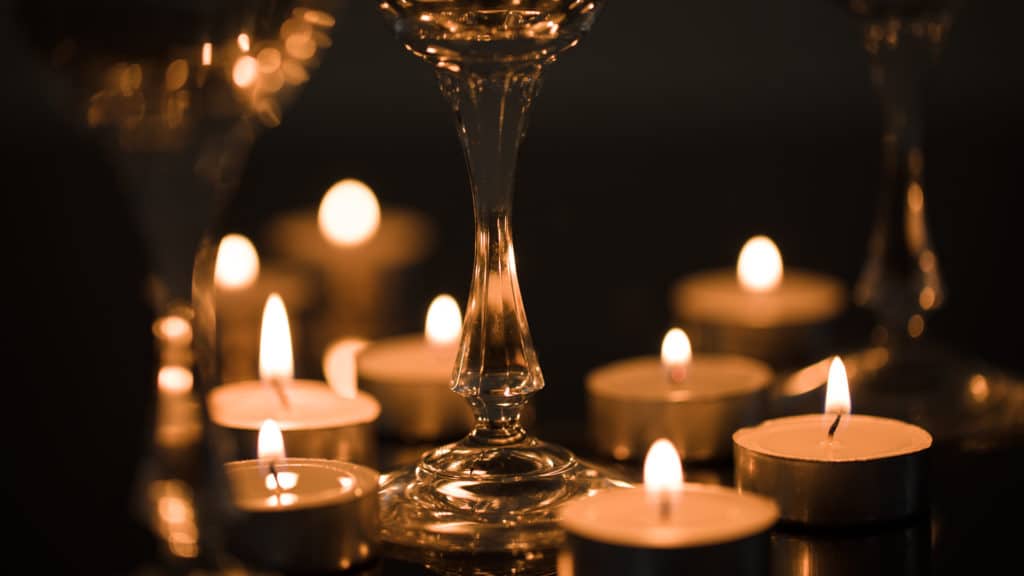
Photos with candles look especially good when light from them shines through glass, reflects off a mirror, or is otherwise processed in some way. Elegant glasses or vases of any kind are ideal for these effects. I used champagne glasses—I have several of them, and so once again I can experiment.

Canon 5D Mark IV, Canon EF 100/2.8 IS MACRO, 1/50 s, f/2.8, ISO 200, focal length 100 mm

Canon 5D Mark IV, Canon EF 100/2.8 IS MACRO, 1/50 s, f/2.8, ISO 200, focal length 100 mm

Canon 5D Mark IV, Canon EF 100/2.8 IS MACRO, 1/50 s, f/2.8, ISO 200, focal length 100 mm
The glass doesn’t have to be clear. For my last photo I used red shot glasses that give the scene a whole new look.

Canon 5D Mark IV, Canon EF 100/2.8 IS MACRO, 1/50 s, f/2.8, ISO 200, focal length 100 mm
And Even More Props
The possibilities don’t end here. Other transparent or reflective objects can look good too. Experiments with them are easy, and just like me, you surely have some. You just have to take the plunge and take a few photos of your own!
Earl J Moniz
I enjoyed the article very much. I was also intrigued by your creation of the term “different differences.”
* * *
I believe you may have intended “different distances,” as was depicted in the image itself.
I was able to figure it out… (grin)
I would have been interested in your captures of such images with a “starburst” filter…
Do you ever use them in your sessions…?
* * *
Until that time…
Vit Kovalcik
Thank you Earl for your kind words. I am glad you liked the article and you are of course right about the “different differences” :) This is something that was lost in translation, so I have fixed it now.
I have not tried the starburst filter (I don’t own it), but together with various bokeh filters it opens up a wide range of new possibilities. So thanks for the tip, it may be useful to other readers too!