Learn the Best Ways to Compose Your Landscape Photos
Maybe you’ve been there—standing somewhere with a breathtaking nature scene in front of you. You pressed the trigger a few times, but for all the world you couldn’t get a picture that really showed the beauty you had before you. What was the problem? It may have been bad composition. Get inspired with these composition tips and sample photos.
The rules of composition for landscape photography aren’t that different from those for other genres. But it can’t hurt to summarize them and give some examples. So let’s get to it!
Horizons One Third In
As long as the horizon is in the picture—and in landscape photos, it typically will be—you’ll want to place it so that it runs through the photo at about one third in from the top or bottom.
In other words—it’s not good to leave the horizon in the middle of the photo. Move it higher or lower depending on whether you’re more interested by the area above the horizon, or below it. Some scenes offer you several options here, so it pays to take several pictures and then pick the best one at home.

Canon 5D Mark III, Canon EF 16-35/2.8 II, 1/160 s, f/10, ISO 250, focal length 33 mm

Canon 5D Mark III, Canon EF 16-35/2.8 II, 1/125 s, f/22, ISO 800, focal length 35 mm
Sometimes circumstances force you to put the horizon in the middle after all. Usually it’s because of some other visual element—for example, if the castle were closer, making it larger, then it would be more important to have it uncropped than to have a nicely placed horizon. Feel free to break the rule on horizons; just follow it where you can.
Place Things on Golden Crop Points
Generally you’re not just photographing the landscape around you. You’re photographing something interesting within it. That may be a forlorn church, a majestic mountain, or an interesting tree. Here again the rule is that you shouldn’t have your main subject placed directly in the middle; it should be shifted off towards one of the corners. This solution is well-known as the Golden Crop rule, or as its simpler sister, the Rule of Thirds. This rule states that you can divide a picture up into thirds with imaginary horizontal and vertical lines, and put important elements in a place where those lines meet. Those spots are marked with numbers in the diagram below.

In practice the Rule of Thirds looks like what you see in the following picture. The rock at the bottom is roughly in the place where the imaginary lines would meet.

Canon 5D Mark III, Canon EF 16-35/2.8 II, 1/60 s, f/10, ISO 100, focal length 20 mm
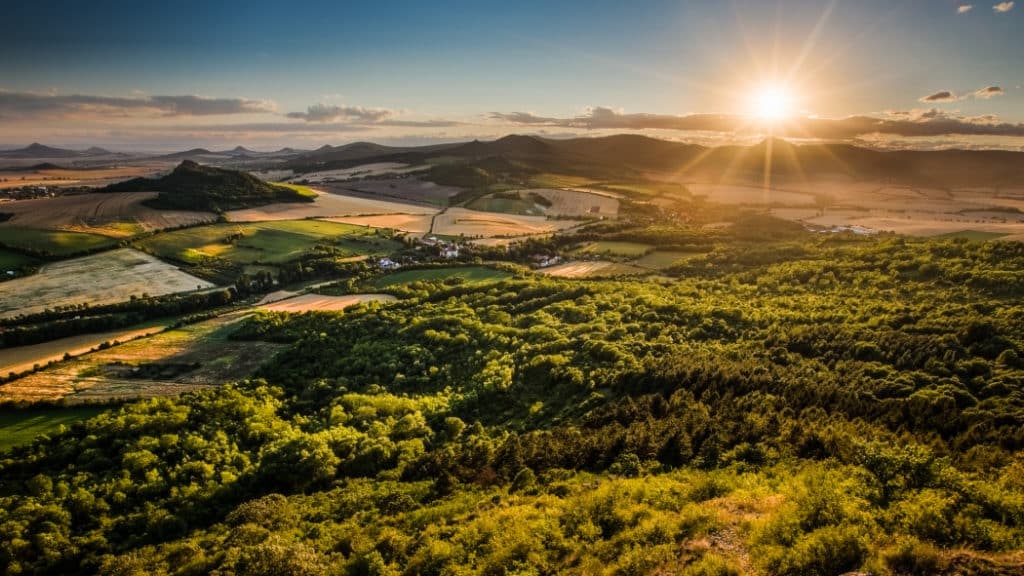
You can also use a similar technique to position background elements—in this case the sun.

Canon 5D Mark III, Canon EF 16-35/2.8 II, f/13, focal length 16 mm (the time and ISO varied, as this is a composite image)
In the last example, I was more extreme with my placement, and I placed both the sun and the horizon close to the edge of the frame. But it’s not such a problem; it’s more an illustration of the fact that thirds are a guideline, not a straitjacket, and elements not exactly on the thirds lines shouldn’t scare you.
Frame the Landscape
If your picture’s subject is somewhere in the distance, then you’ll want to complement it with something. And that’s when framing comes into play. You just need to walk back a few meters and get a part of the surroundings into the frame as well. In nature that mainly means trees. In the illustration below I used them to complement the sea—which was otherwise fairly static and boring.

Canon 40D, Sigma 18-50/2.8, 1/200 s, f/11, ISO 400, focal length 18 mm
In some parts of the world, it’s not hard to run into romantic ruins. These are great for framing too. For example in this picture, the castle ruins frame the landscape perfectly:

Canon 5D Mark III, Canon EF 16-35/2.8 II, 1/160 s, f/13, ISO 2500, focal length 35 mm
Lines Lead Eyes
Lines of any kind are a significant element in an otherwise randomly organized landscape. Rivers, roads, lines in the fields, straight ridges in the hills, or anything geometric that you run into—it’s all interesting in photos.
There are three kinds of guidelines that you’ll typically encounter. The first is the S-curve. These curves are made up of two or more bends; if they wind their way out of the photo, as they often do, they are great at guiding eyes from the edge all the way to the end of the curve.

Canon 5D Mark III, Canon EF 24-70/2.8 II, 1/40 s, f/8, ISO 200, focal length 43 mm
Another type is converging lines, which usually lead out to the horizon. To make them run together more dramatically, use a wide-angle lens. Just as with guidelines, your audience automatically follows them, and their eyes slide all the way to the place where they meet.

Canon 40D, Canon 10-22/3.5-4.5, 1/640 s, f/8, ISO 200, focal length 10 mm
And when you’re really lucky, you run into diagonal lines. The example below is an extreme one, but in any area with vineyards, this kind of picture is there for the taking.

Canon 5D Mark II, Canon EF 70-200/2.8 II, 1/50 s, f/7.1, ISO 400, focal length 200 mm
Surface Reflections
Whenever you find a water surface, look to see if something interesting is reflected in it. Often the water is too wild for photographing surface reflections, but if you’re lucky, you can take a picture that will have that little something extra.
Photographs of water-surface reflections often break our first rule above about putting the horizon one-third in. In many cases, it’s placed halfway in to emphasize symmetry, since this positioning makes the top and bottom halves of the photo very similar.

Canon 5D Mark III, Canon EF 70-200/2.8 II, 1.3 s, f/14, ISO 100, focal length 123 mm
Combine and Experiment
Even though each of the rules above got a separate section, that doesn’t mean they are mutually exclusive. For example a surface reflection can be combined with framing to get a different picture.

Canon 5D Mark II, Canon EF 16-35/2.8 II, 1/500 s, f/8, ISO 100, focal length 16 mm
So try to experiment. On your next trip, try picking out a single rule and experimenting with it during your journey. That way it will become second nature to you, and you can start exploring another rule, and then even start combining them. We’re sure you’ll find this photographic exercise entertaining!
Annie Clark
Helpful!